 Calls
Calls
 Phone numbers
 SMS
SMS
 Business Phone System
 eSIM for Internet
 AI agent
 AI Speech Analytics
 Click to Call
 Call Tracking
 VoIP for Business
 Become a partner
 Integrations
 For whom
 Setup guides
 FAQ
FAQ
 Online chat
 Contact us
 Blog
Blog
Setup guides / MS Teams
MS Teams integration
Zadarma and Microsoft Teams integration is absolutely free.
Integration features:
- Calls to MS Teams clients in one click;
- Call routing setup for organizations in Teams;
- Call statistics integration. Voice menu configuration and additional features in MS Teams.
Zadarma advantages:
- Completely free PBX, setup in 5 minutes;
- Phone system price plans for calls at attractive rates to all destinations;
- Multichannel numbers in 110 countries (local, mobile, toll-free);
- Additional services: call tracking, website widgets, video conferencing;
- Maximum quality and security (19 years of work, data centers in 6 countries, 24/7 support).
Setup instructions
1. The following conditions have to be met for Zadarma PBX and MS Teams integration:
- Each Teams user that will be making calls using the integration needs to have an active license (recommended package Office 365 E3 + MS 365 Phone System + MS 365 AudioConferencing or Office 365 E5)
- MS Teams users need to have the required permissions and roles to make calls
- You need to have a setup and configured virtual Zadarma PBX. Minimal settings: extension numbers created (from 1 up to 100, one for each employee), call recording enabled in extension number settings if required (call recording to the cloud)
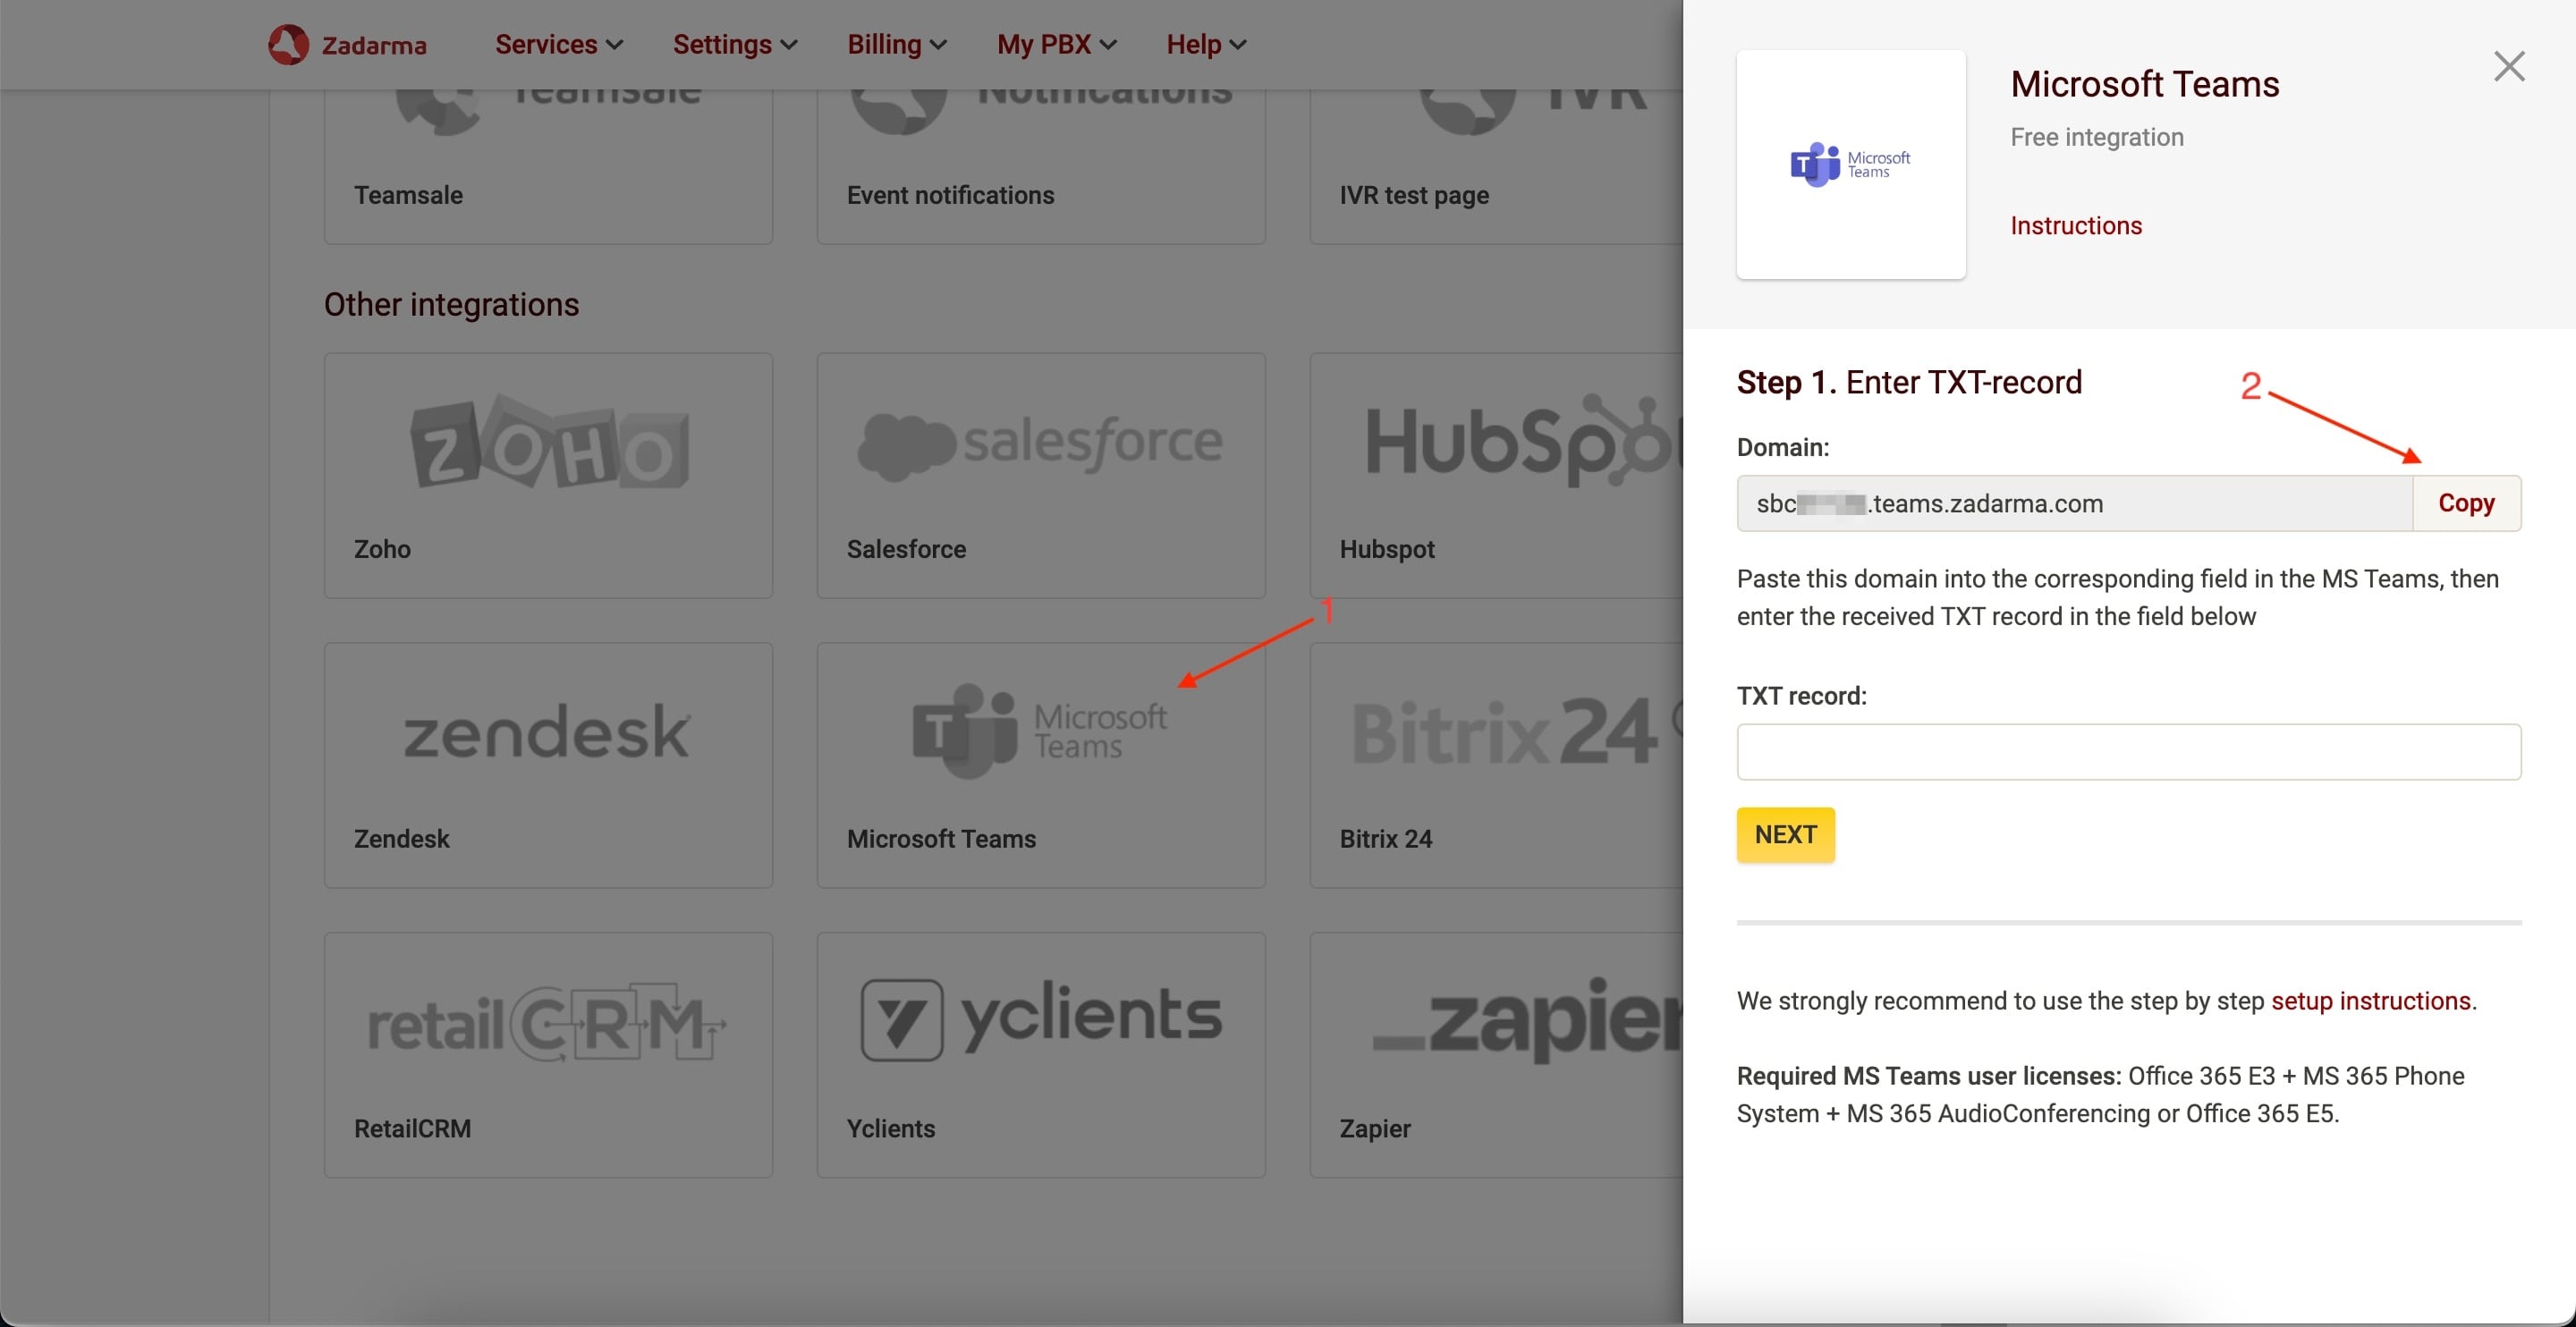
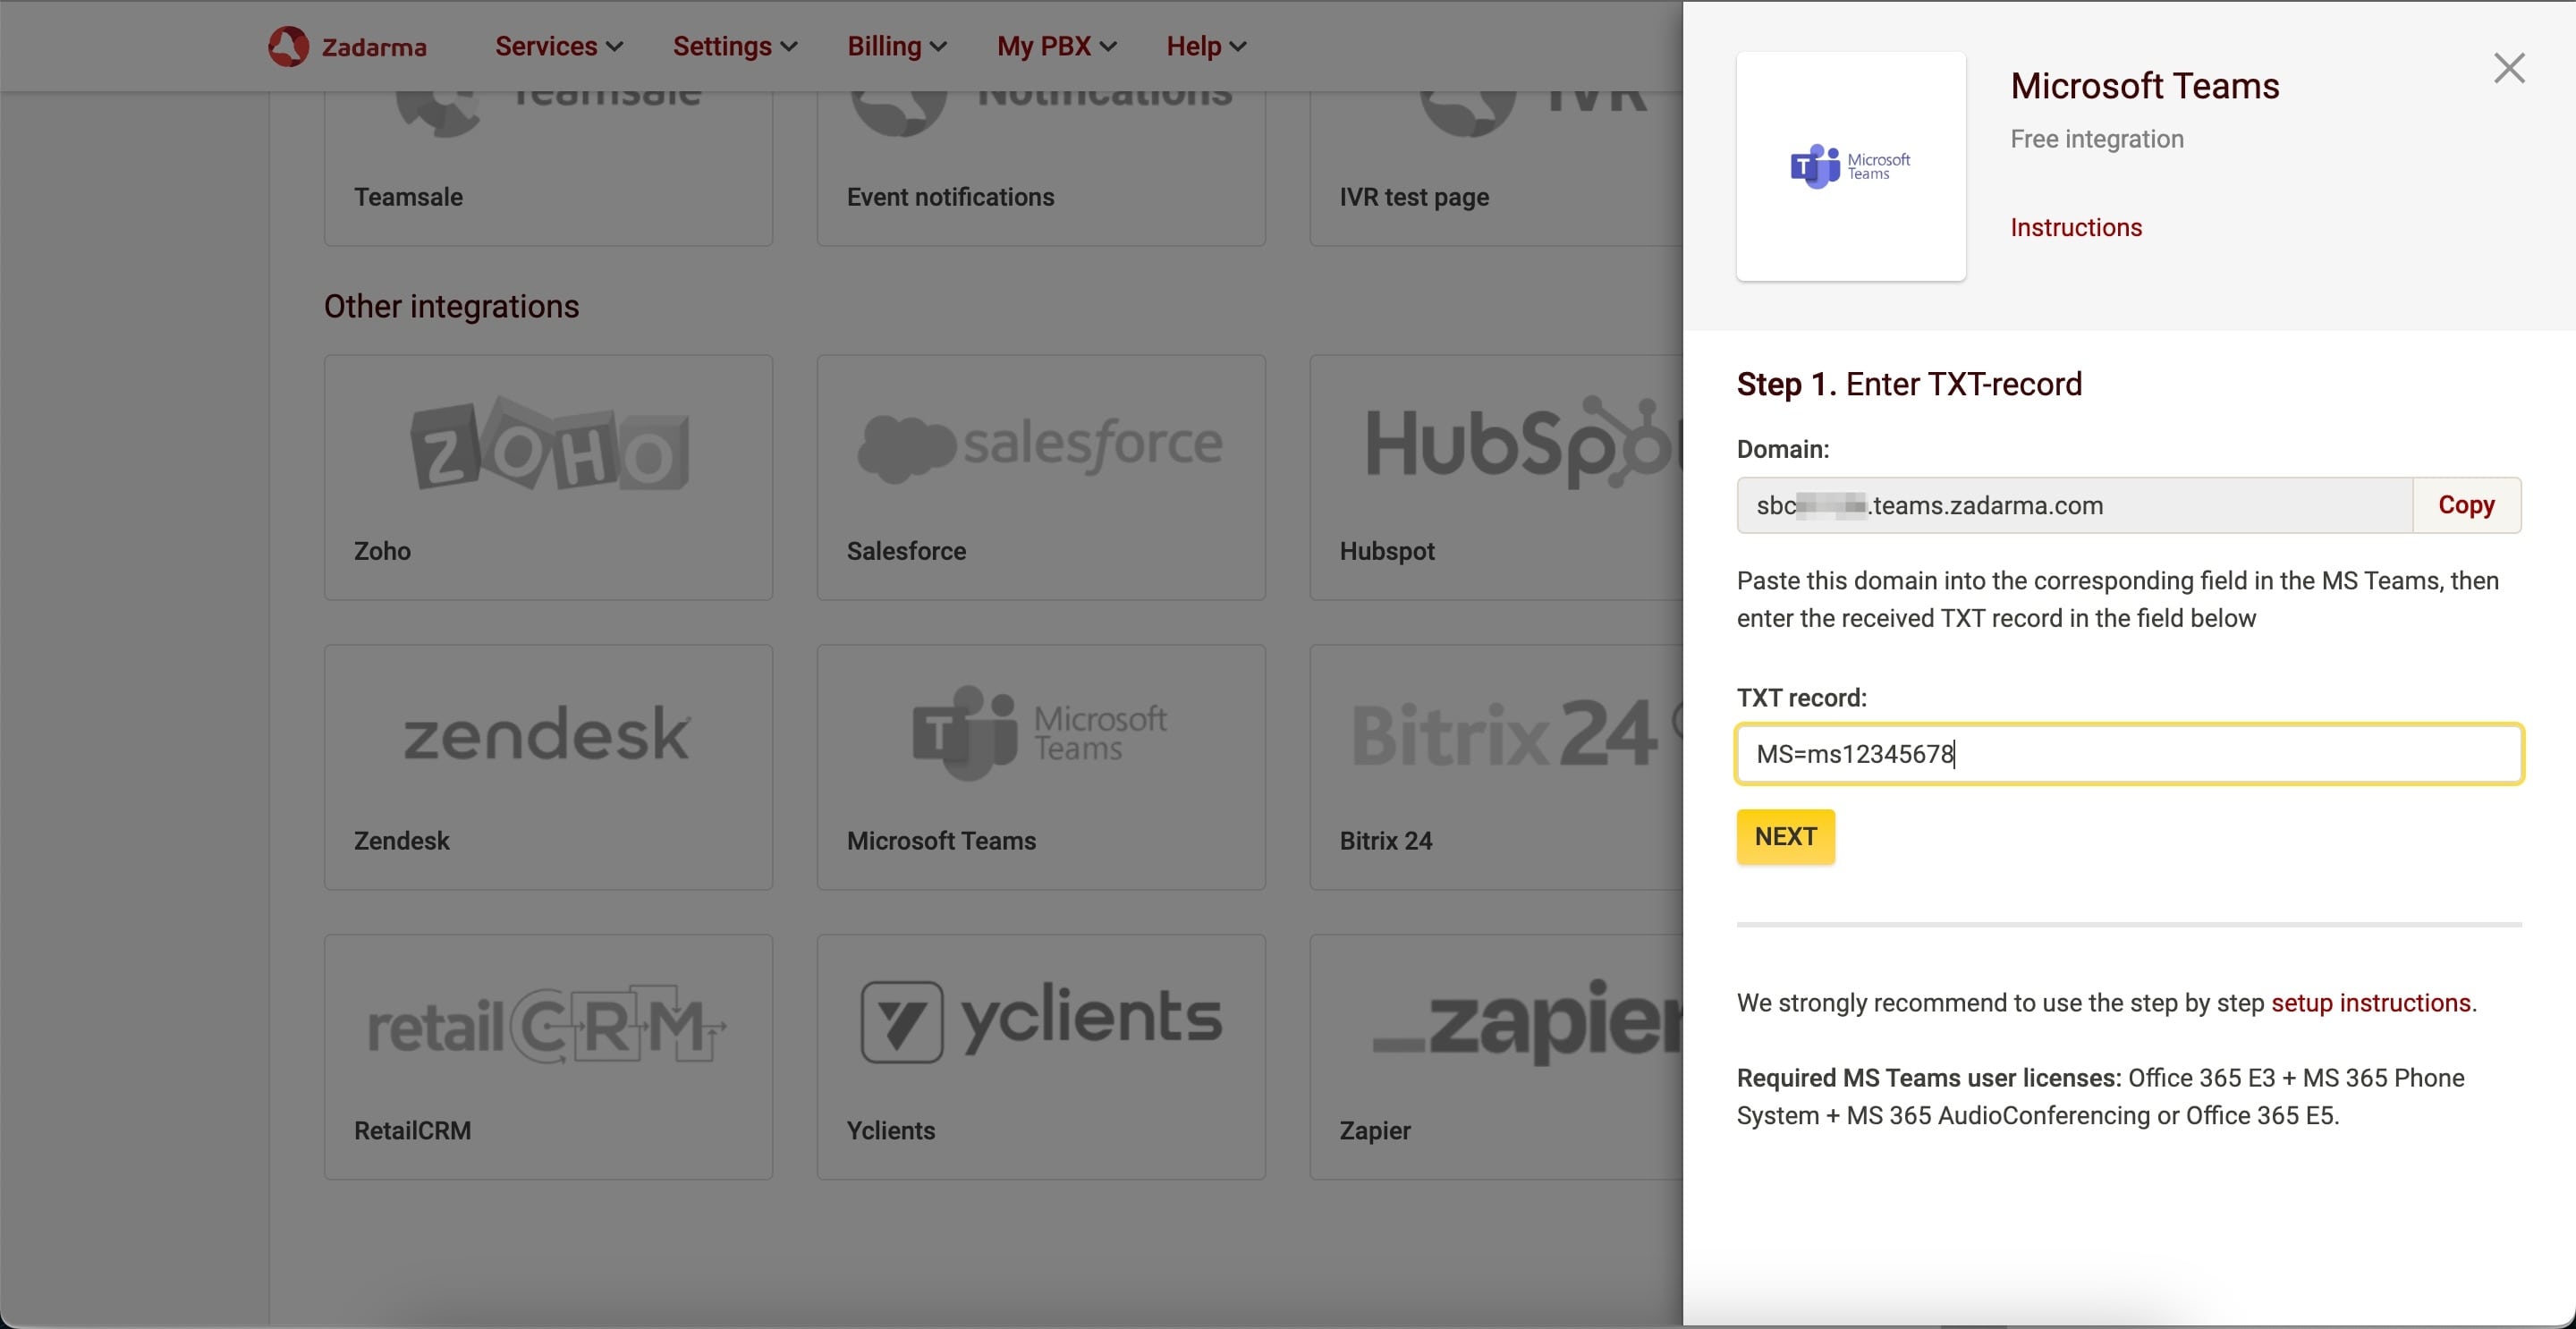
2. In Zadarma personal account go to Settings - Integrations and API and activate MS Teams integration. Then, in the pop-up window you need to copy individual SBC domain for integration.
3. In the new browser tab go to Microsoft admin center without closing the tab with Zadarma personal account.
Step by step integration setup example with screenshots:
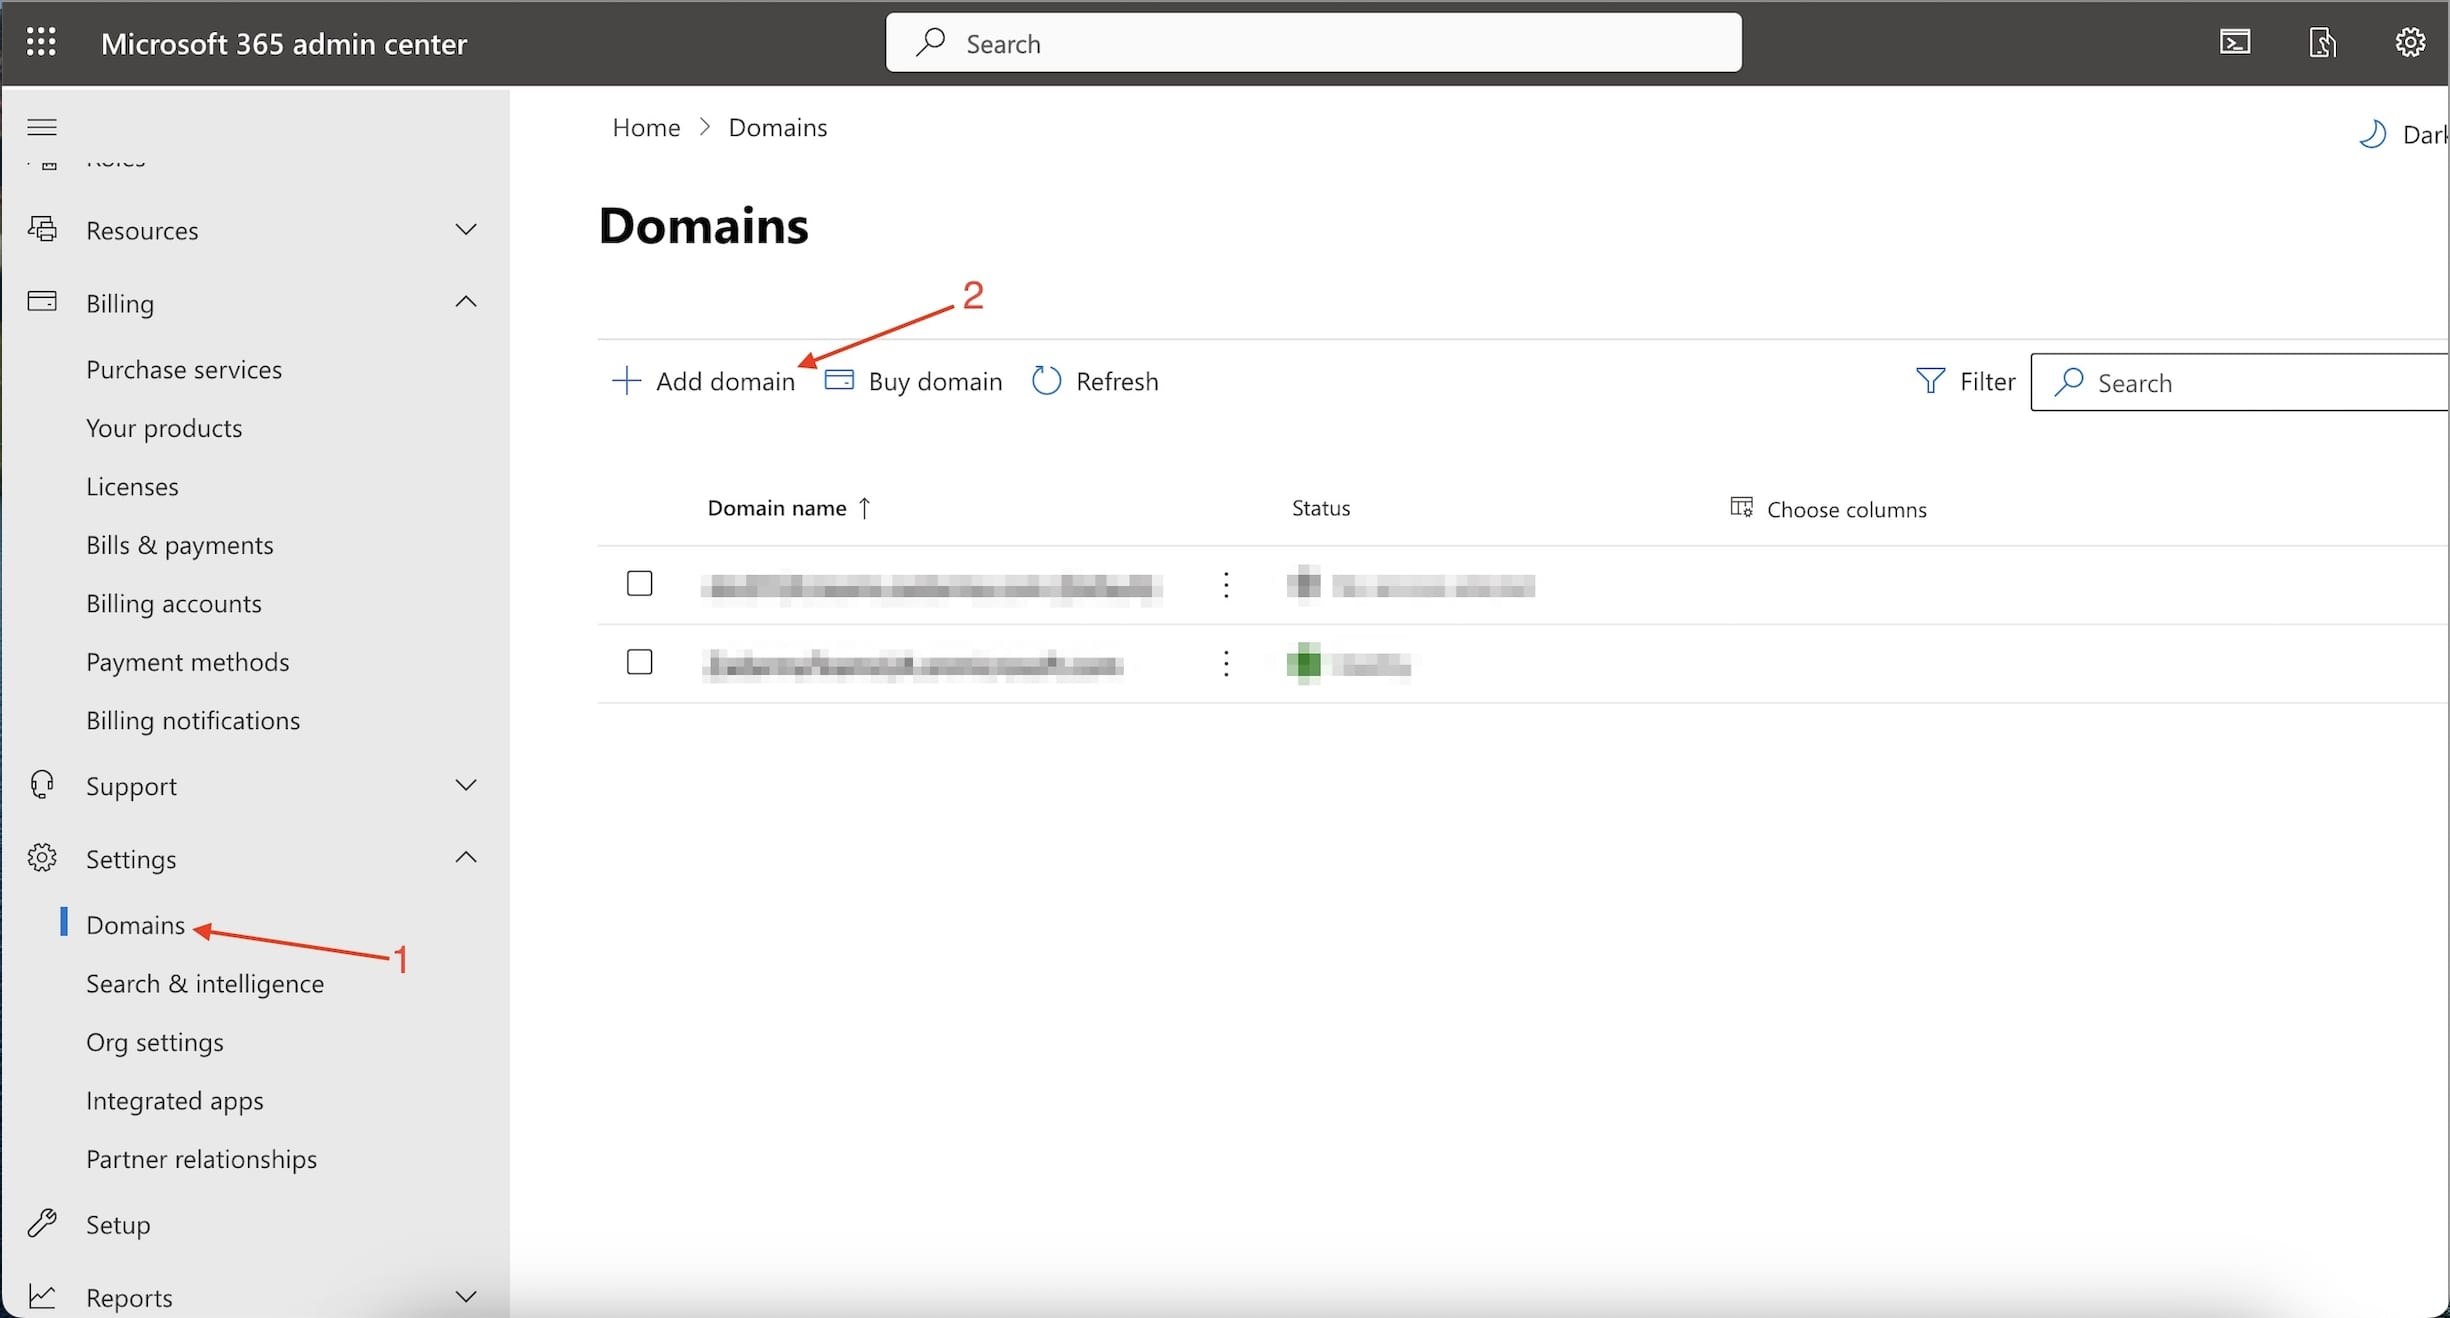
Step 1.In Microsoft admin center open “Parameters” - “Domains” and choose “Add domain”.
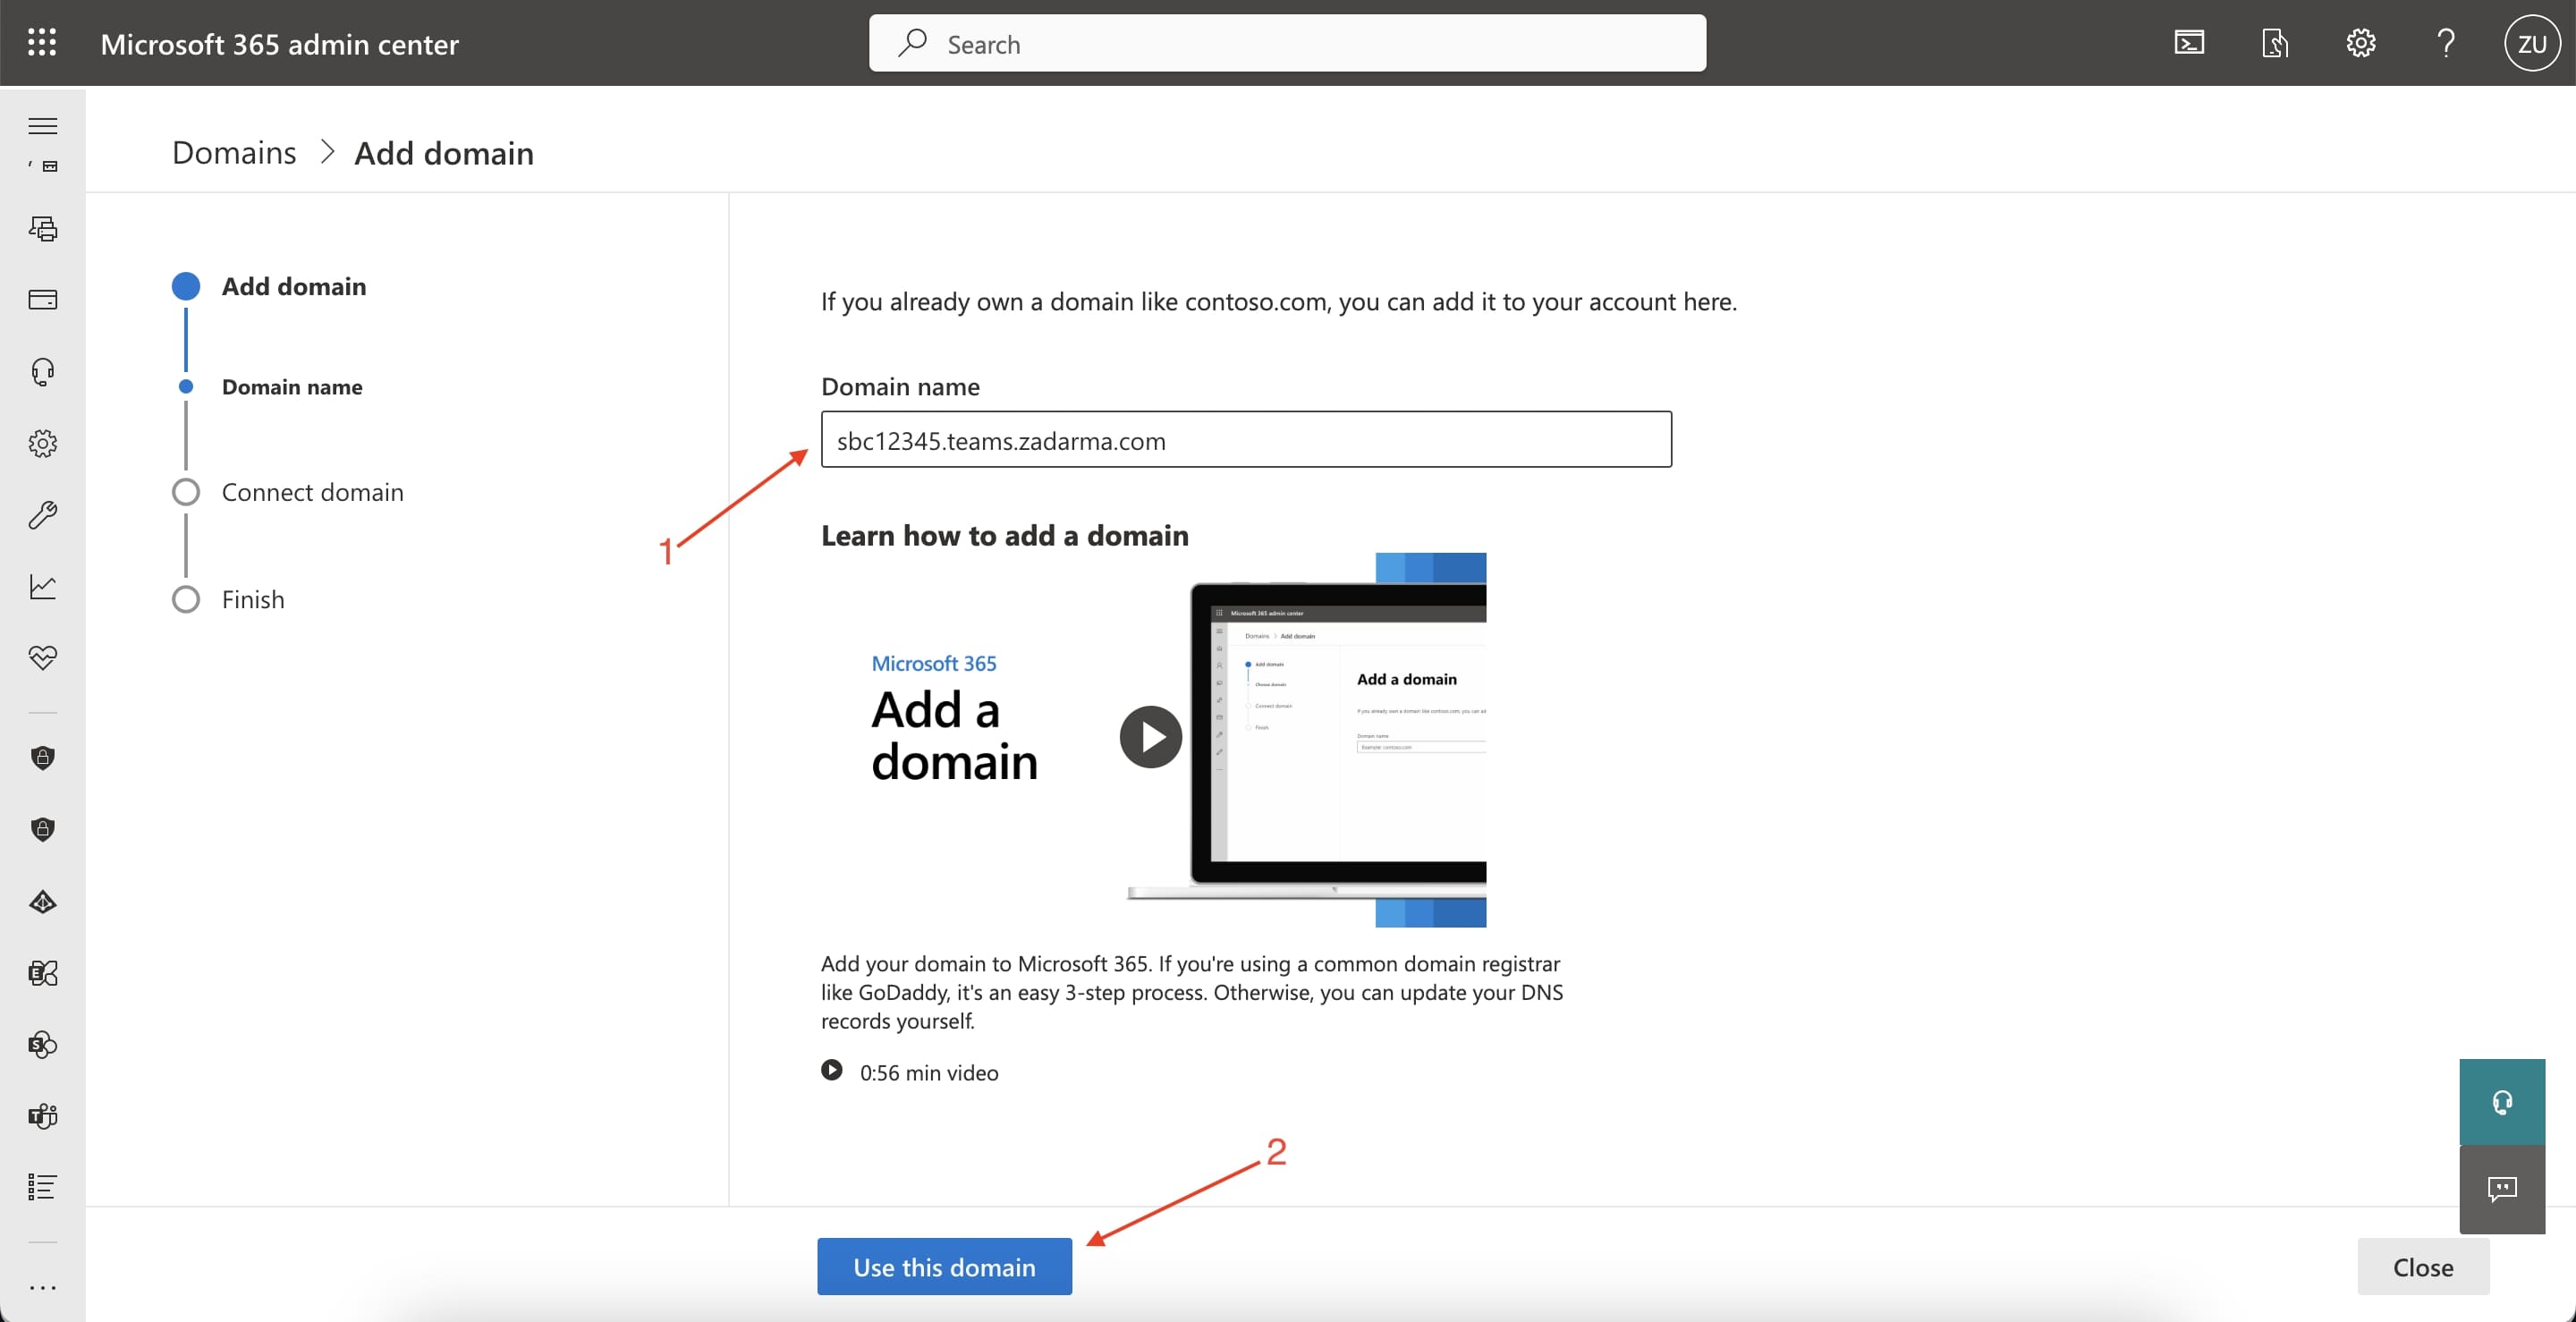
Step 2. In the new window, copy the domain value received in Zadarma account Settings - Integrations and API to the “Domain name” field (in our example - sbc12345.teams.zadarma.com). To go to the next step choose option “Use this domain”.
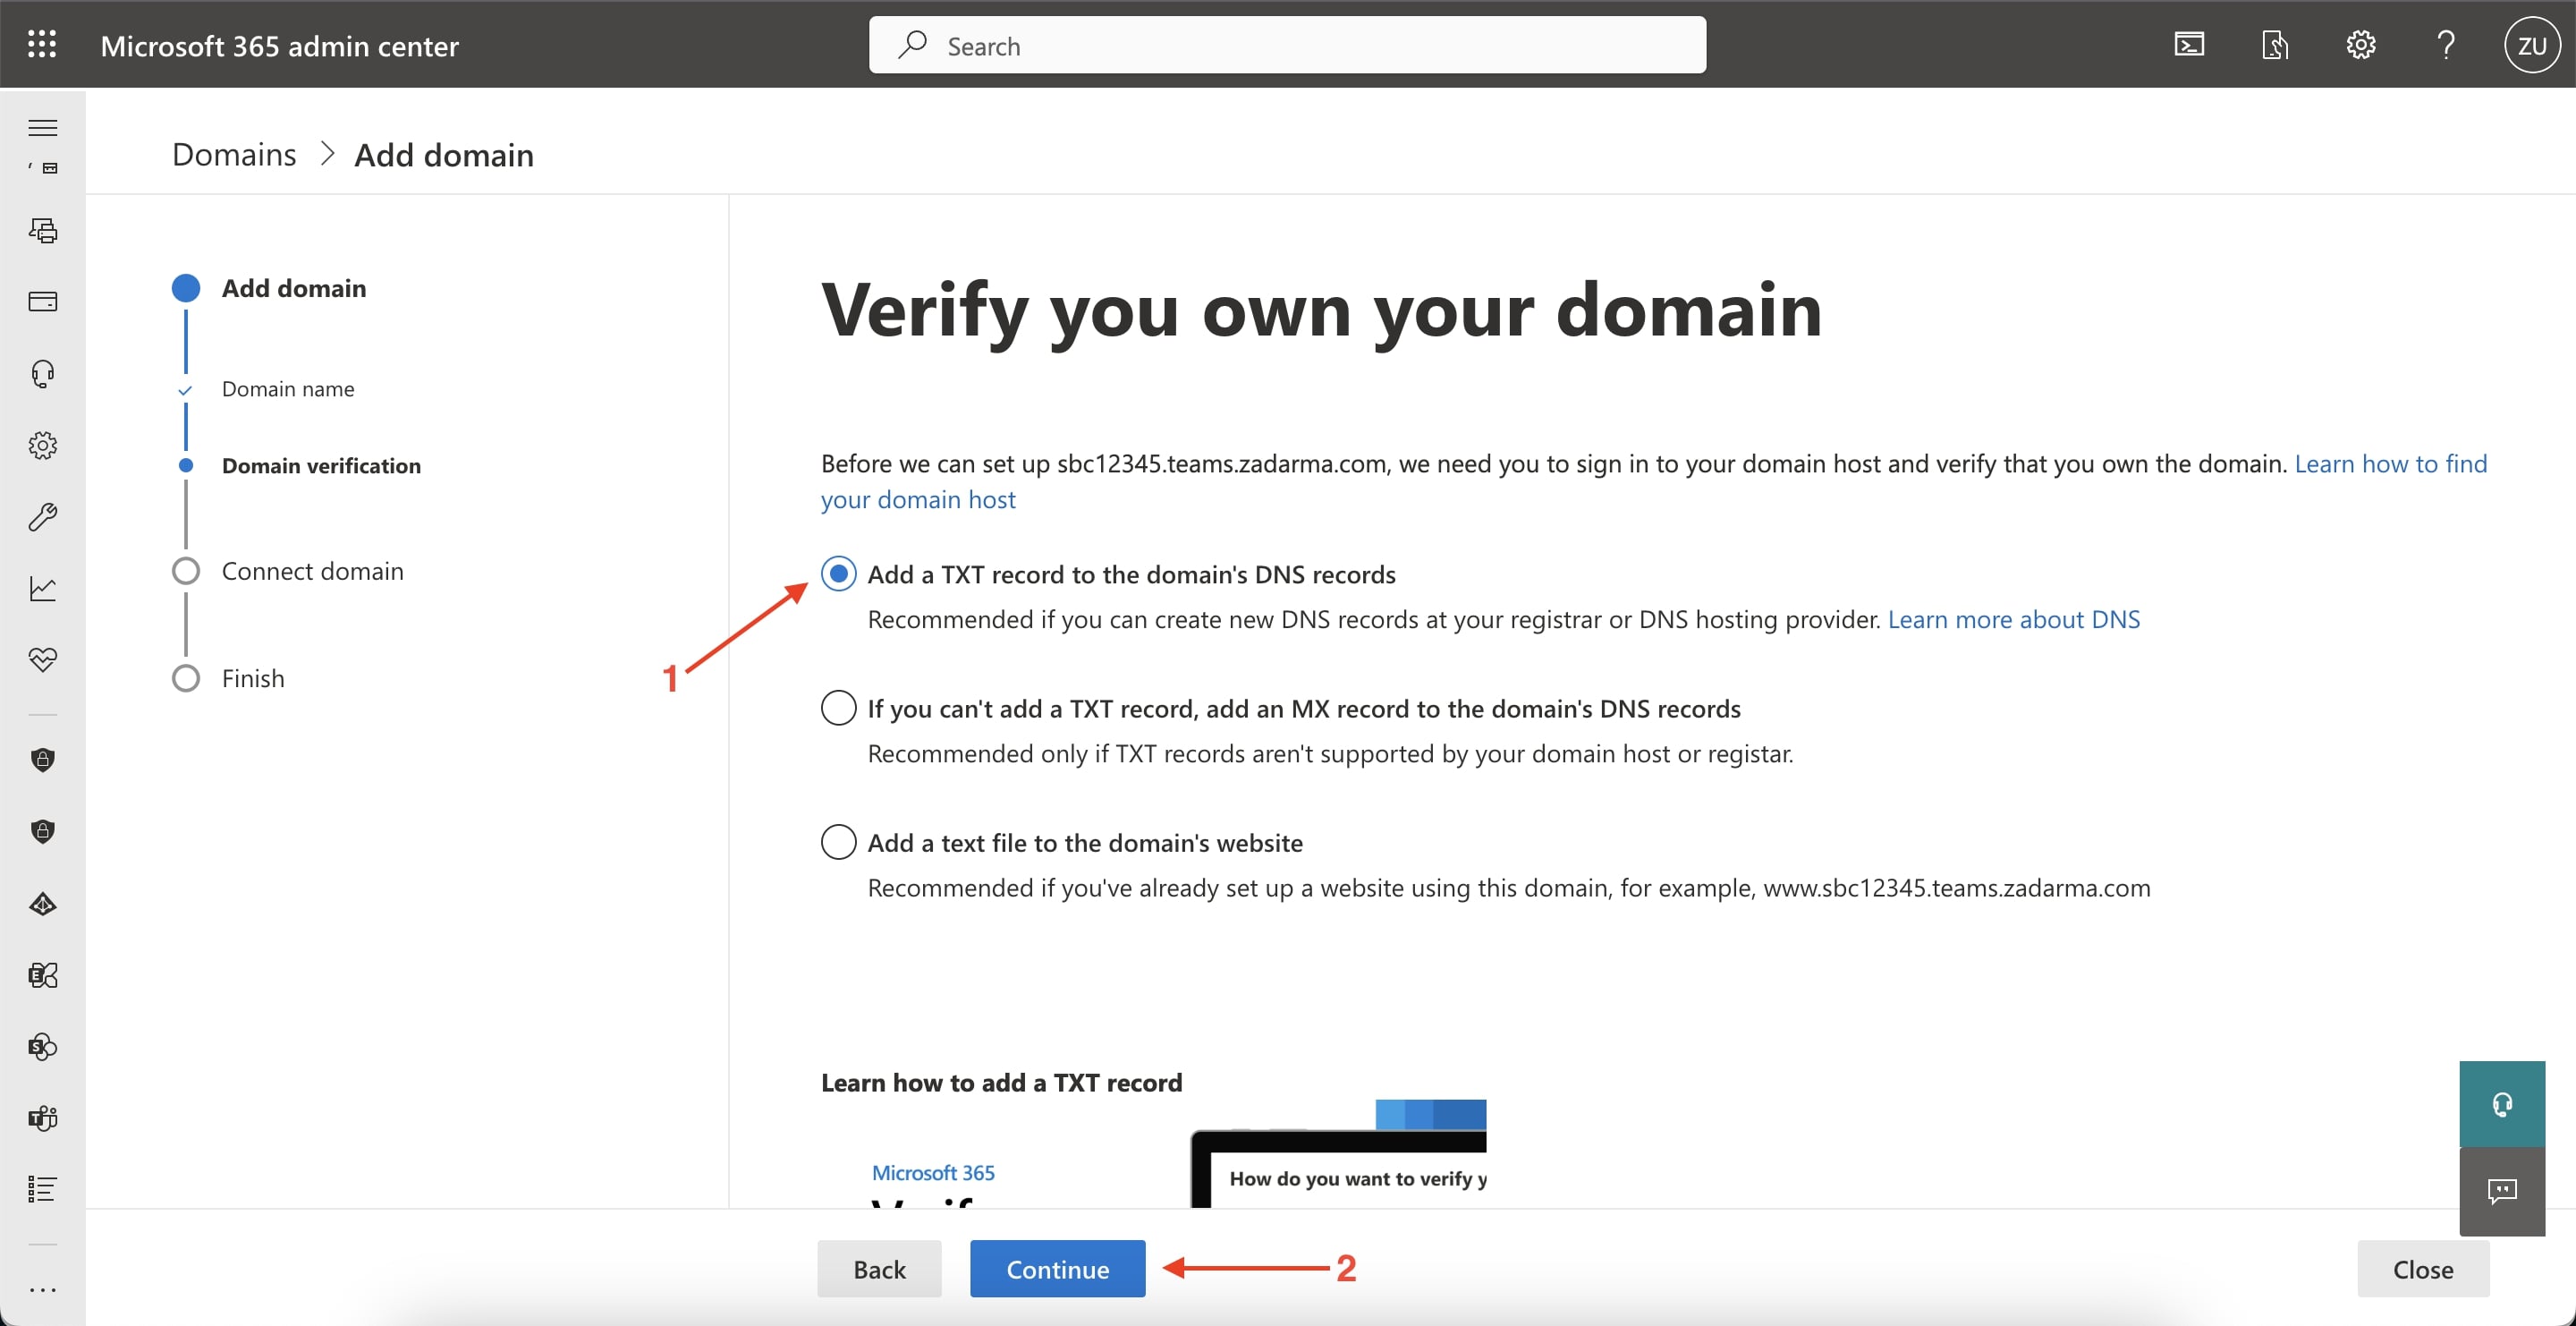
Step 3. To confirm the domain for the next step, choose value “Add TXT record to the domain’s DNS record”.
Step 4. On the next page you can copy TXT record from the field “TXT record”. You need to paste the received value to the corresponding field on the integration setup page in Zadarma account - Settings - Integrations and API and confirm it by clicking “Next”.
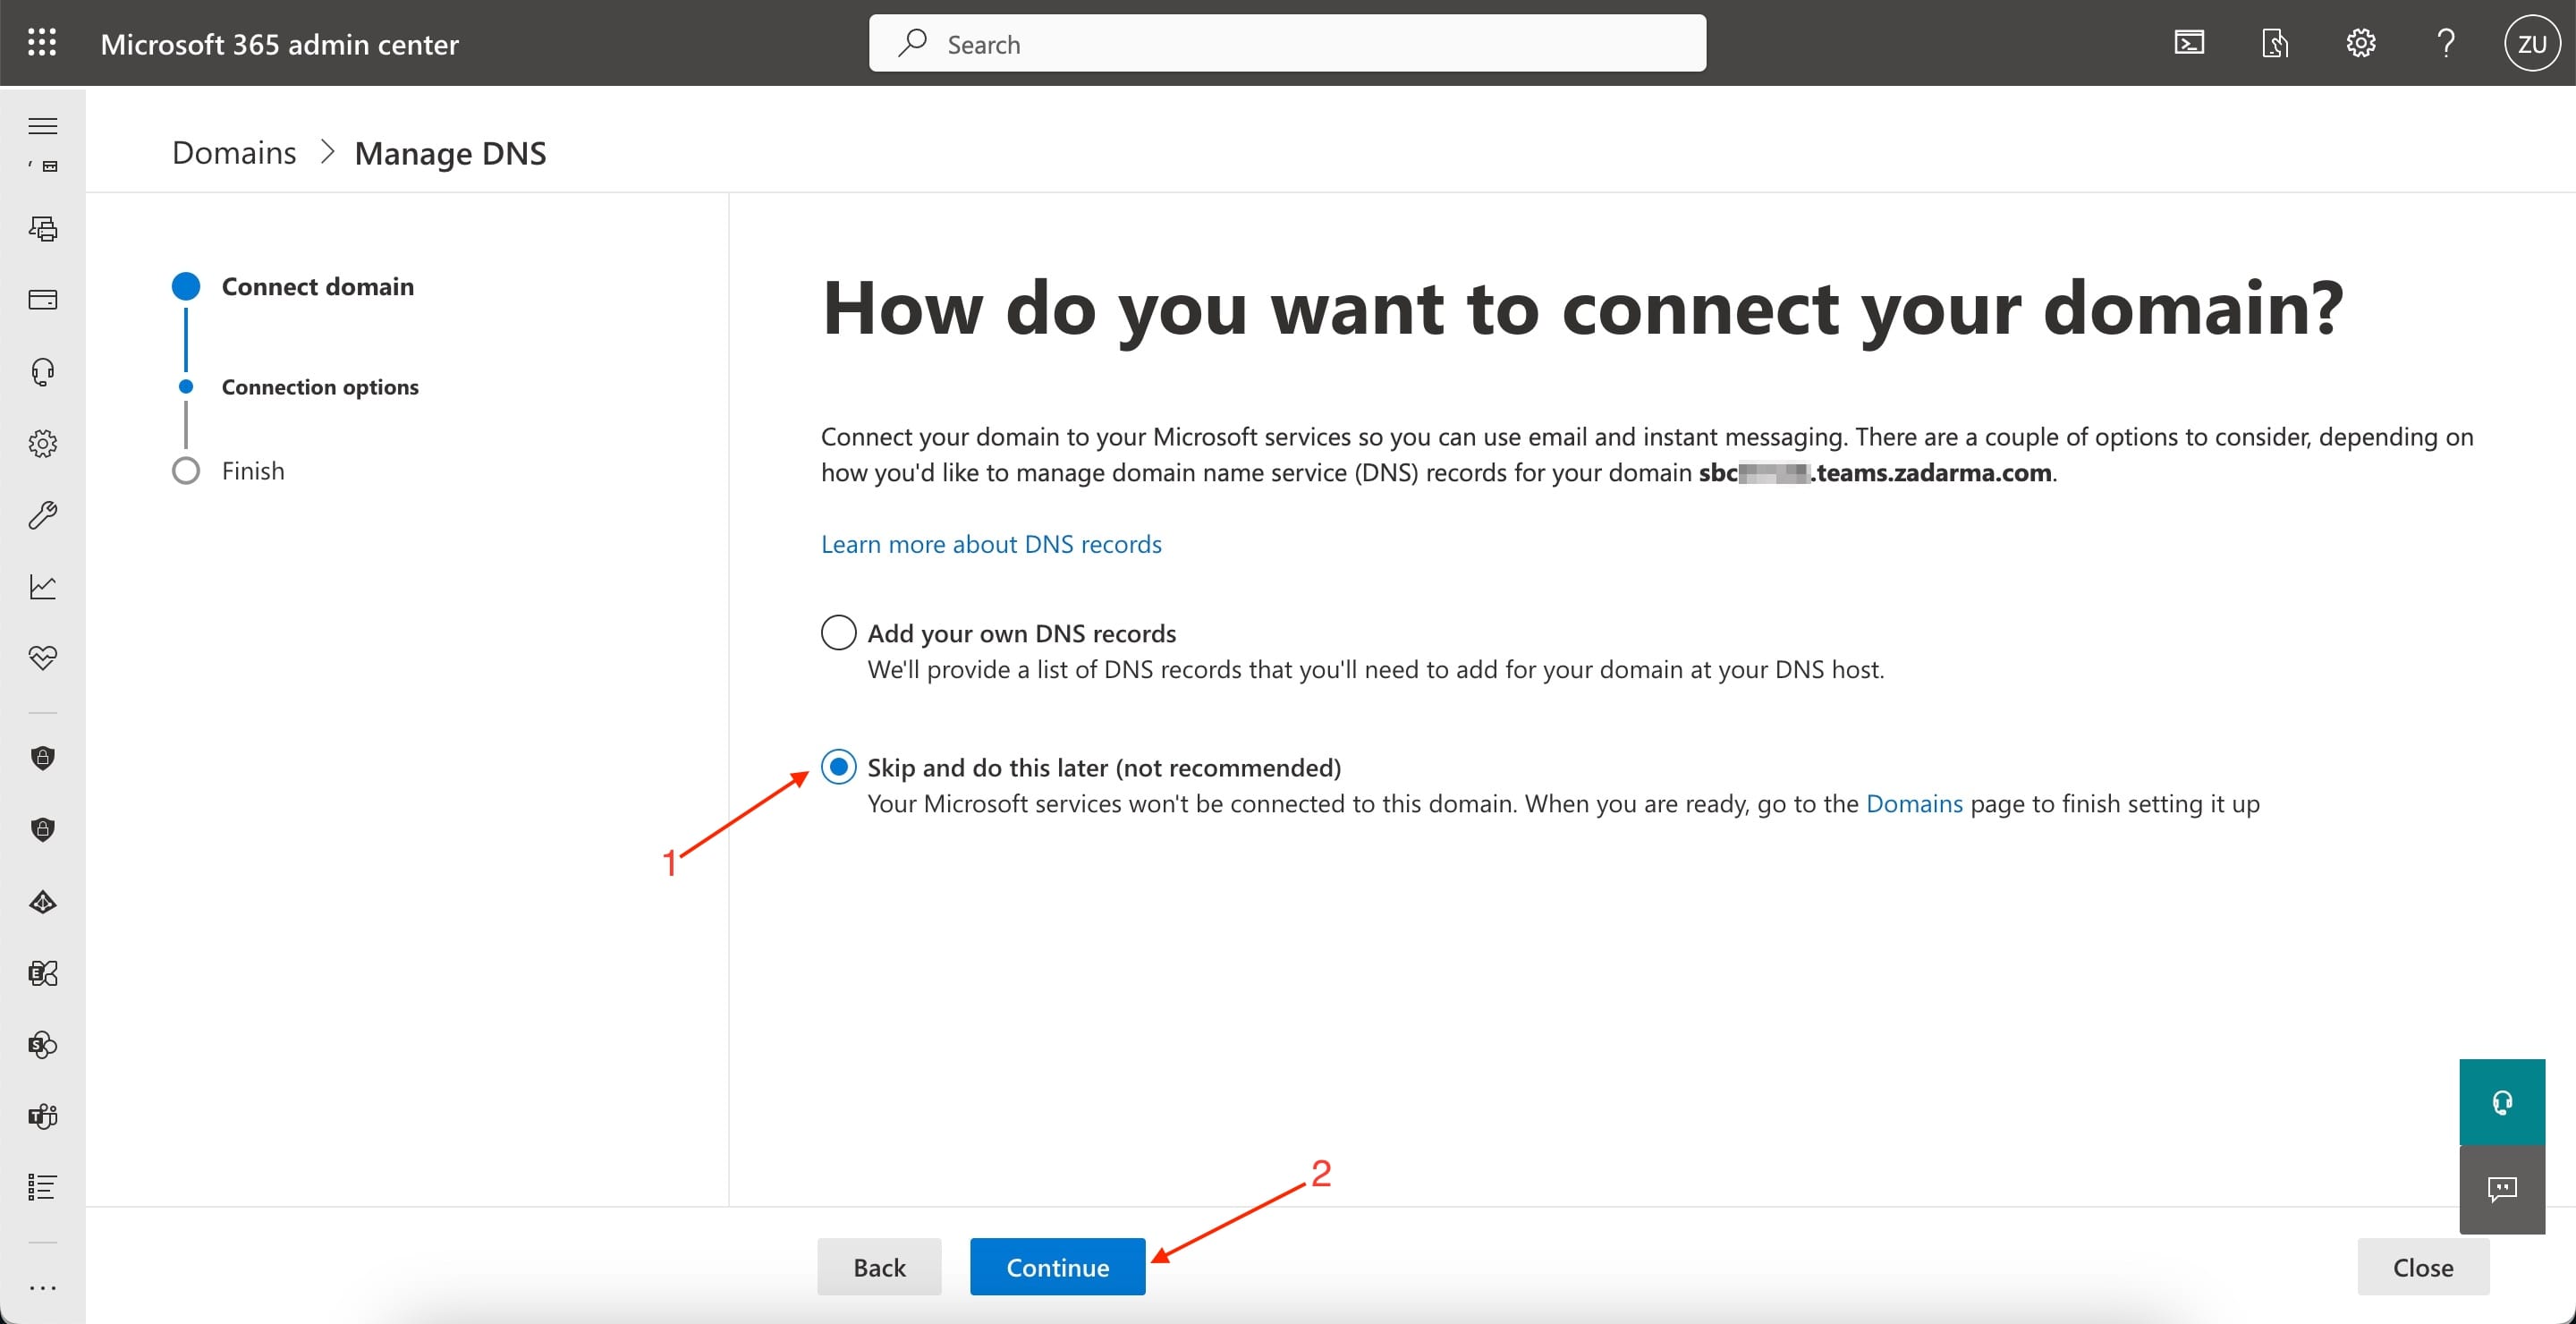
Step 5. Go back to Microsoft admin center and complete domain validation by choosing “Verify” option. On the next page, for the question “How do you want to connect your domain?” choose “Skip and do this later”, click “Continue” and “Done” in the new window.
After that, in the open Microsoft Teams integration setup tab (Settings – Integrations and API in Zadarma account) click “Next”, choose SIP login that will be used for further integration work and click “Save”.
4. In Microsoft admin center, in the Users - Active users tab, click on the user’s name with the admin rights that set ups the Teams integration, choose item “Manage username and email”.
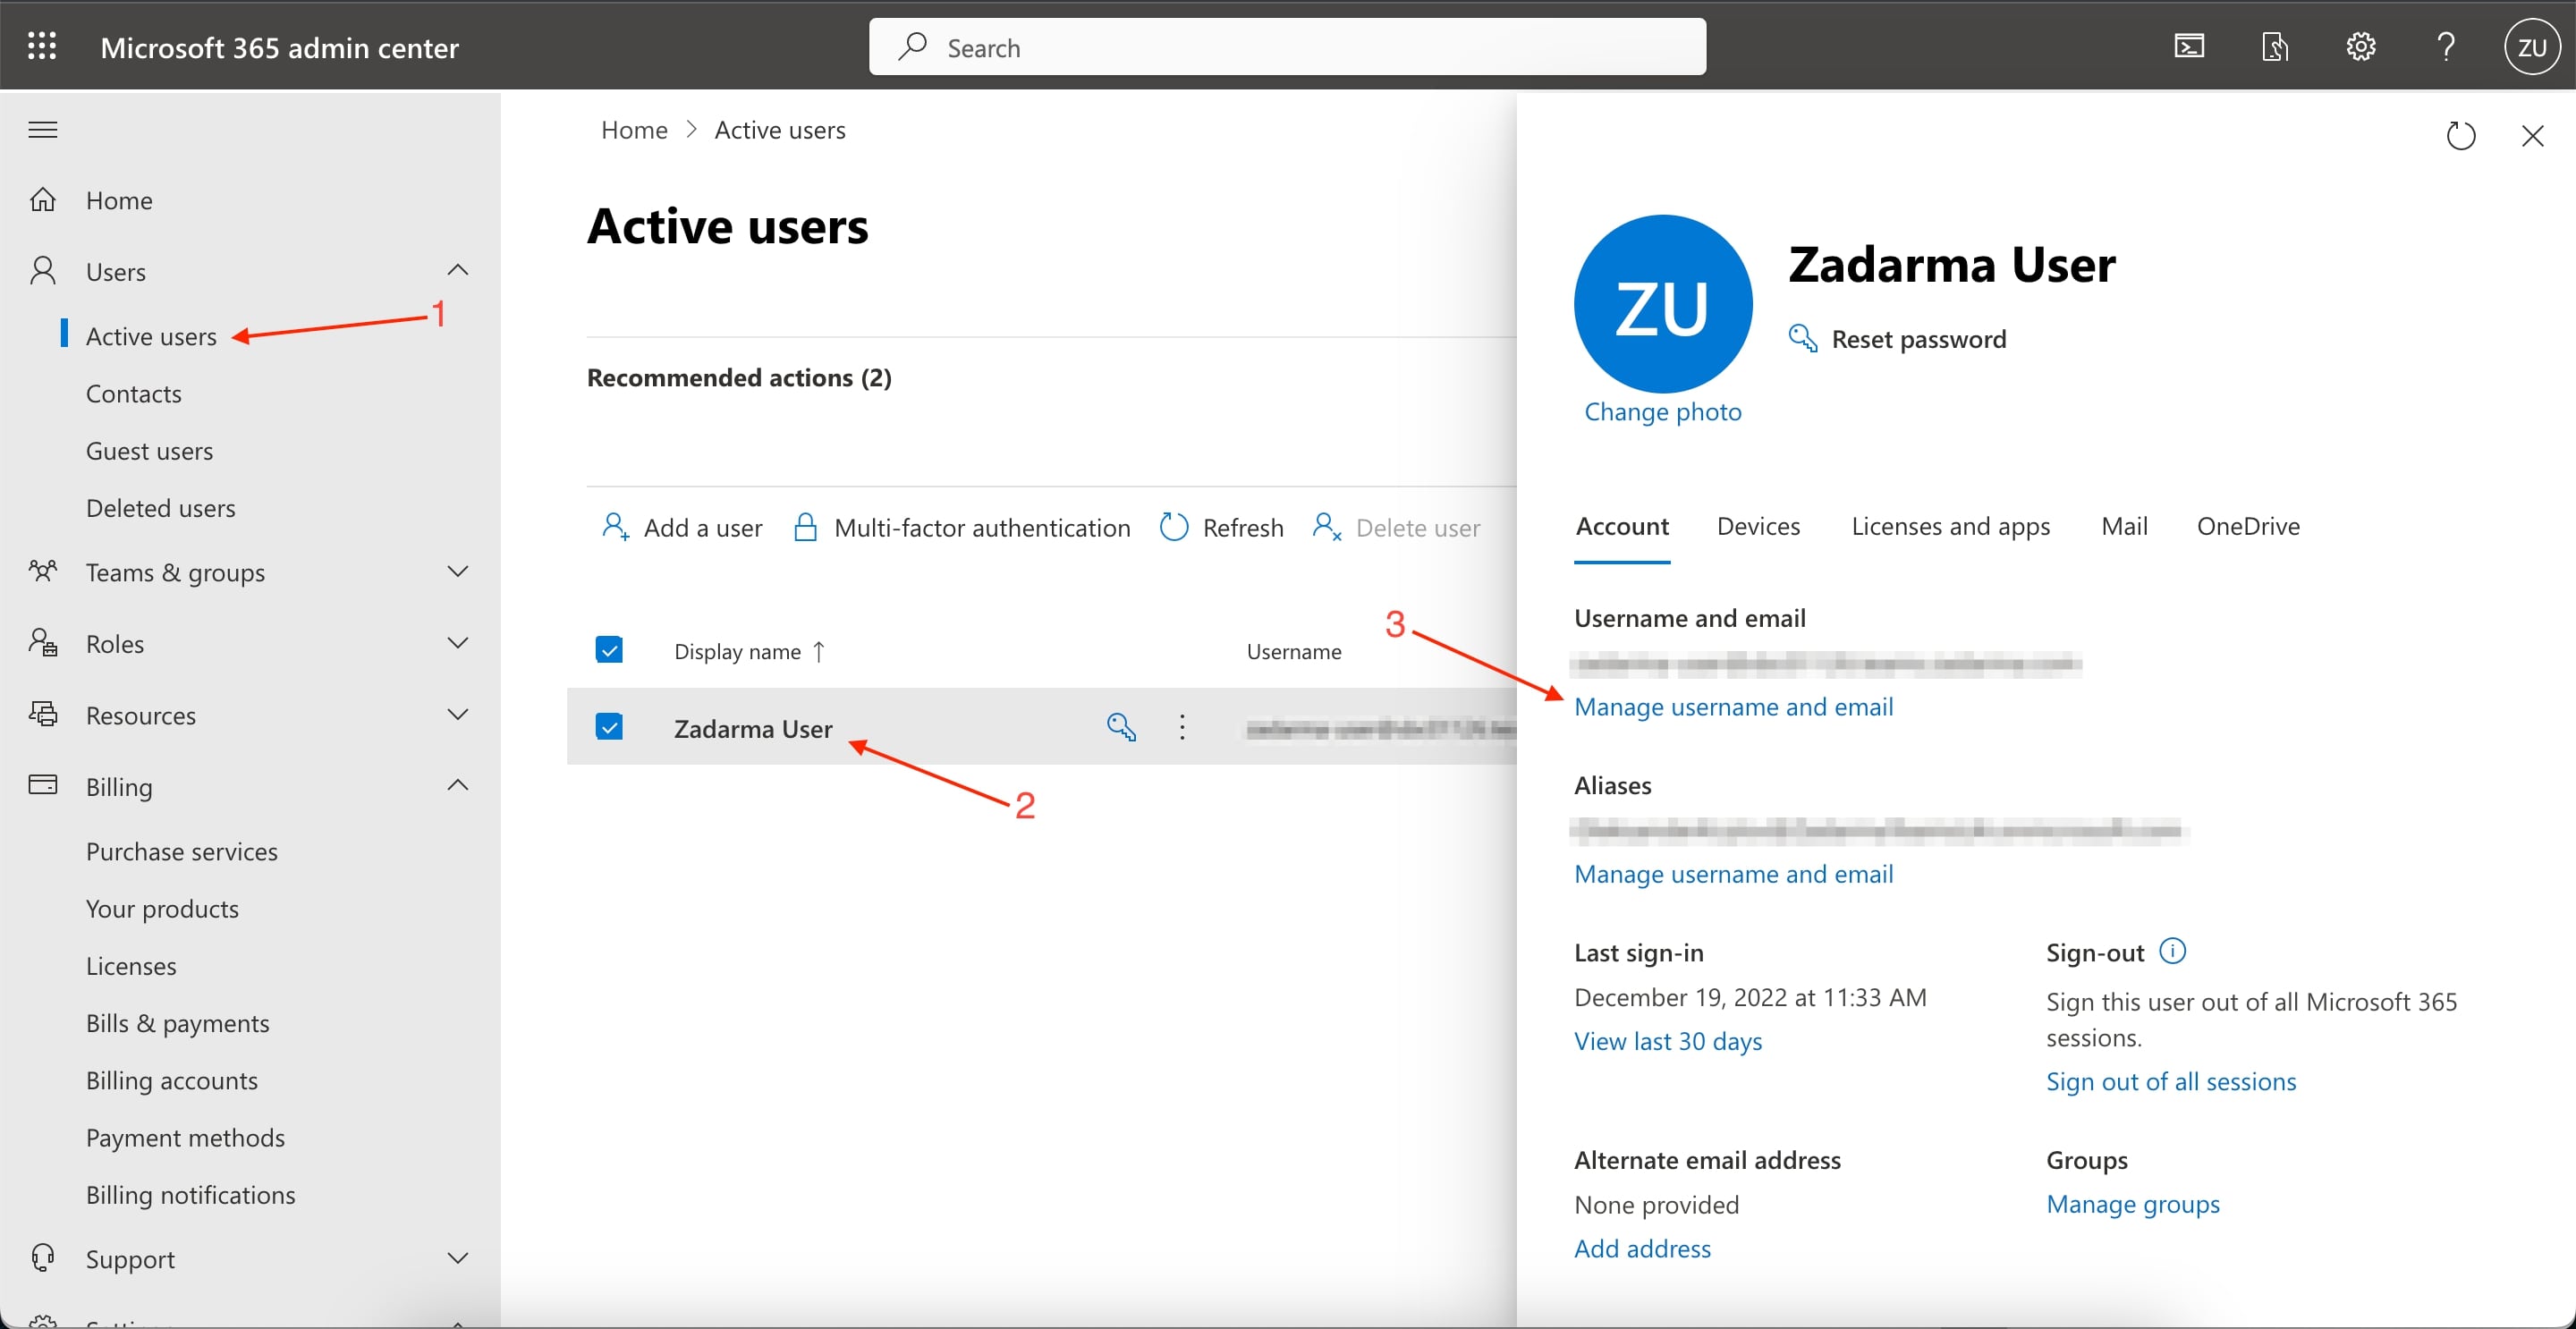
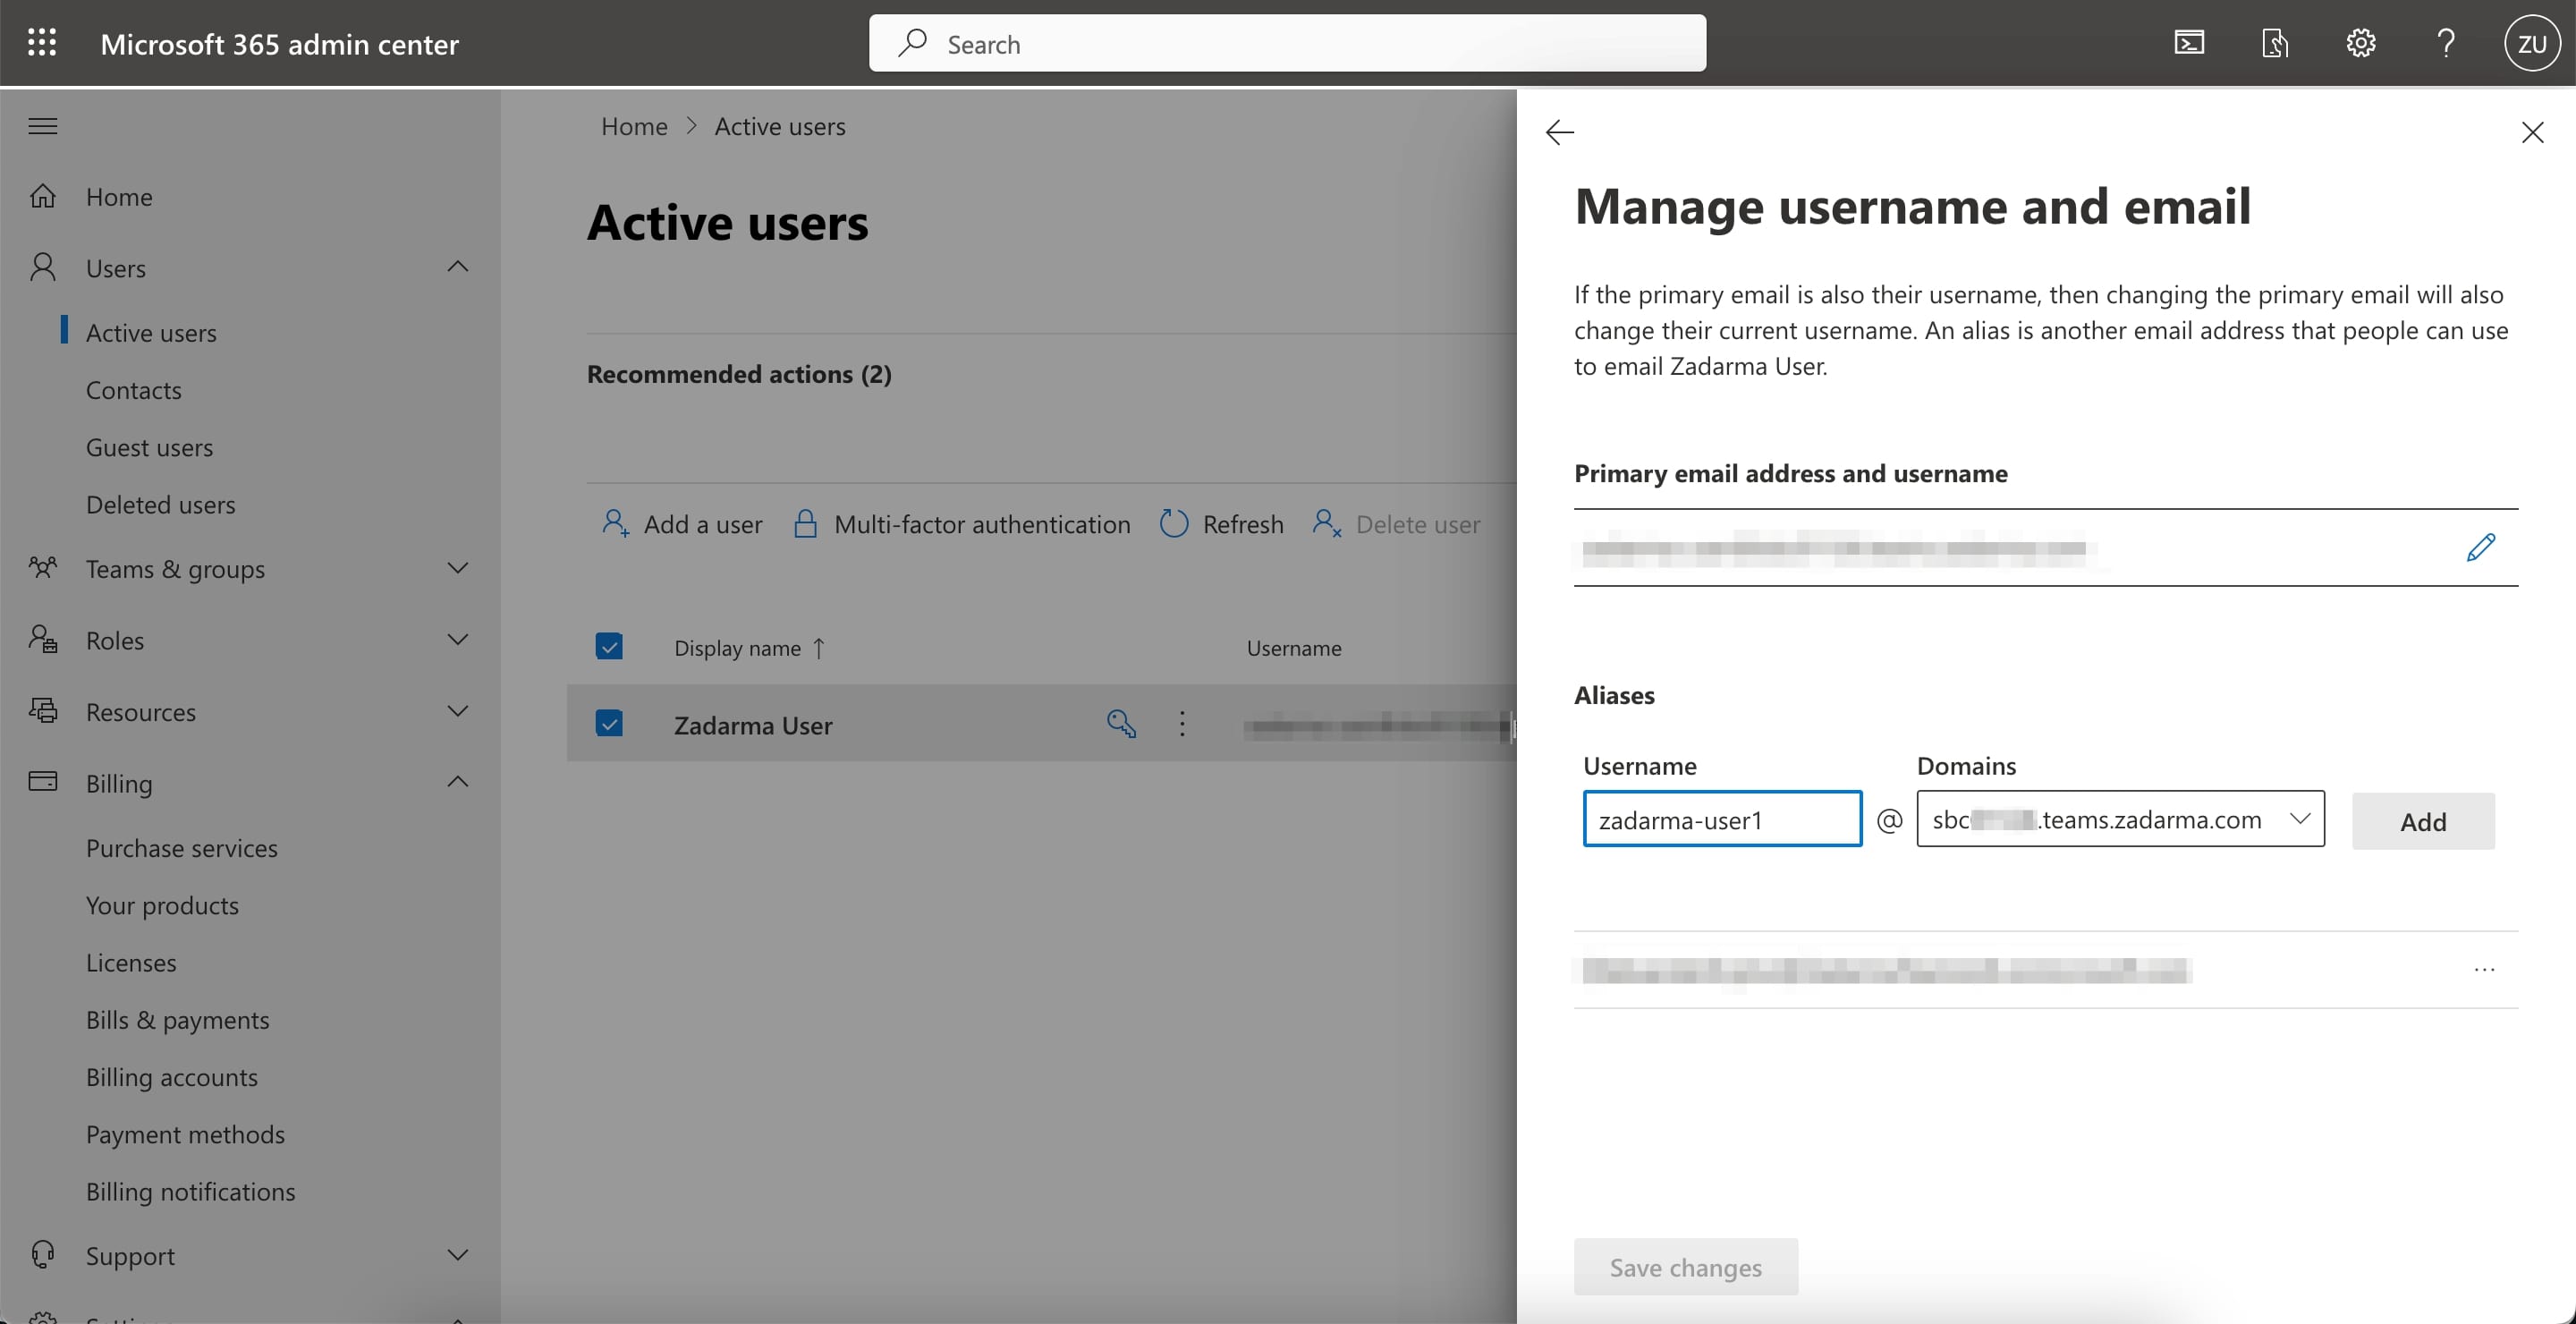
In the new window, in the "Aliases" field in the “Domains” column, choose a previously confirmed SBC domain, enter the user name and click “Add”. Then on the same page next to the added "Aliases" click on the “…” icon and choose item “Make the main email address”, after that save changes. The new login will then be used for logging into Microsoft Teams.
5.The following settings are performed by the Microsoft organization admin with the corresponding right (MS Teams admin). Please note: settings can be performed through Microsoft Teams admin center or through PowerShell command-line.
Teams admin center
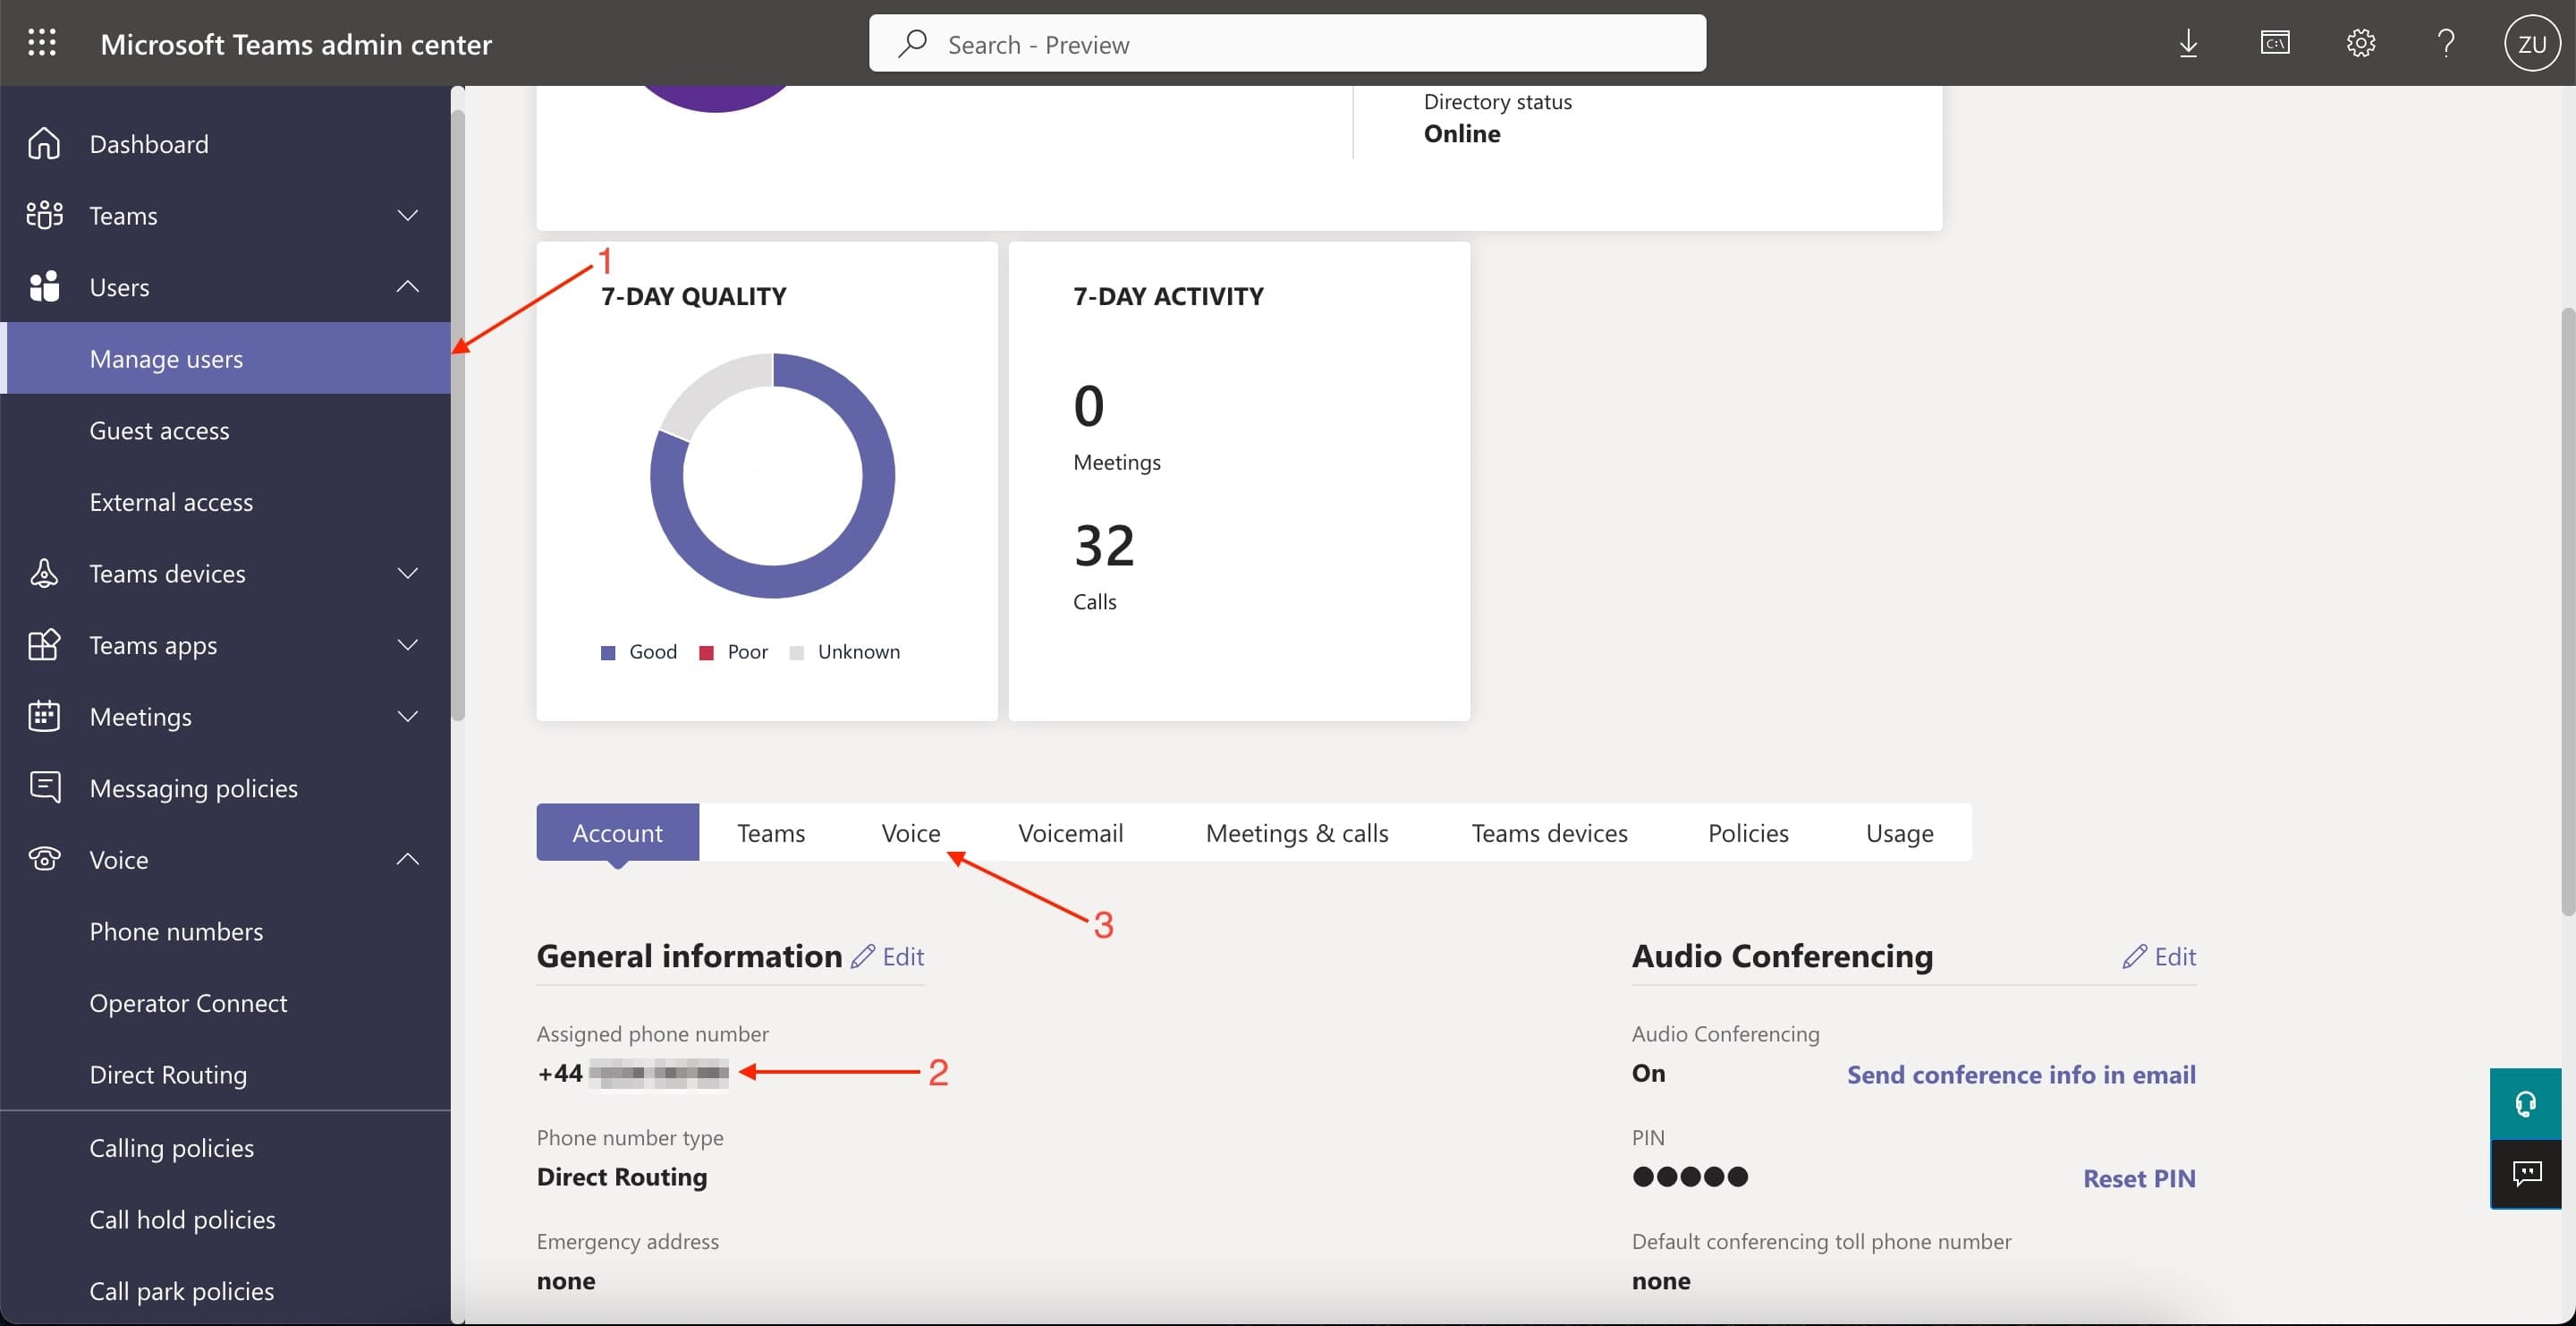
5.1. On the “Users” - “Manage users” page, click on the user being set up make sure that the user has an assigned phone number in the “User account” tab, and on the same page in the “Voice” tab call extensions are set up.
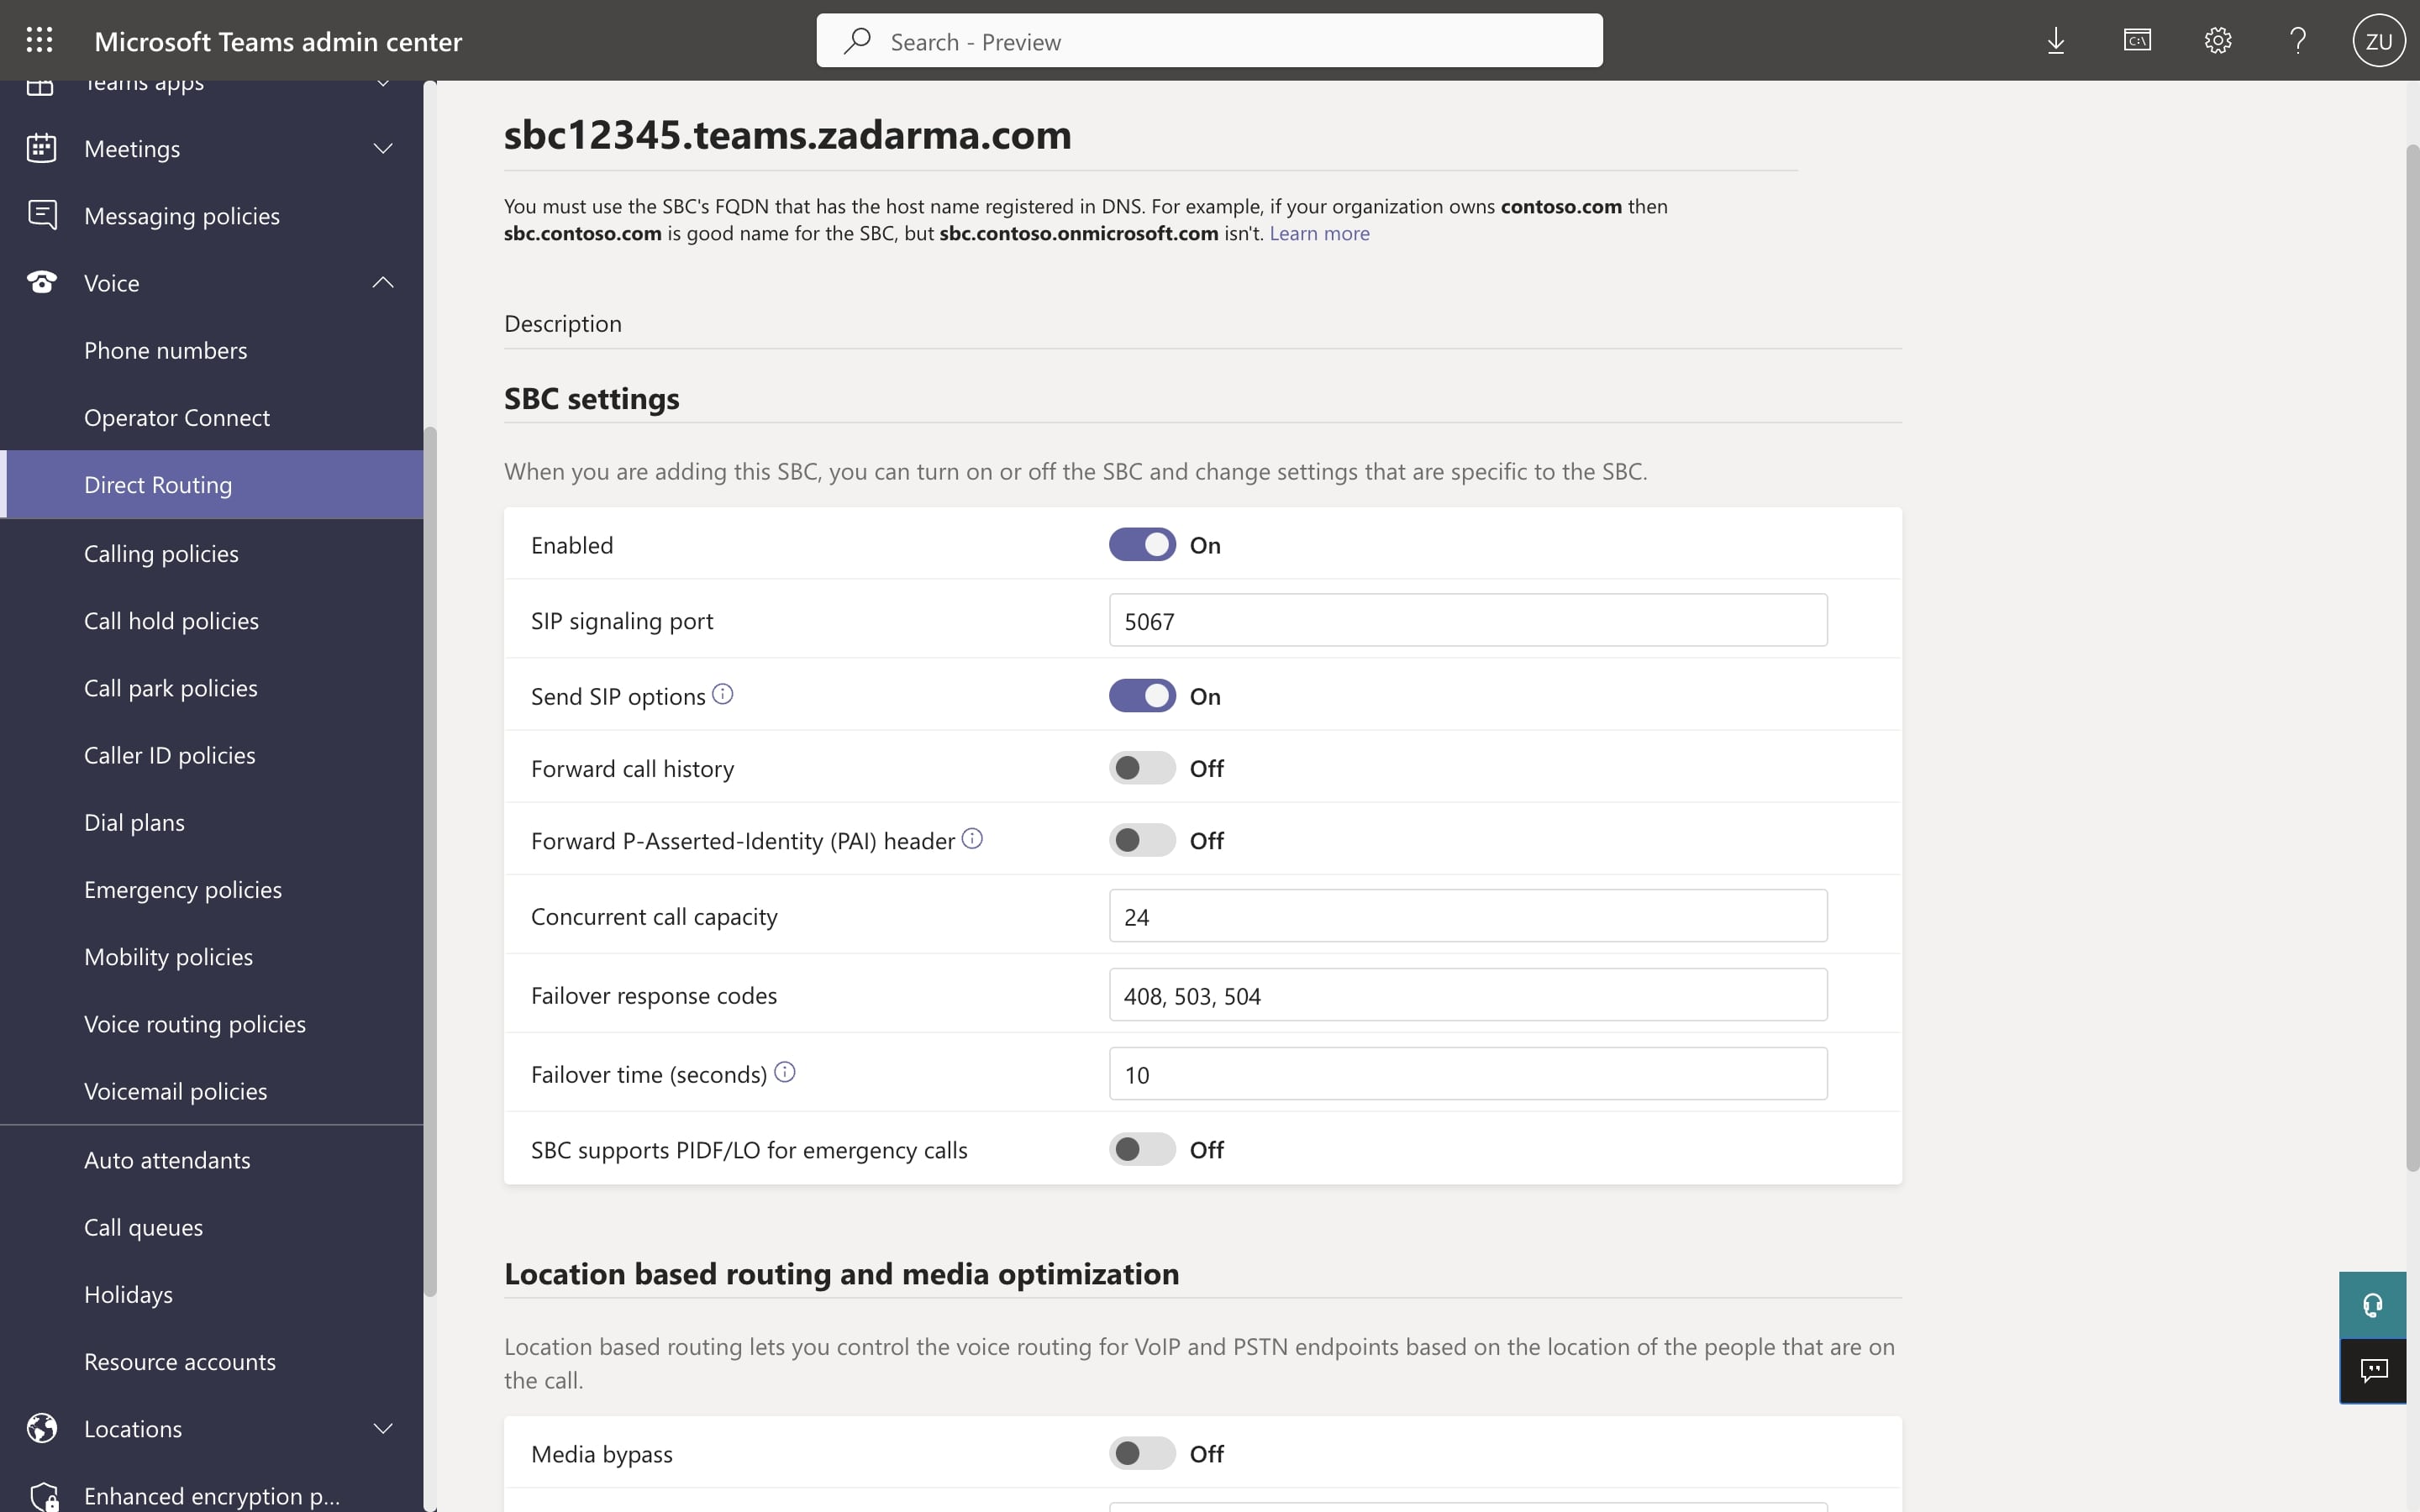
5.2. In the menu on the left go to “Voice” - “Direct routing” and in the SBC tab select “Add”, them enter the previously received SBC domain (in our example - sbc12345.teams.zadarma.com) and its description, and in “SBC settings” field complete settings as in the screenshot, then save the parameters.
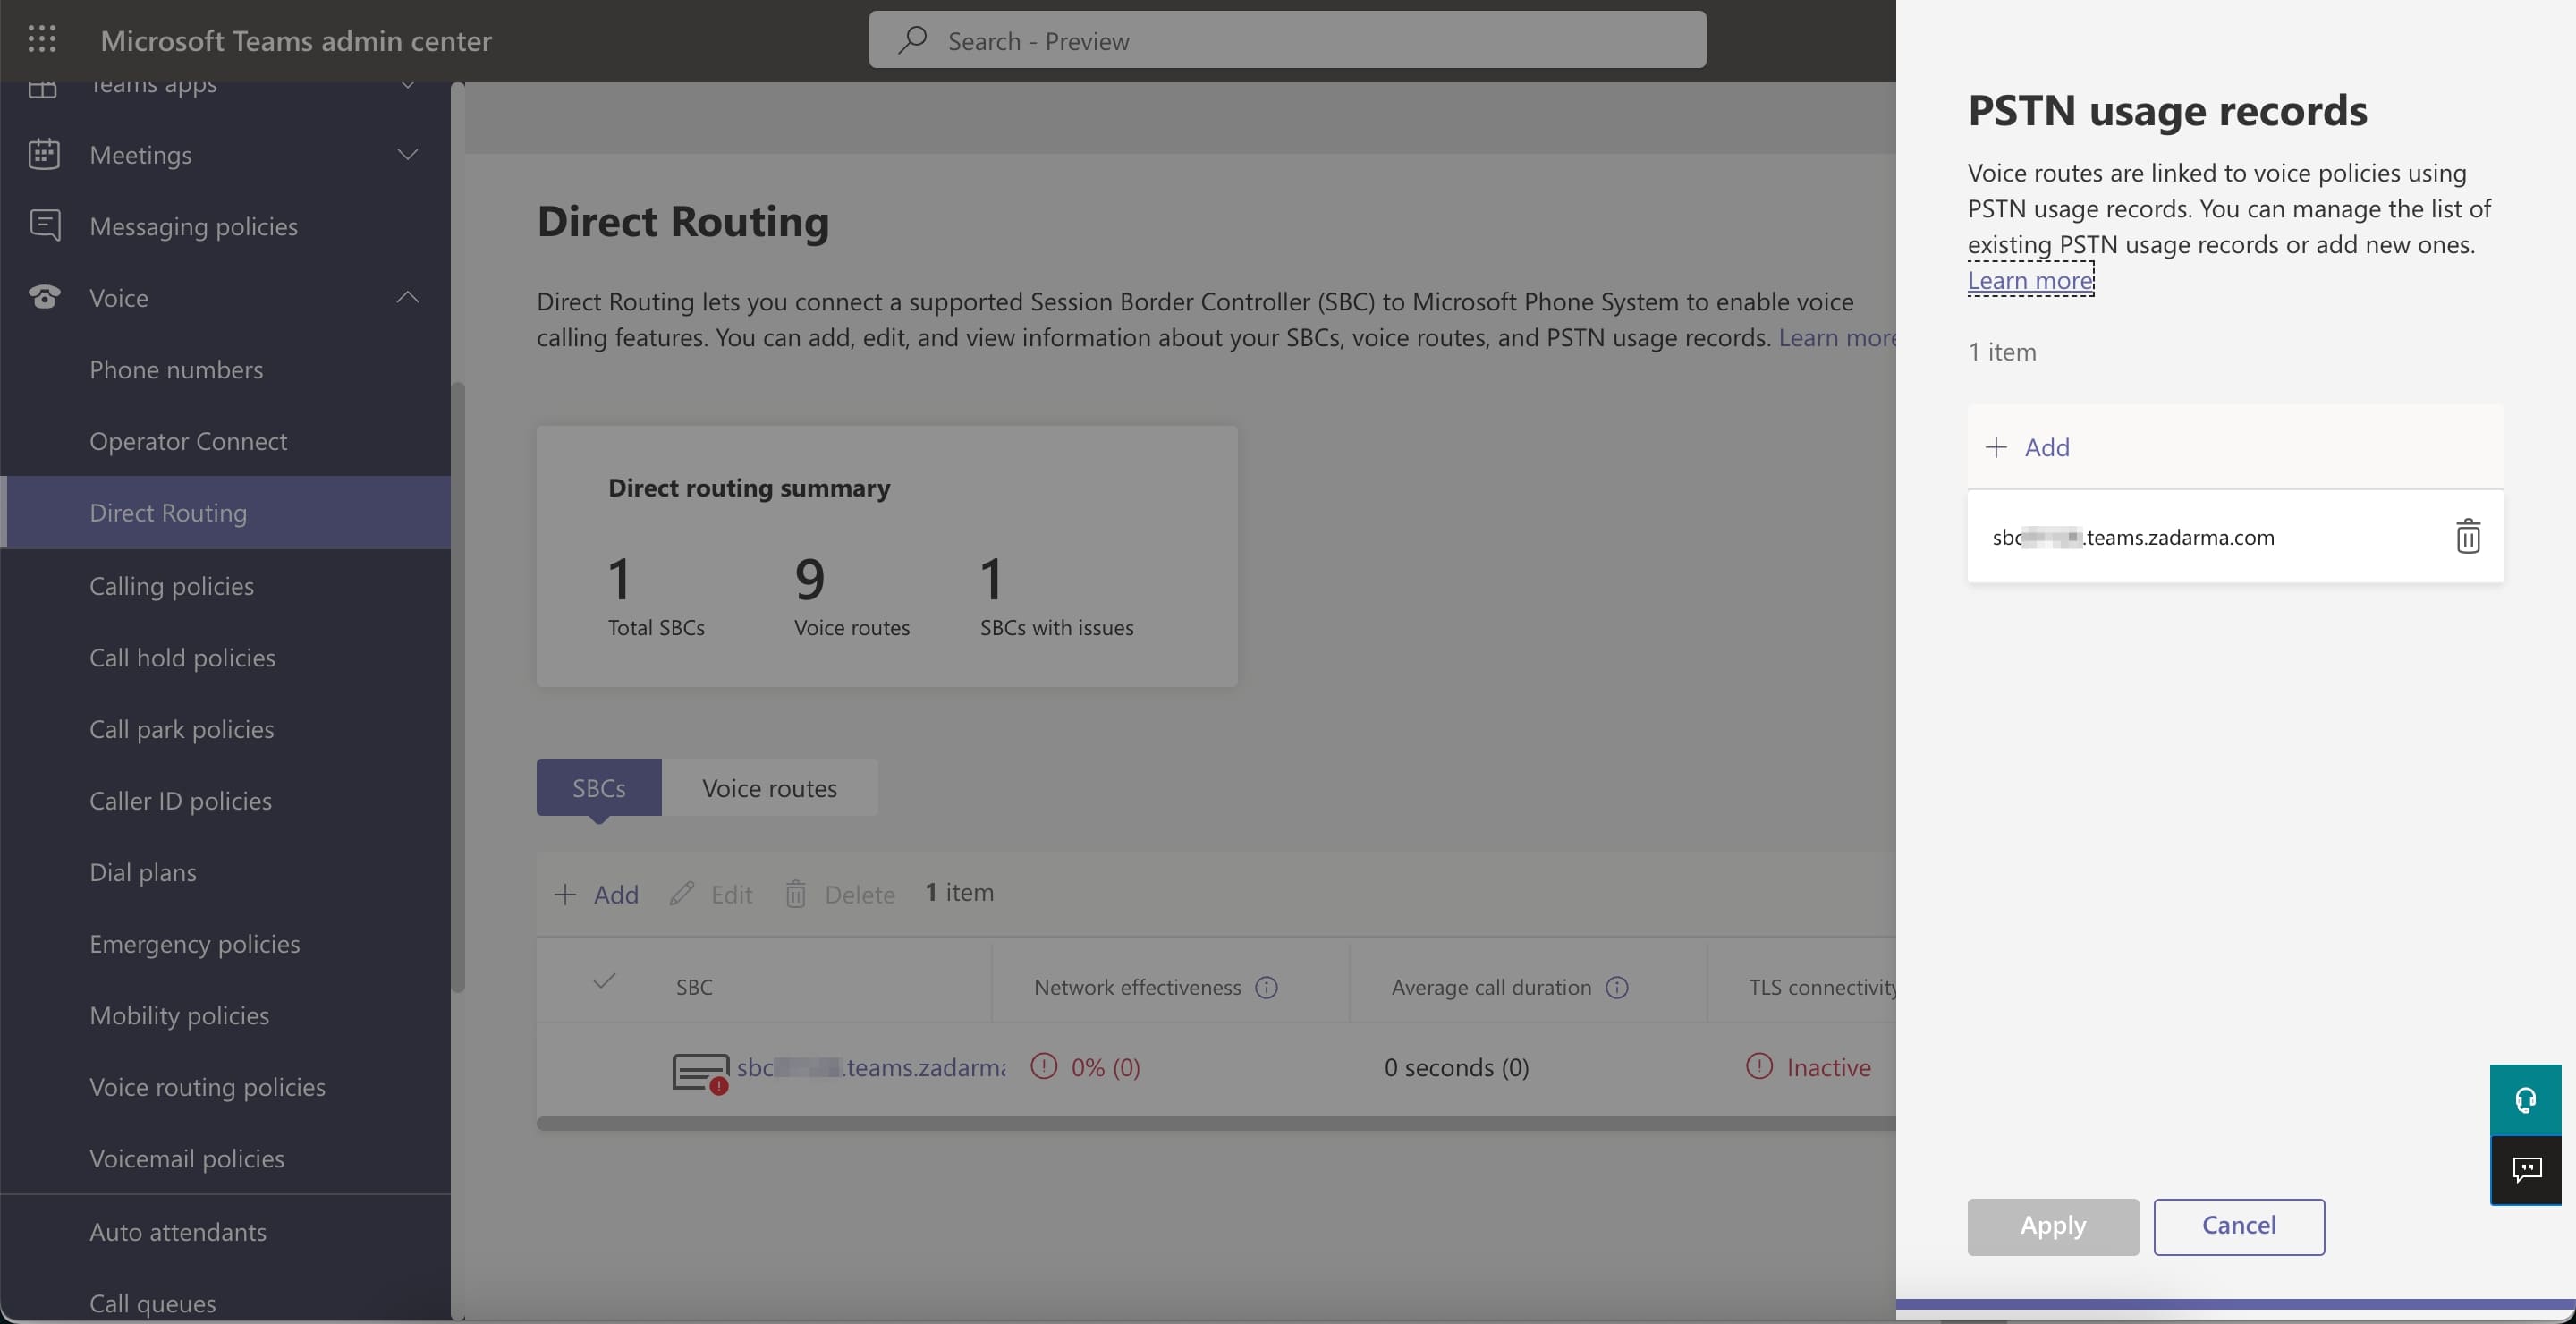
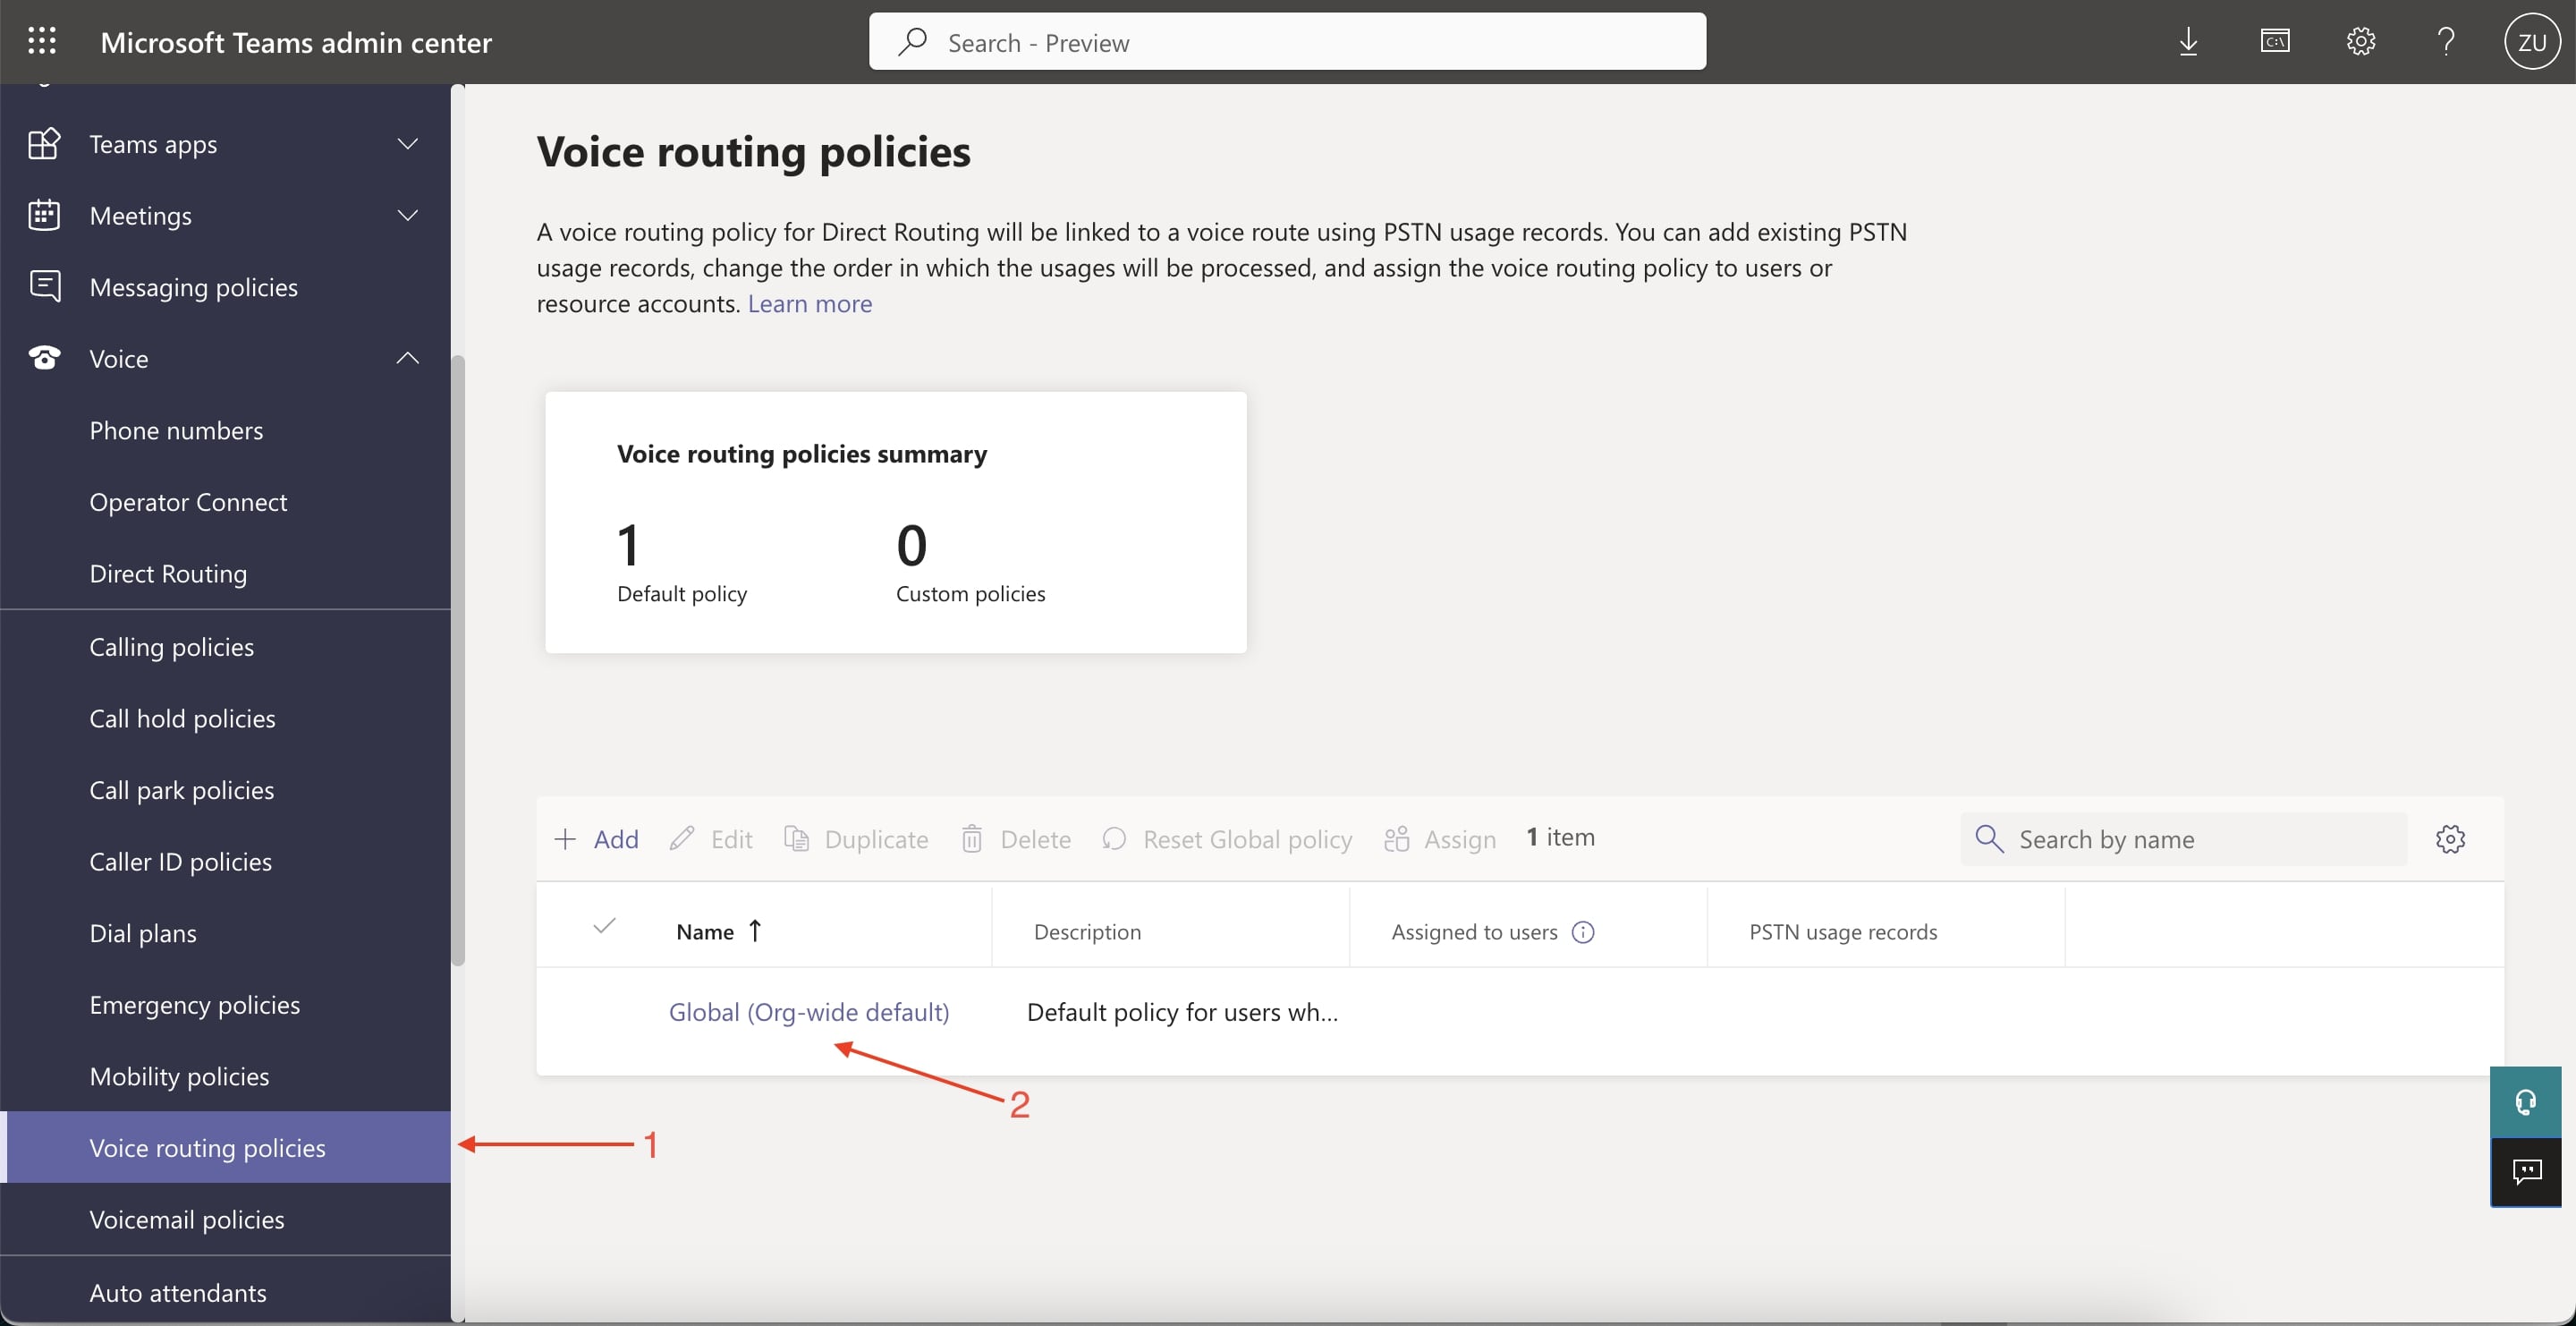
5.3. On the same page in the bottom right corner click on “PSTN usage records” and add your unique SBC domain generated during integration setup.
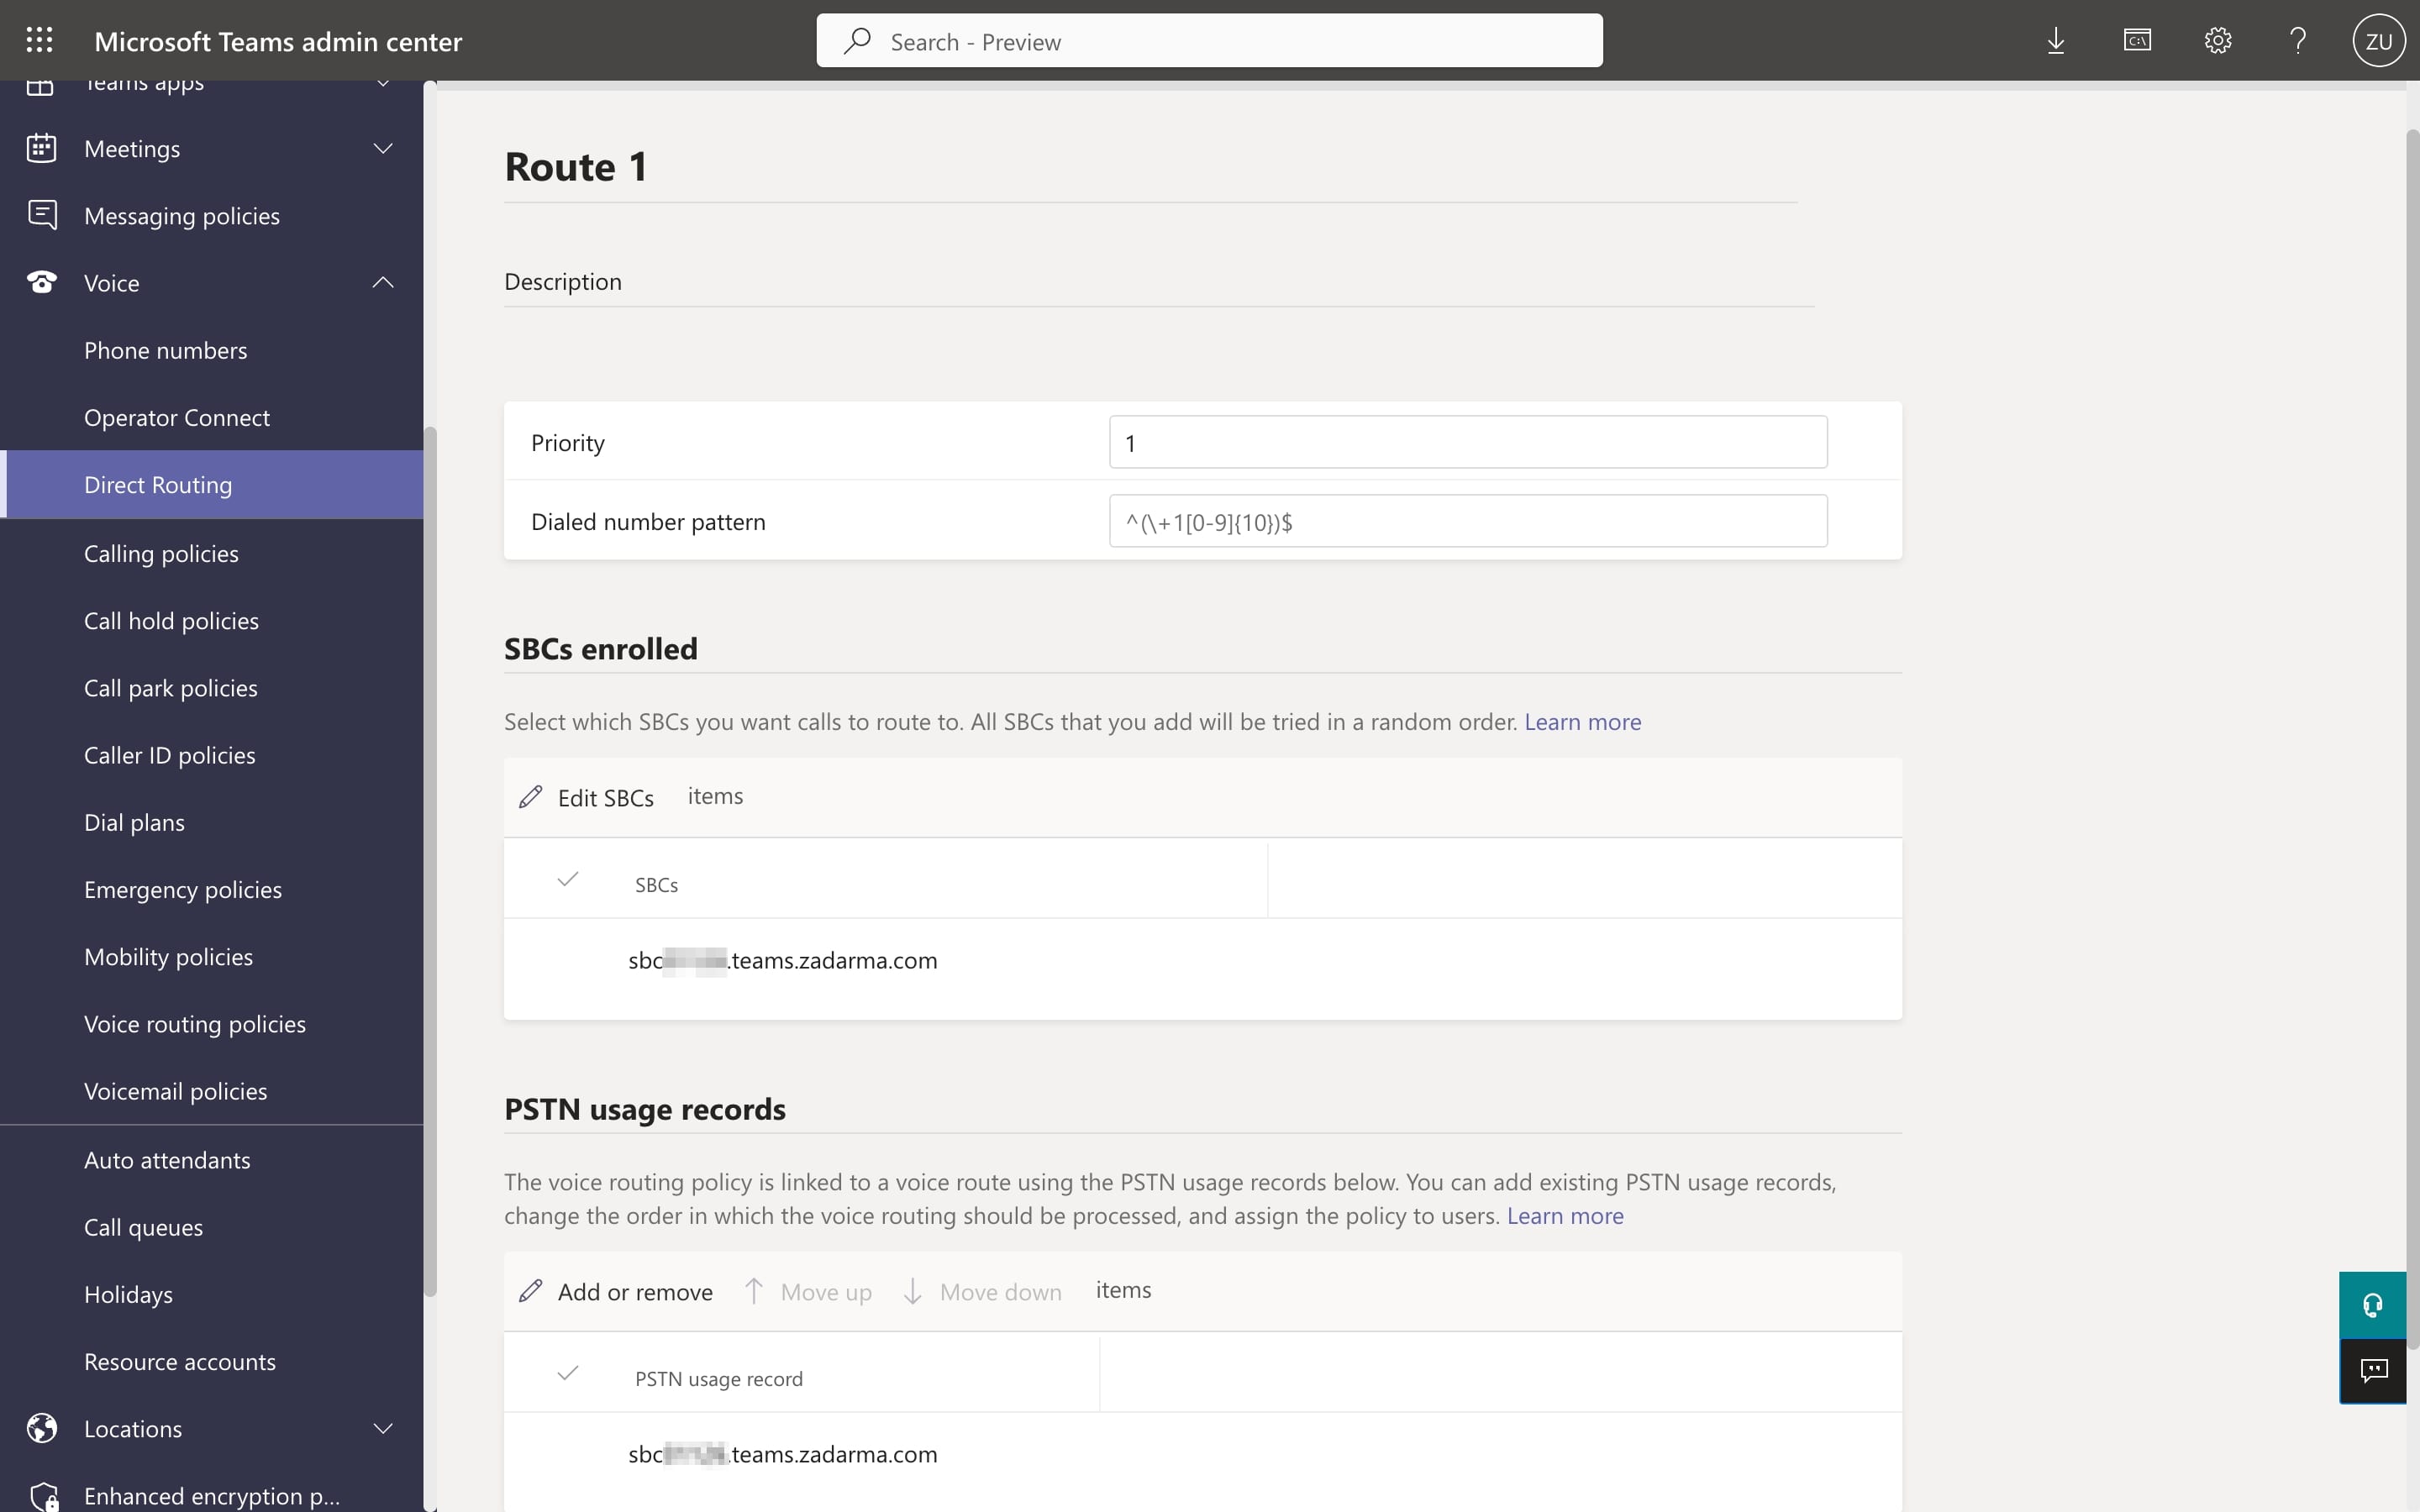
Here we move on to the “Direct routing” tab and click “Add”. On this page you need to add patterns of the dialed number for outgoing calls. Enter pattern name and route description, set a priority and in the “Dialed number pattern” enter value ^(\+1[0-9]{10})$, which will allow you to make call to numbers starting with +1 (USA and Canada). Below in the fields “SBC Enrolled” and “PSTN usage records” select previously added SBC controller and save settings. Similarly, you can add call routing to other countries with numbers that start with digits 2 to 9, you just need to change the digit in the template after the “+“ sign.
Please note that the pattern ^(\+1[0-9]{10})$ is meant for dialing 11-digits numbers. If the dialed number had more digits (for instance 12), then the template example will look like so ^(\+1[0-9]{11})$.
5.4. Then go to “Voice” - “Voice routing policies”, select the current policy (or create a new one) and in the “PSTN usage records” field add the SBC controller, then save the settings.
5.5. Then go back to the “Users” - “Manage users”, click the user’s name and go to the “Policies” tab, select item “Edit” and set “AllowCalling” for “Calling Policy”. If you created a new policy during the previous step, select it in the “Voice routing policy” field.
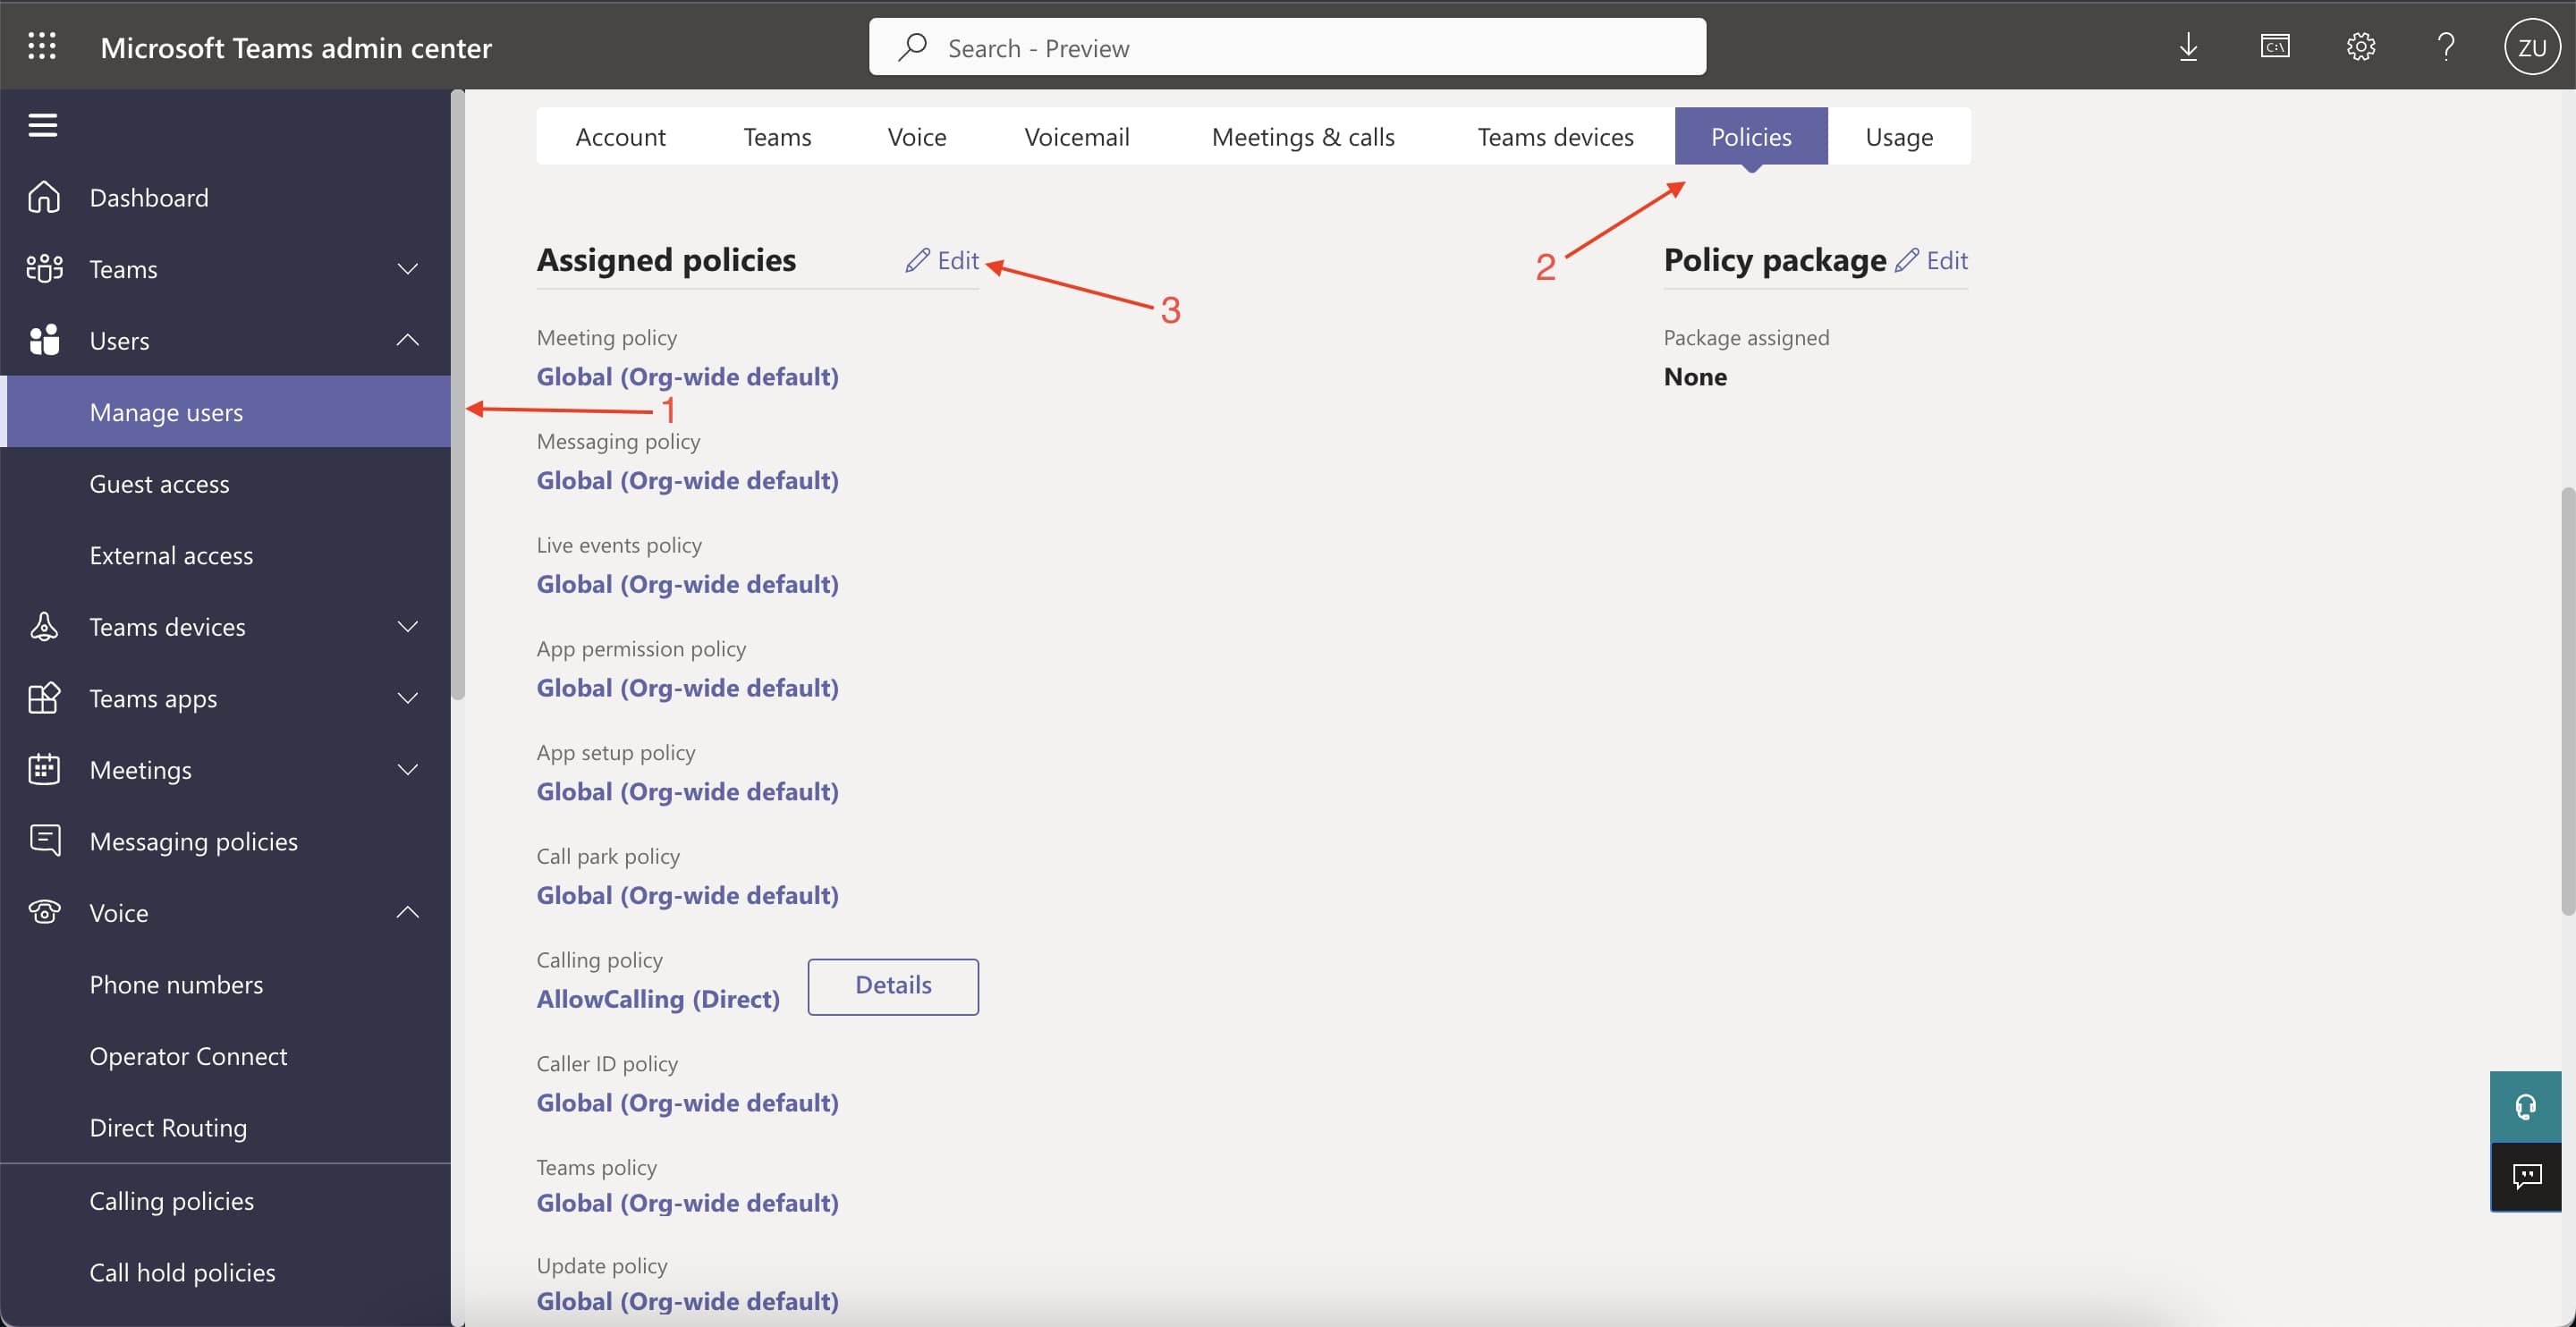
After saving the changes, everything is ready for outgoing calls for this user.
Apply the same policy settings and routing for other users.
The order of connecting new users to outgoing calls routing via Zadarma after creating the routes and policies does not change. Users just have the required policies set like in the last step.
PowerShell
An alternative to MS admin center is to set using PowerShell command-line.
To configure this way, you would need access to MS admin account via command-line in Windows OS, or via web emulator Azure Cloud Shell command-linel.
After logging into PowerShell/CloudShell as MS admin you need to perform the following commands in order:
1. Module installation:
Install-Module MicrosoftTeams2. Connection and authentication:
Connect-MicrosoftTeams3. Settings:
3.1. Enabling VoIP calls for users
Set-CsUser -Identity "zadarma-user@sbc12345.teams.zadarma.com" -EnterpriseVoiceEnabled $truewhere zadarma-user@sbc12345.teams.zadarma.com – is user’s Microsoft Teams login.
3.2. Setting call policy for users
Grant-CsTeamsCallingPolicy -identity "zadarma-user@sbc12345.teams.zadarma.com" -PolicyName AllowCalling3.3. Creating a new outgoing calls routing policy and PSTN record
New-CsOnlineVoiceRoutingPolicy -Identity "Zadarma out" -OnlinePstnUsages "sbc12345.teams.zadarma.com"where sbc12345.teams.zadarma.com – is the unique SBC domain, that is generated during integration enabling in Zadarma personal account.
3.4. Assigning user with outgoing calls routing policy
Grant-CsOnlineVoiceRoutingPolicy -Identity "zadarma-user@sbc12345.teams.zadarma.com" -PolicyName ”ZadarmaOut,”3.5. Assigning user with a number (with an extension) for incoming calls and enabling voicemail
Set-CsUser -Identity "zadarma-user@sbc12345.teams.zadarma.com" -HostedVoiceMail $true -OnPremLineURI tel:+44123456789;ext=223344where 44123456789 or 223344 – is a phone number assigned to the employee for making calls from Microsoft Teams and PBX extension number in Teams respectively.
3.6. Adding a new outgoing calls route
New-CsVoiceRoute -Identity "Route1"3.7. Checking that all parameters are set correctly
Get-CsOnlineUser -Identity "zadarma-user@sbc12345.teams.zadarma.com" | fl OnPremLineUriManuallySet,OnPremLineUri,LineUri,EnterpriseVoiceEnabled,HostedVoiceMail,TeamsCallingPolicy,OnlineVoiceRoutingPolicy,EnterpriseVoiceEnabled3.8. Creating and setting a dial plan (not required, it is used for adding number dialing format)
New-CsDialPlan -Identity "ZadarmaDialplan"3.9. Assigning user a created dial plan (not required)
Grant-CsDialPlanIncoming calls settings
In Zadarma personal account on the page “Settings - SIP Connection”, for SIP-login that you have chosen previously for integration select “Enable call forwarding” in the “Forwarding to the phone number” field, select “Always active” and enter a phone number that is assigned to the employee in their profile in Teams admin center. after that incoming calls to this SIP login will be forwarded to MS Teams trunk.
Then incoming calls routing is set on the side of MS Teams PBX.
For joint use of Zadarma PBX with MS Teams you just need to enable incoming call forwarding from an extension number to SIP-login with MS Teams trunk.
Forwarding is enabled on the “My PBX - Extension numbers” page. In the extension number settings, in the “Call Forwarding and Voicemail” field select “Enable”, then choose forwarding conditions, below click on the flag icon and at the top of the srop-down menu select “SIP number”, enter the corresponding SIP login and save settings.
Examples of MS Teams use for making calls and possible additional settings:
1. Making an outgoing call via Teams
To make an outgoing call you only need to go to “Calls” tab in the side menu, enter the number you want to call and click “Call”.
- you can also enter a contact name in the dial field
- dialing format depends on rules set for the user by the admin the in the MS Teams settings
- moreover, outgoing calls can be made from other menus, for instance, straight from a chat by clicking a headset icon
2. Accepting an incoming calls via Teams
To accept an incoming call you just need to click on a corresponding icon in the incoming call notification that appears on the screen.
- during a call you can put it on hold or use a transfer option with a help of corresponding buttons
- incoming calls can be automatically routed to voicemail by changing the settings in the bottom left corner of the screen
- any Teams user can change availability status (for example, enable “don’t disturb” mode) by clicking your avatar icon in the top right corner and choosing the required status in the dropdown menu