 Calls
Calls
 Phone numbers
 SMS
SMS
 Business Phone System
 eSIM for Internet
 AI agent
 AI Speech Analytics
 Click to Call
 Call Tracking
 VoIP for Business
 Become a partner
 Integrations
 For whom
 Setup guides
 FAQ
FAQ
 Online chat
 Contact us
 Blog
Blog
Setup guides / Zapier
Zapier is an integration tool that connects different web applications, allowing them to interact with one another.
Integration features:
- Integration with all notifications for incoming and outgoing calls, including call initiation, answer, end, and missed calls;
- Call recording transfer;
- The ability to set up callback calls based different triggers available in Zapier;
- Incoming SMS forwarding and outgoing SMS sending from Zapier have been added.
Integration features with Teamsale CRM
- Creating new leads and updating existing ones;
- Creating new clients and updating existing ones;
- Adding information to the client’s feed;
- Adding new tasks and updating existing ones;
- Integration with Facebook Messenger;
Examples of how to use Zapier’s features.
Setting up a communication channel with clients using Teamsale - Zapier - Facebook Messenger▾
On the Facebook side, you need to have a Facebook Page created with a message button enabled to communicate with page visitors. For example, if you have a page dedicated to selling children’s clothing and a potential customer sends you a message, Teamsale will create a lead based on that message. You can then communicate with the customer directly through your Facebook Page
Setting up message transfer from Teamsale to Zapier and from Zapier to Facebook Messenger
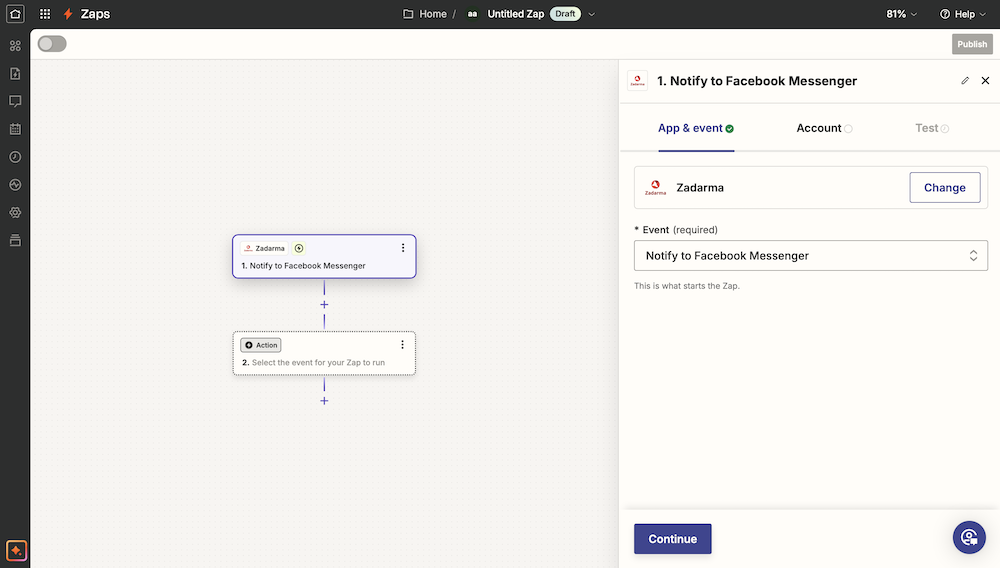
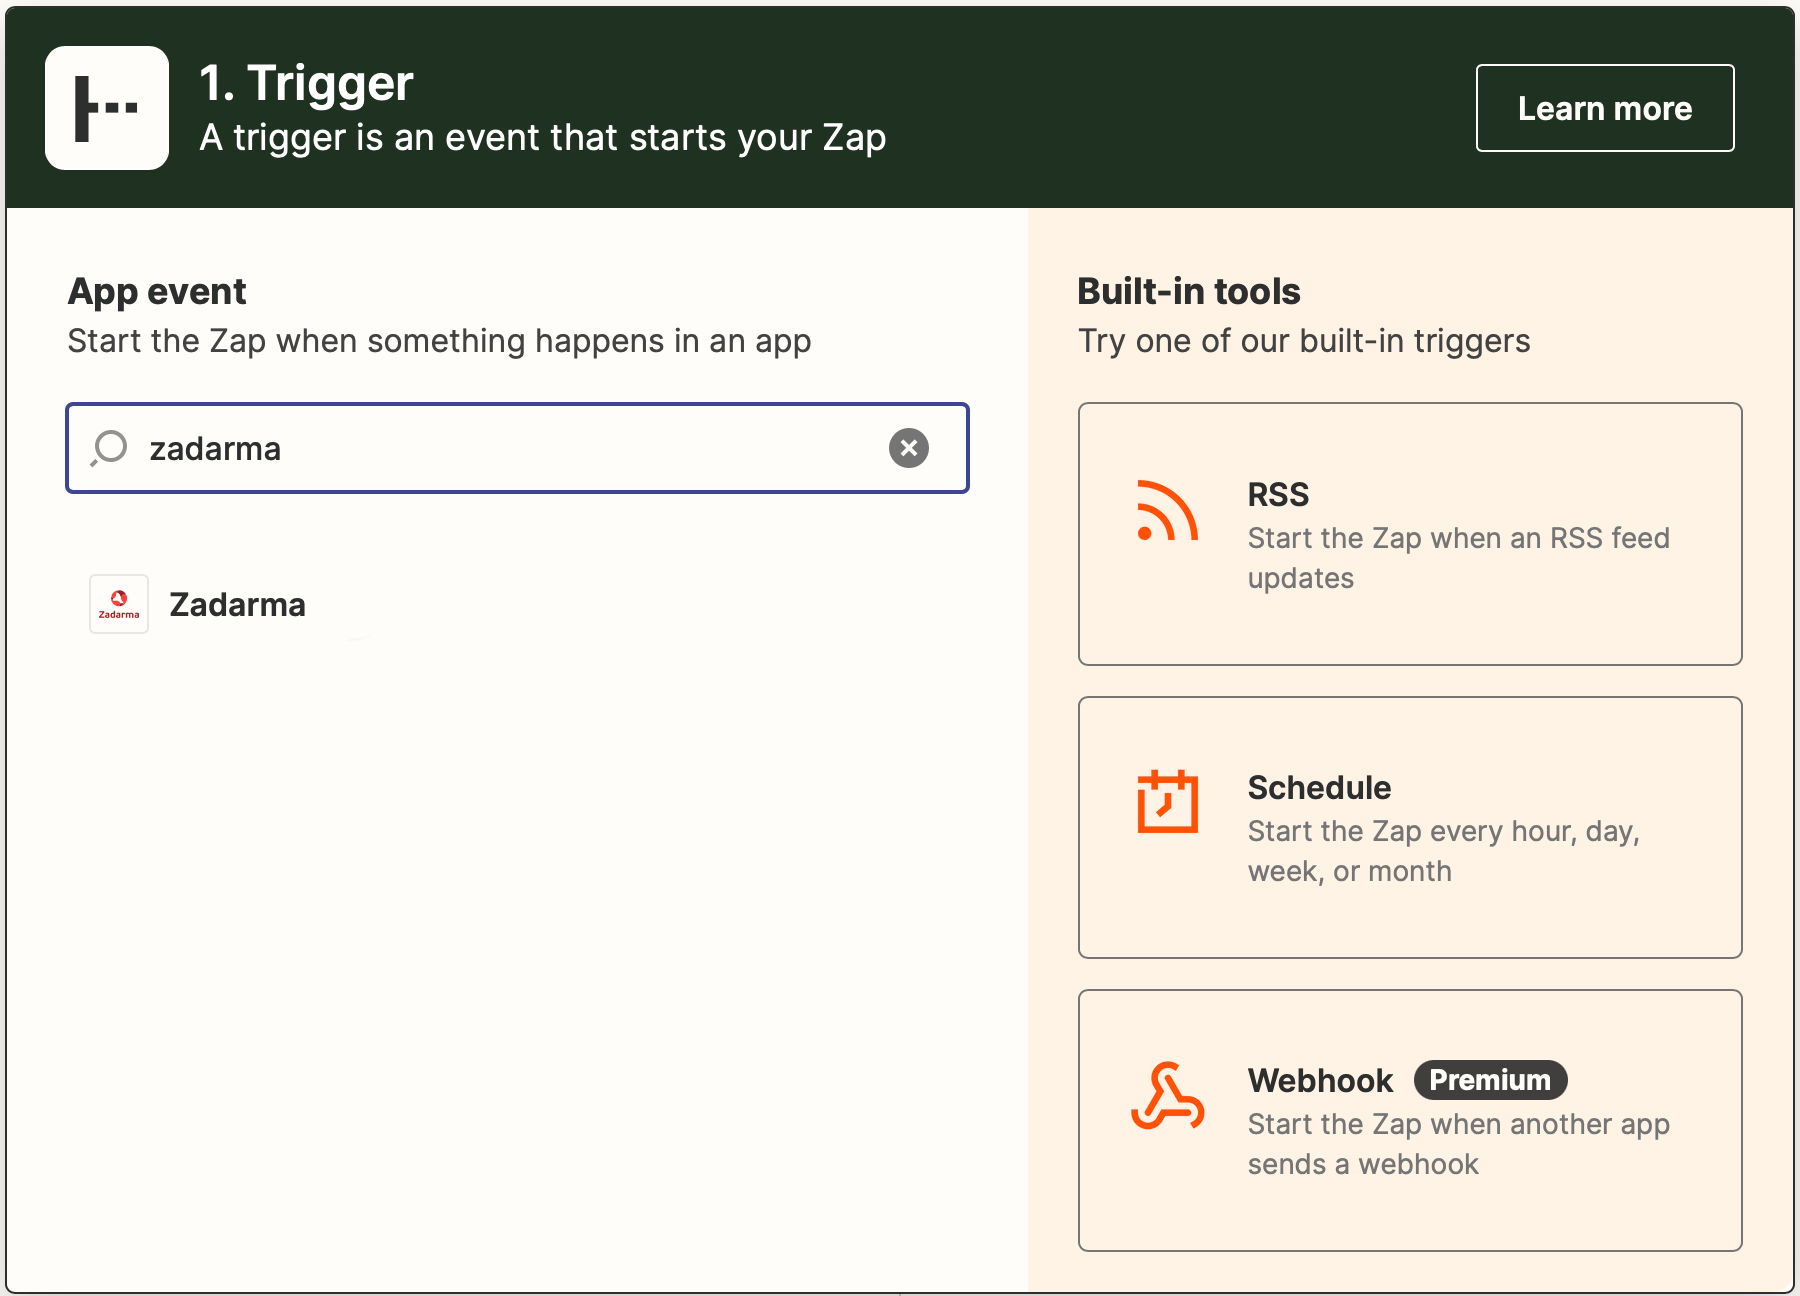
1. Log in to your Zapier account and select Create Zaps. In the Trigger section, find and select the Zadarma application.
In the Event field, select the event that will trigger the action "Notify to Facebook Messenger" and then click Continue.
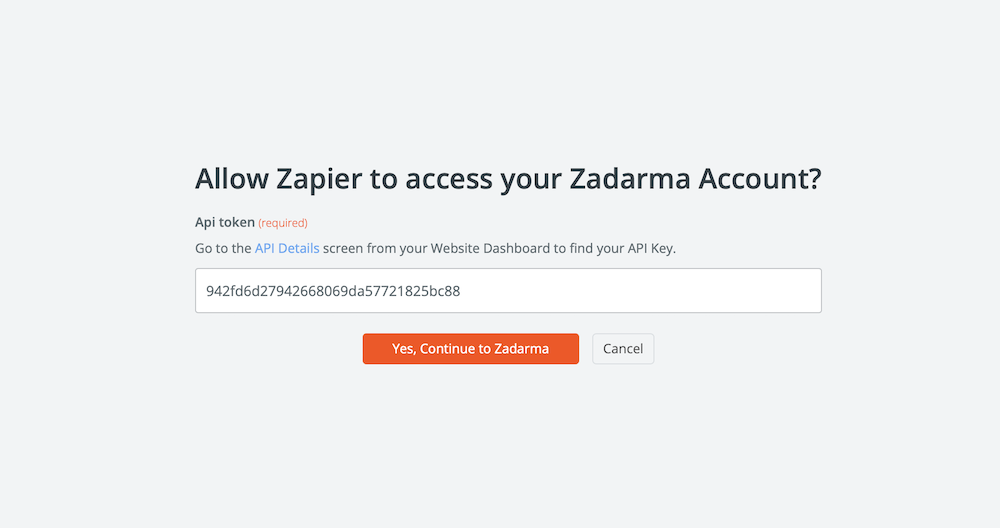
In the second tab, click the Sign in button. A window will appear for you to enter the token to connect with your Zadarma account. In your Zadarma account, go to Settings - Integrations and API enable the Zapier integration, and copy the token.
In the Zapier window that asks "Allow Zapier to access your Zadarma Account?", paste the token and click Yes, Continue to Zadarma and then click Continue in the trigger setup window.
In the third tab, Test, click Test Trigger. Once the test is complete, click Continue with selected record.
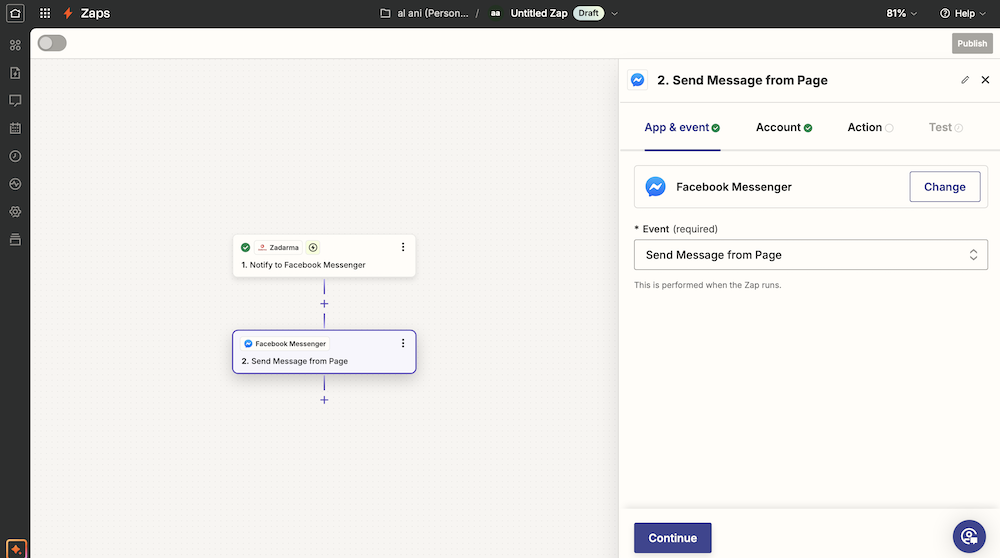
2. In the next window, select Facebook Messenger as the application for the Action block.
In the Event field, select "Send Message from Page" and then click Continue.
In the second tab, Account, click the Sign in button to log in to your Facebook account. After authorization, click Continue.
Next, in the Actions tab, select the following values:
Page - select your Facebook page.
Recipient id - PSID (page-scoped user ID)
Text - Message text
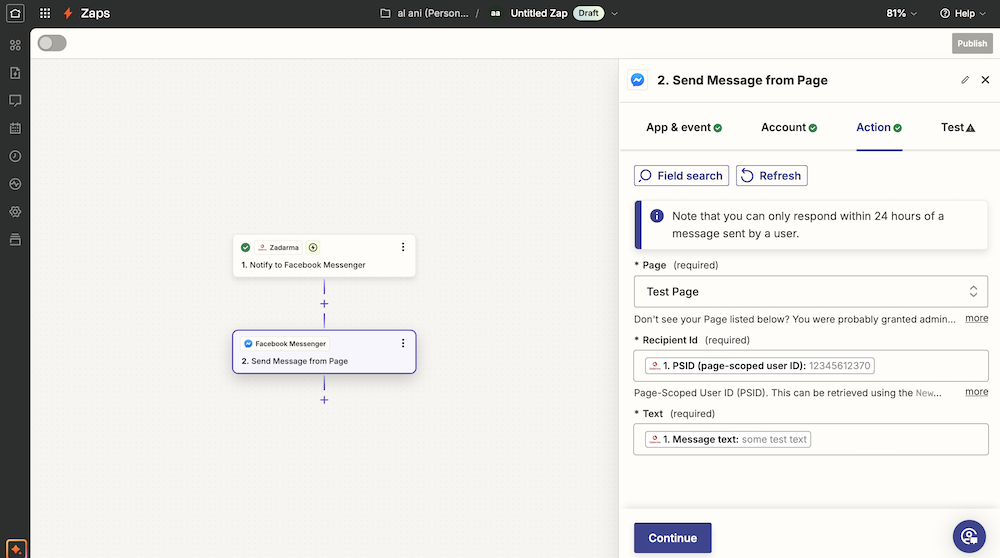
Then click Continue.
In the final tab, Test, click Skip test and then Publish. A message will appear confirming the successful creation of the Zap. You can close this message and proceed to the next setup stage.
Setting up message transfer from Facebook Messenger to Zapier and from Zapier to Teamsale.
3. Create Zaps. In the Trigger section, find and select the Facebook Messenger application.
In the Event field, choose the event that will trigger the action - New Message sent to Page and then click Continue.
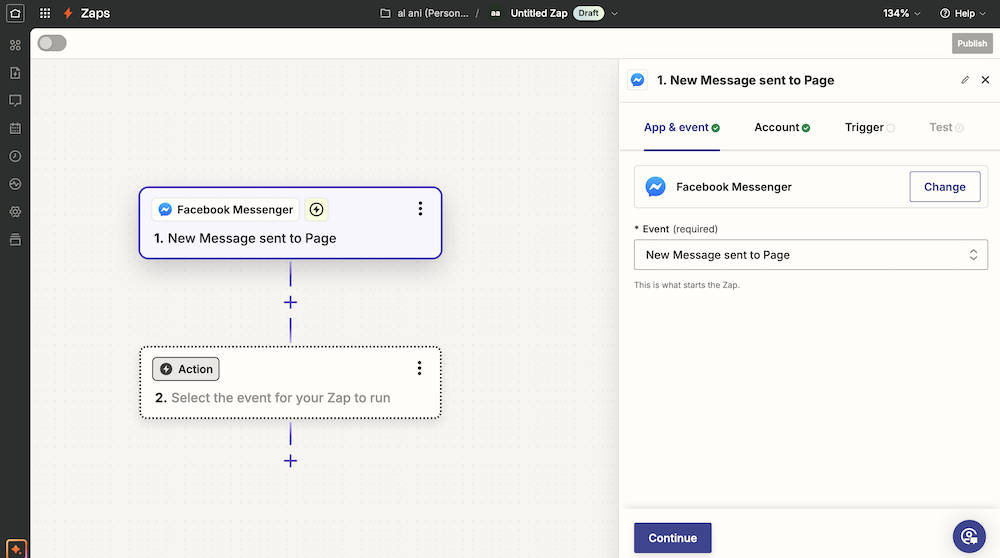
In the Account tab, click Continue. In the Trigger tab, select your Facebook Page from the Page field and click Continue. In the final tab, Test, click Test trigger then Skip test and finally click Continue.
4. In the next window, select Zadarma as the application for the Action block.
In the Event field, choose the action Notify From Facebook Messenger and click Continue.
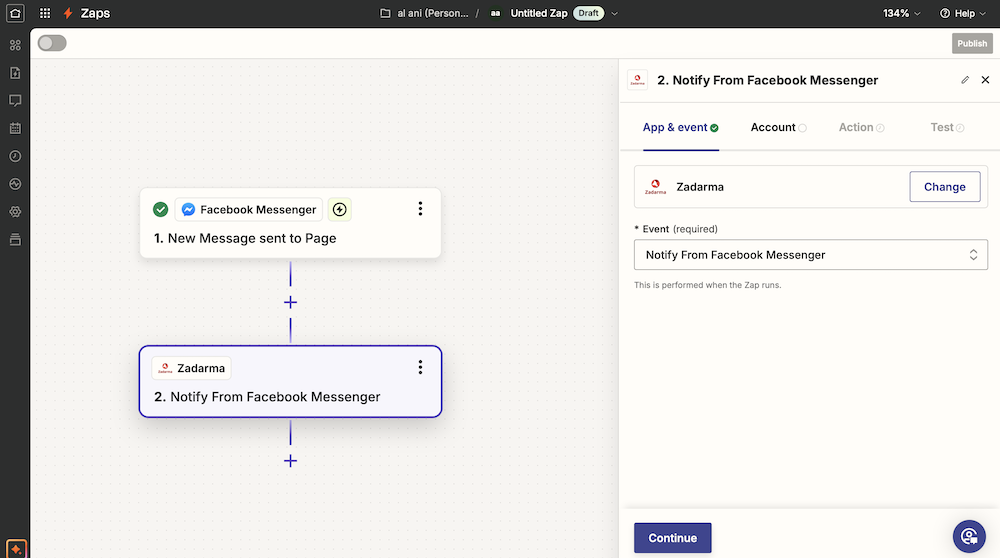
In the Account tab, click Continue. In the Actions tab, select the following values:
Facebook Messenger PSID - Sender Psid
Message text - Message text
Sender full name - Sender Full Name
Time - Time
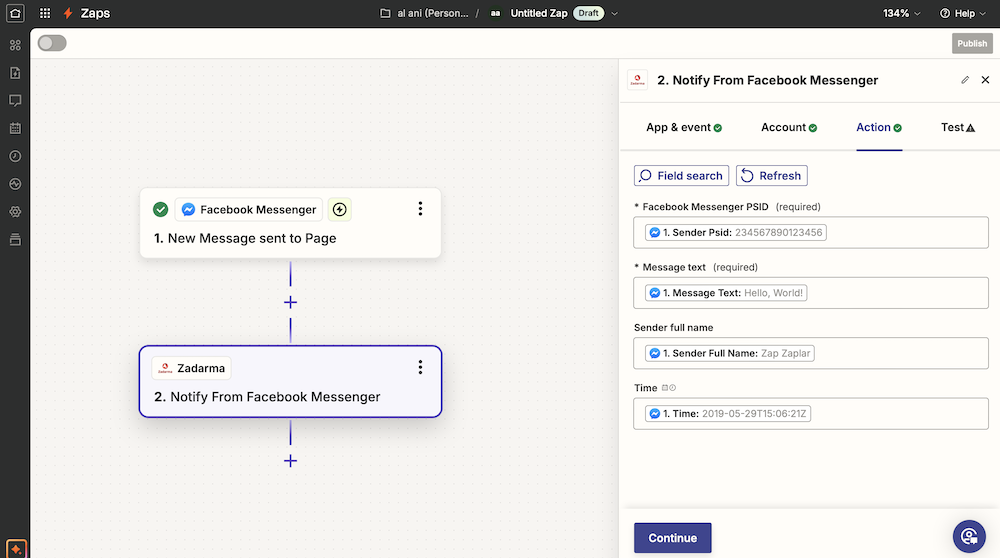
Then click Continue.
In the final tab, Test, click Skip test and then click Publish.
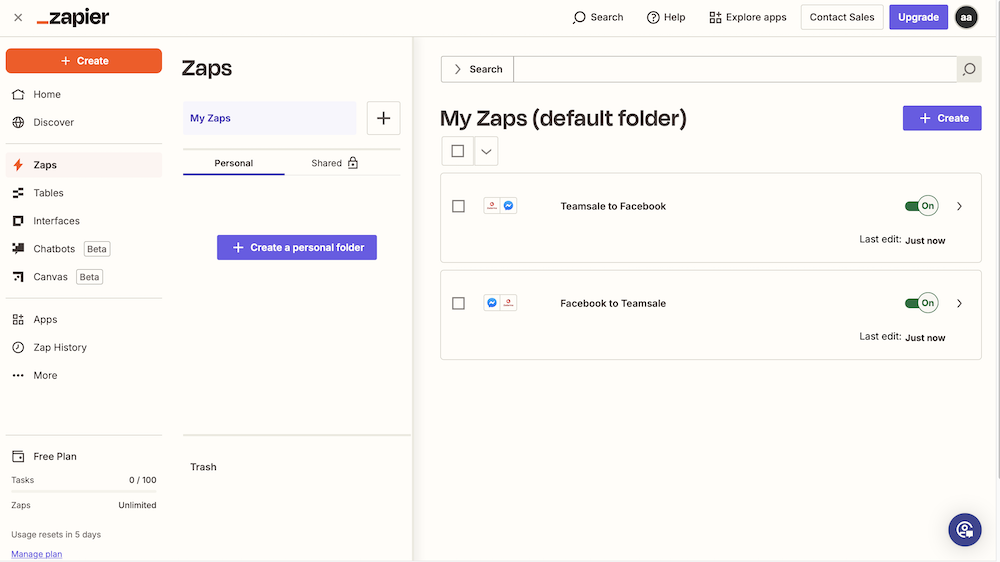
The Zap has been published. Go to the Zaps section, refresh the page, and ensure that both Zaps are created and enabled: one for messages from Teamsale to Facebook, and the other for messages from Facebook to Teamsale. For convenience, you can rename the created Zaps or keep the default names.
Setup is complete.
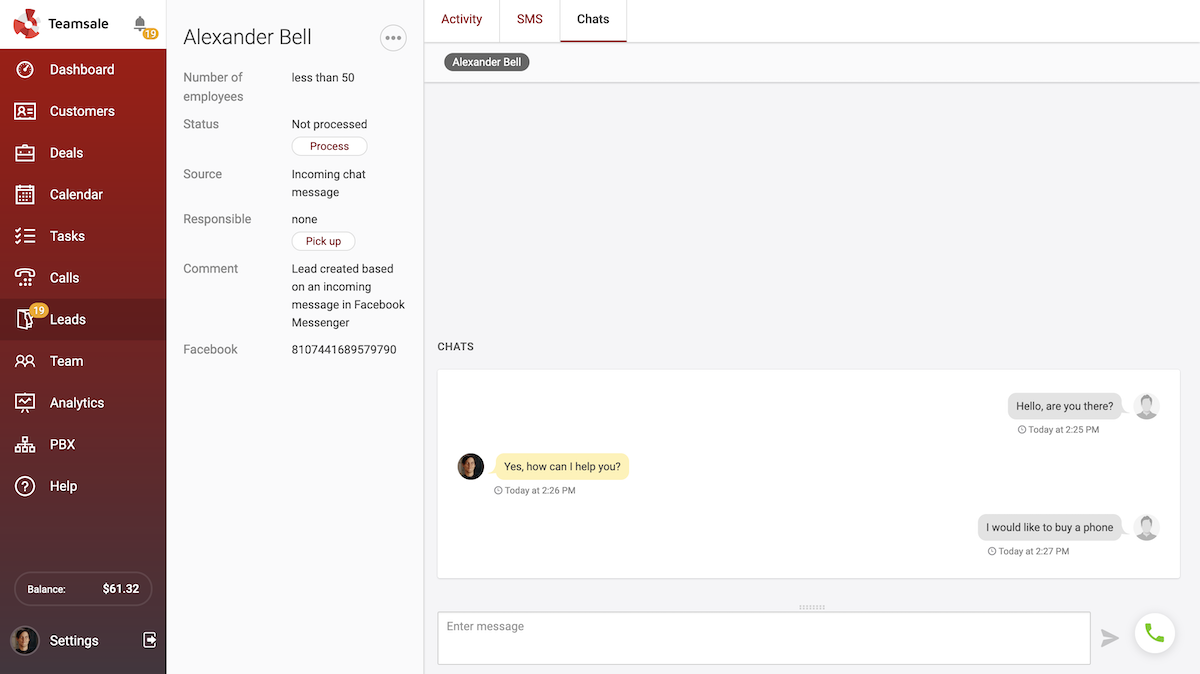
When a visitor to your Facebook Page sends you a message, a lead will be created in Teamsale under the Raw section. Any Teamsale user can then take ownership of the lead and continue the conversation with the client directly from the lead's card, in the Chats tab. You can also receive notifications about new messages in the notification center in the top left corner of the page.
Integration with Gmail: Sending an email about a missed call in the PBX ▾
1. In your Zadarma account, go to **Settings - Integrations and API**, select the integration with Zapier, and click the **Enable** button.
2. Copy the API Token by clicking the **Copy** button, you'll need it for the integration with Zapier.
3. Log in to your account at https://zapier.com/ and go to the Dashboard. Click the “Create Zap+” button.
4. In the search bar, type **Zadarma** and then select the application from the results.
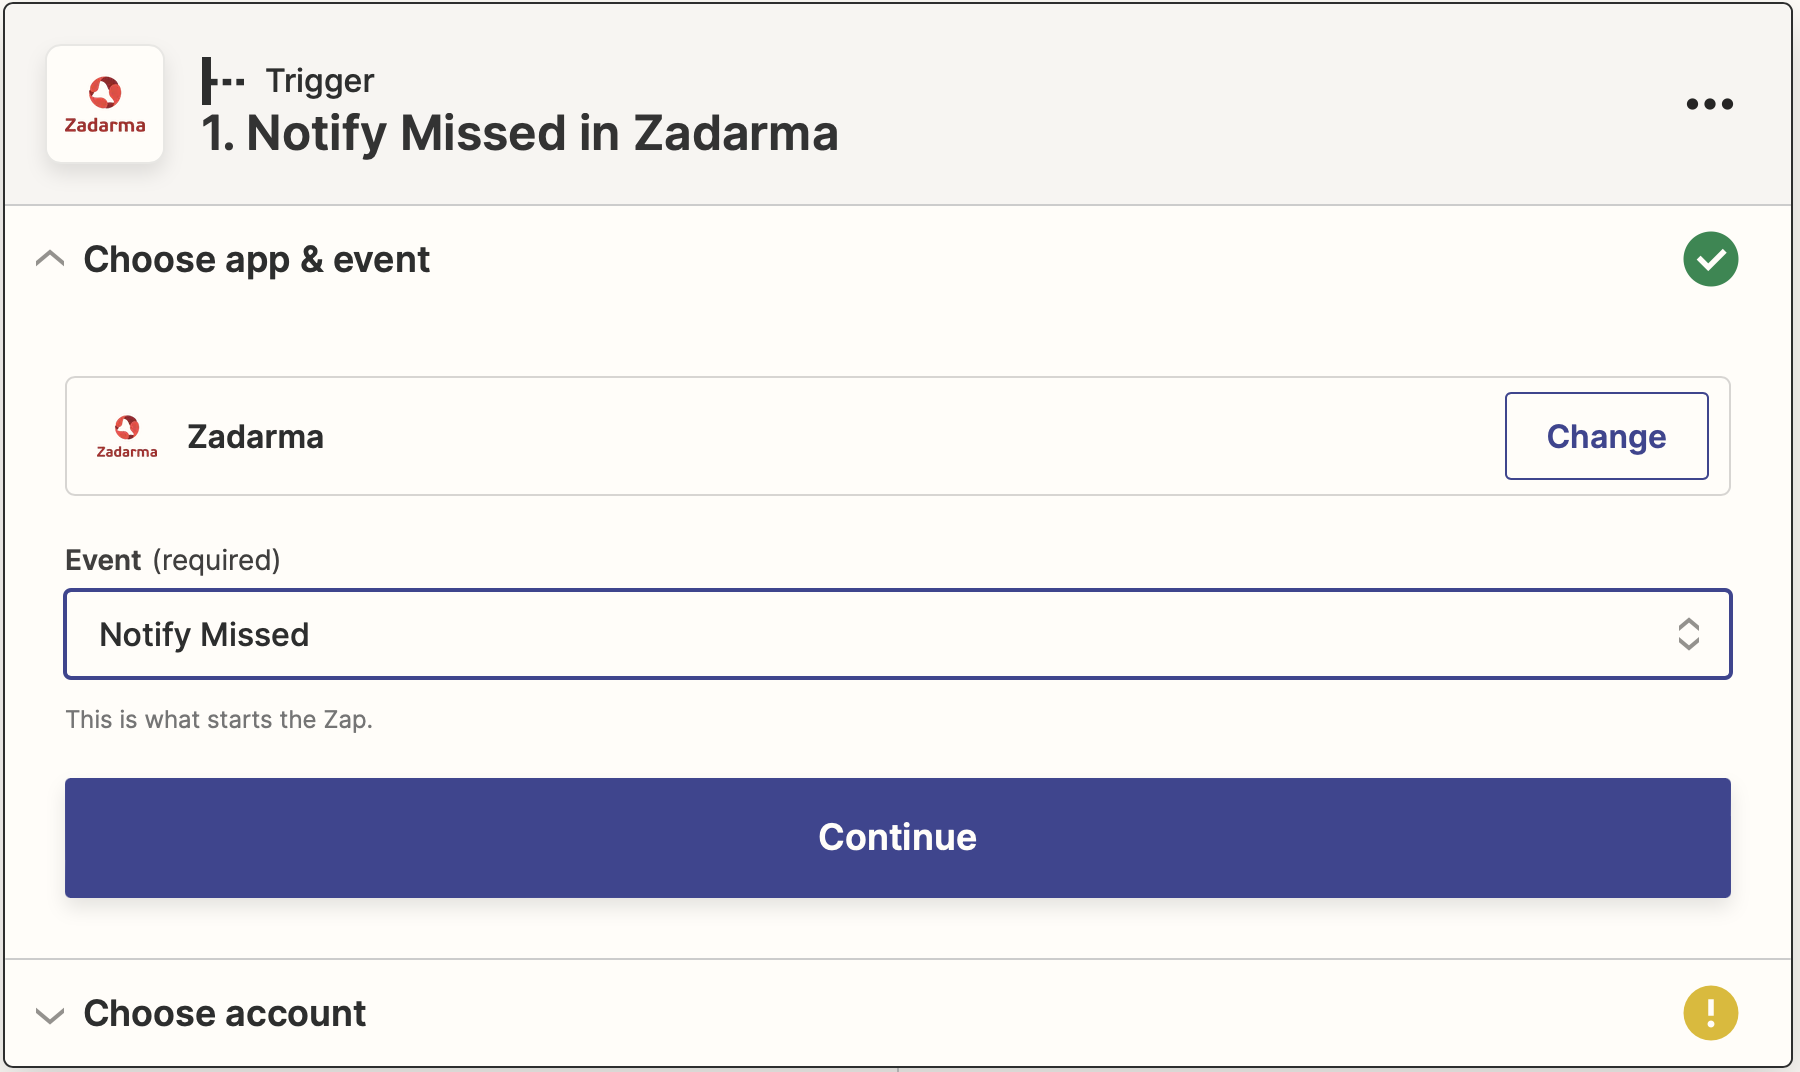
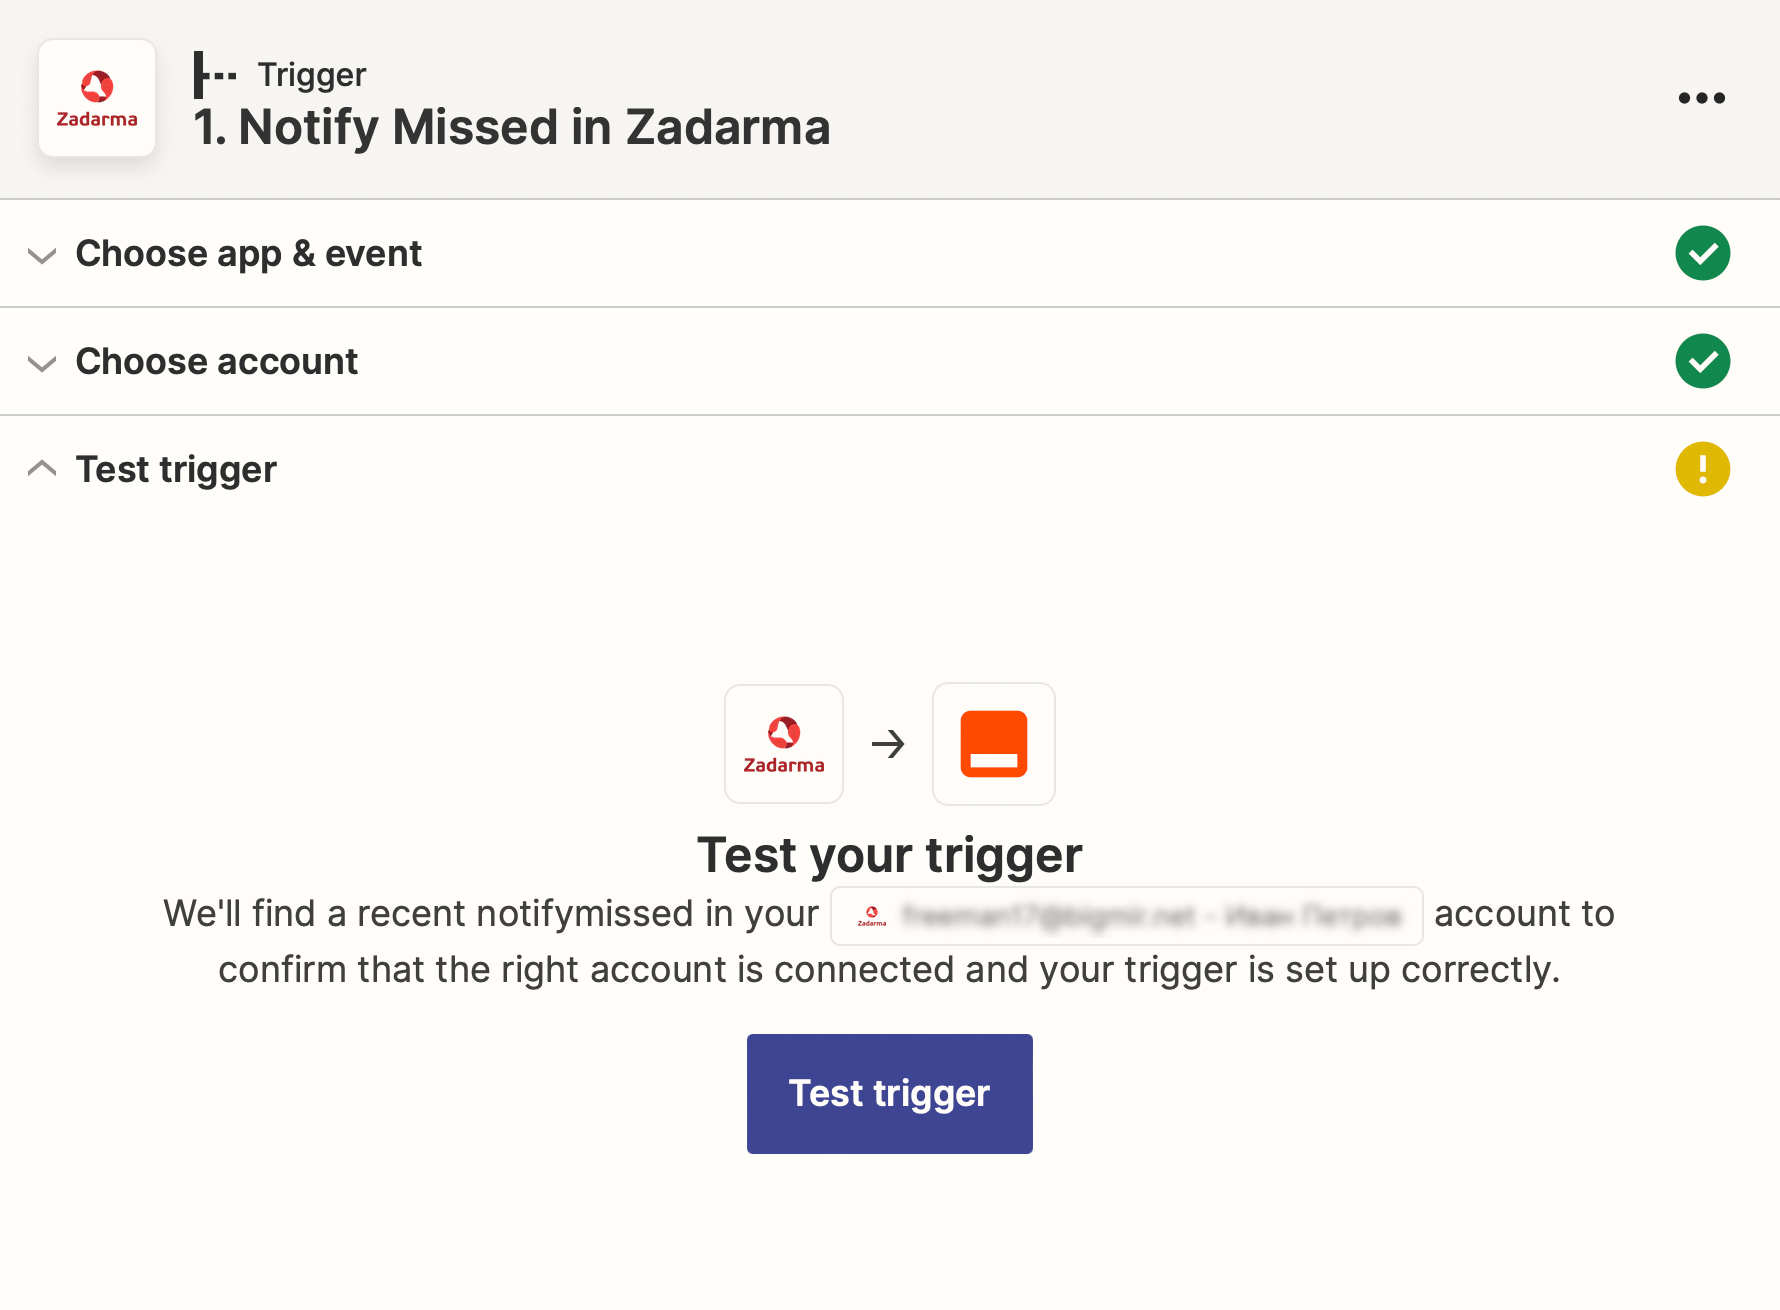
5. In the settings, select the event that will trigger the action, such as Notify Missed (notification of a missed incoming call in the Cloud PBX).
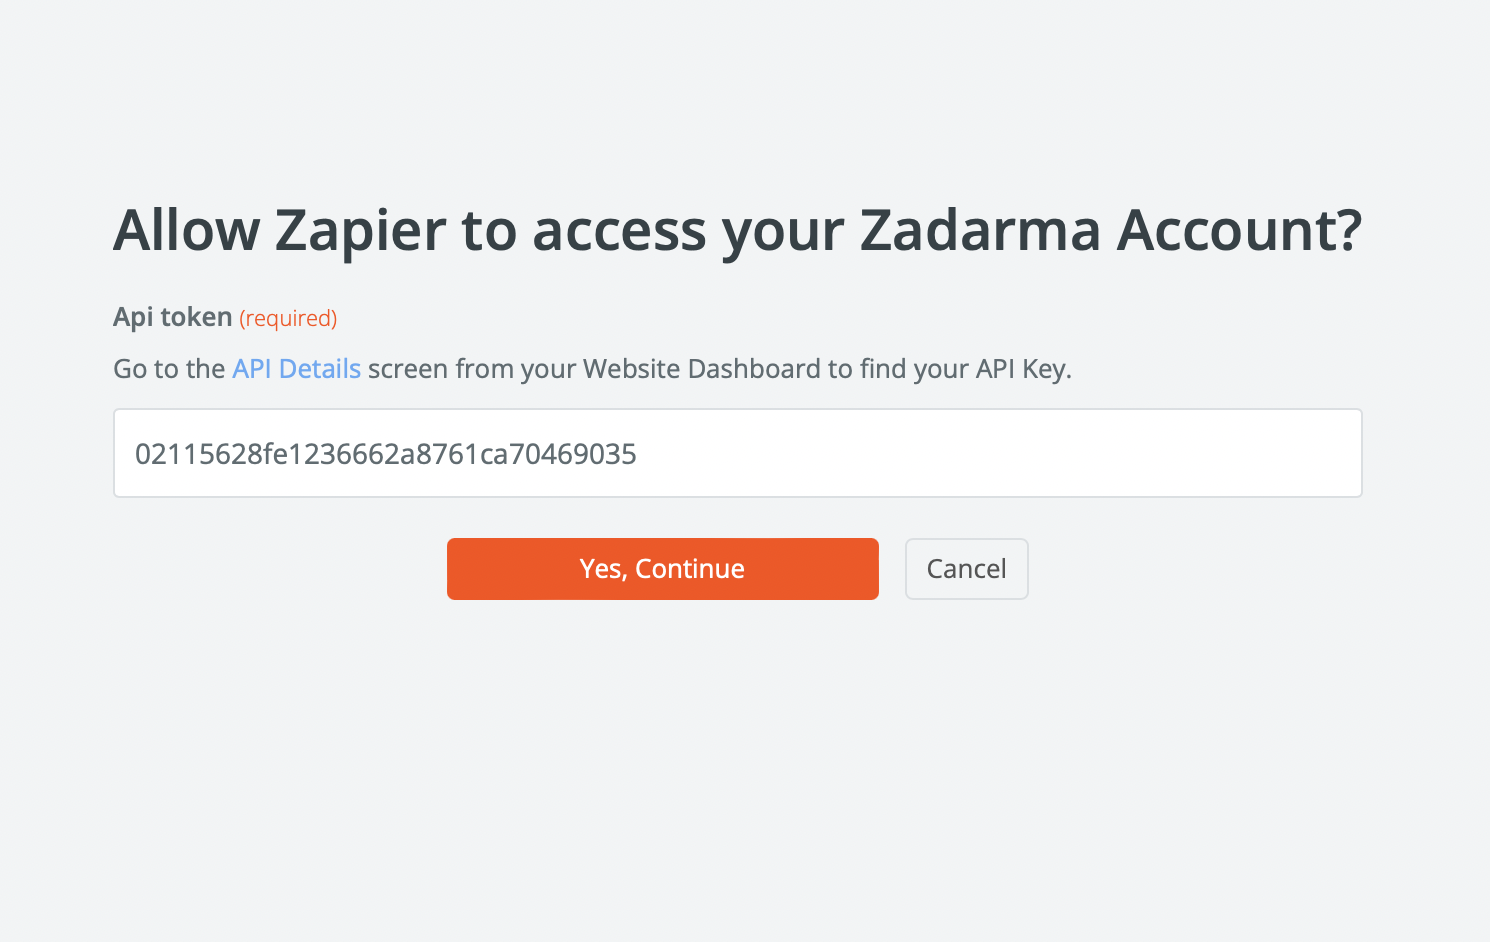
6. In the next step, add your account by clicking the Sign in button. Enter the API Token you copied from your Zadarma account in the step two and click Yes.
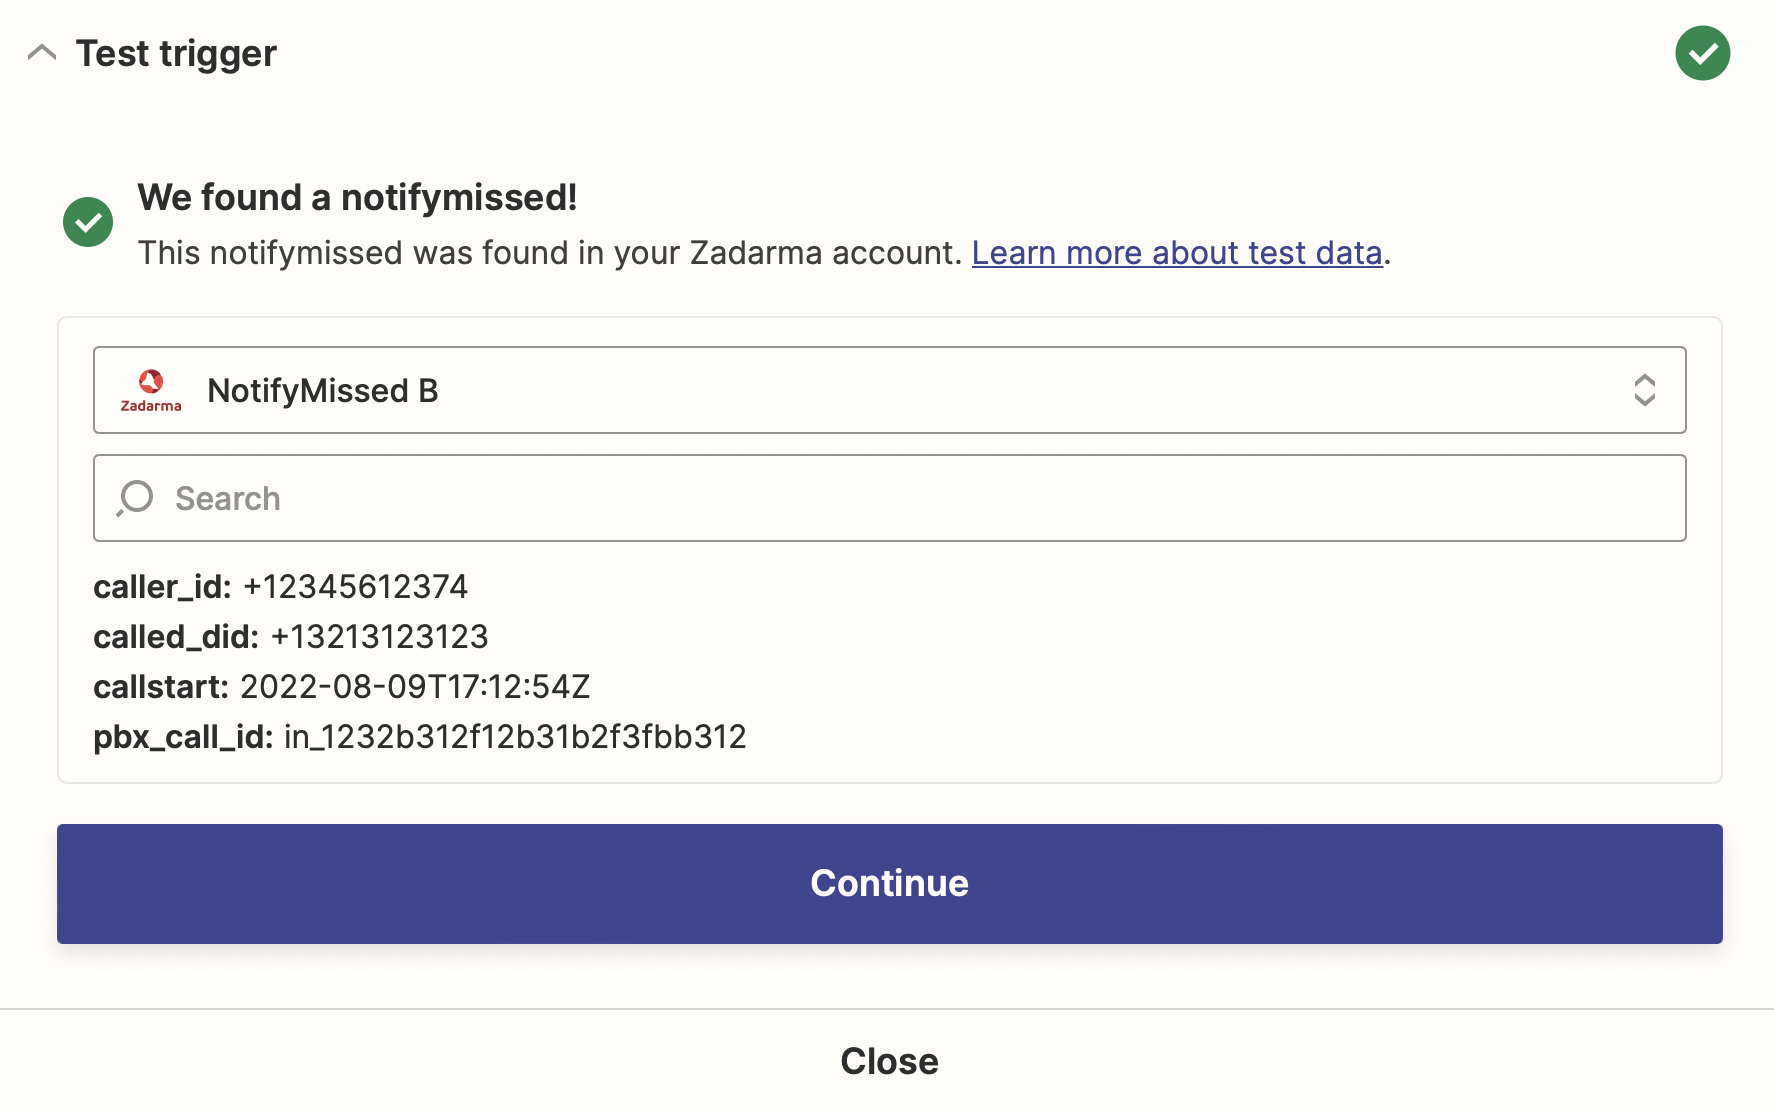
7. On this page, click Test trigger
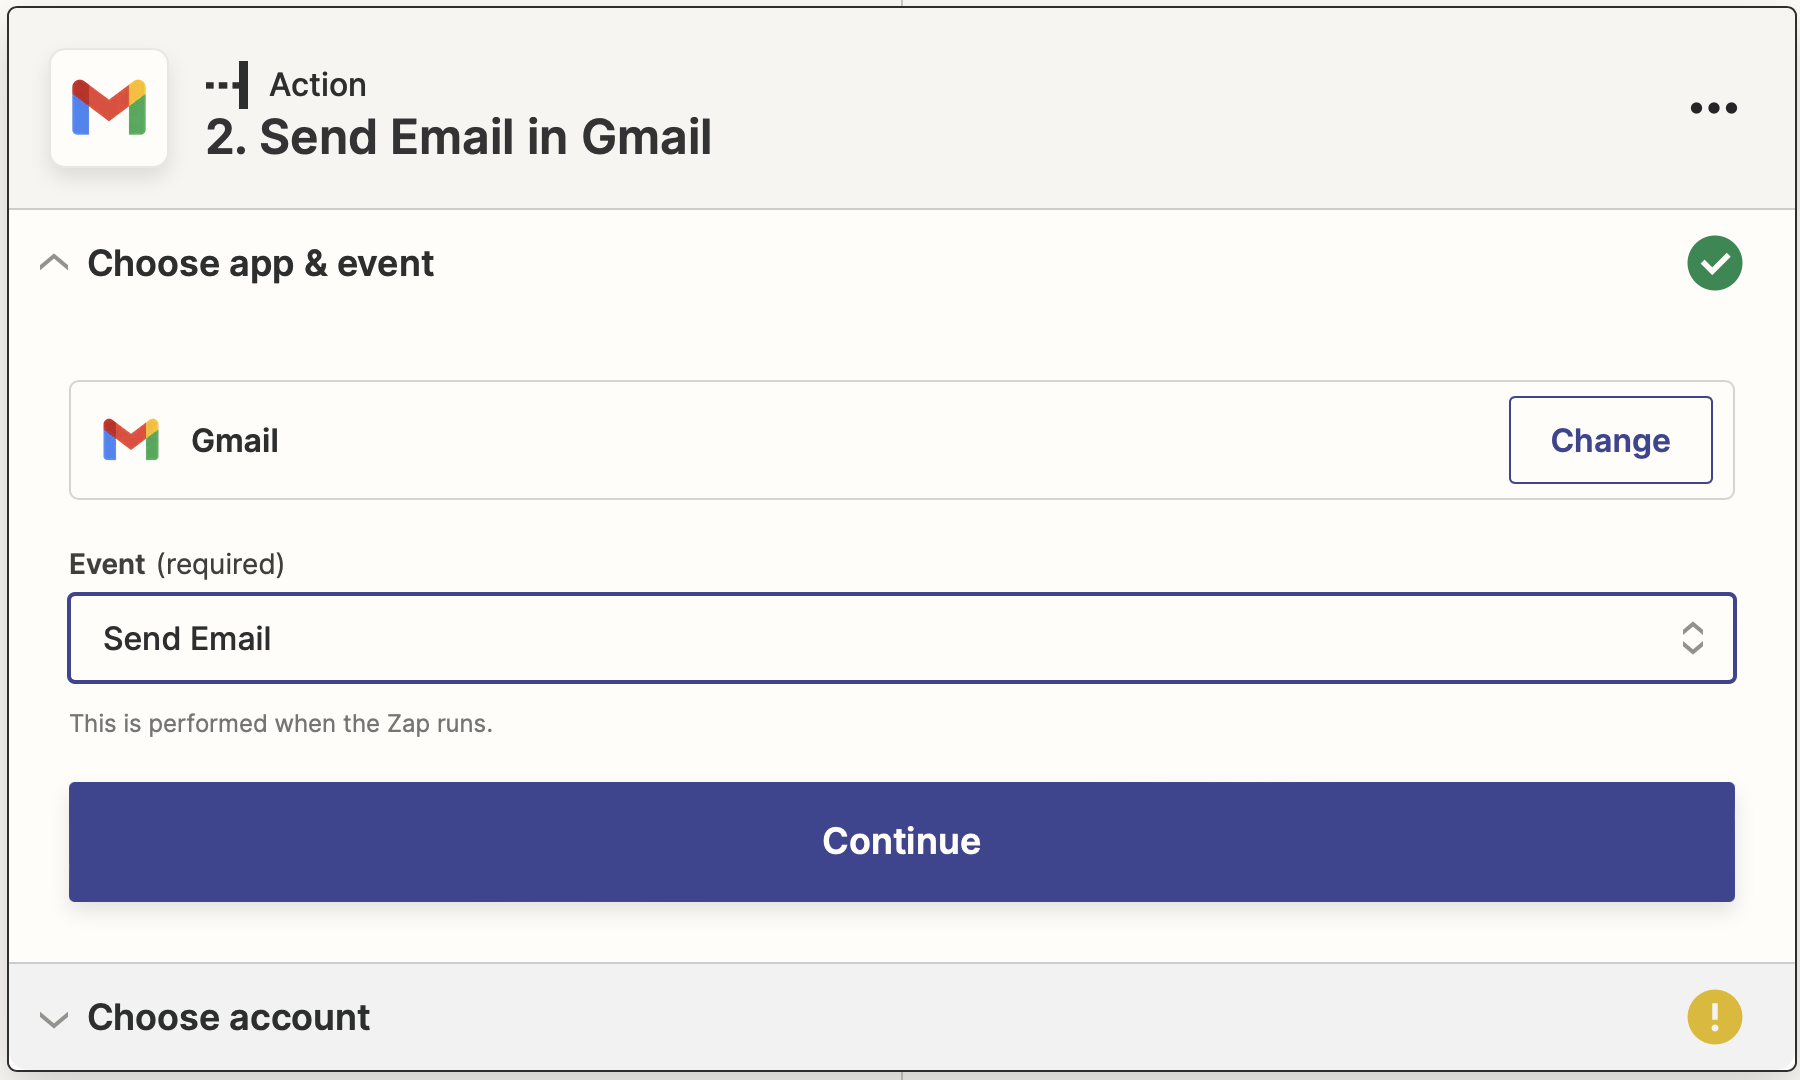
8. In the Actions section, select the application that will be used after receiving the notification from the Cloud PBX, for example, choose Gmail and the action Send Email.
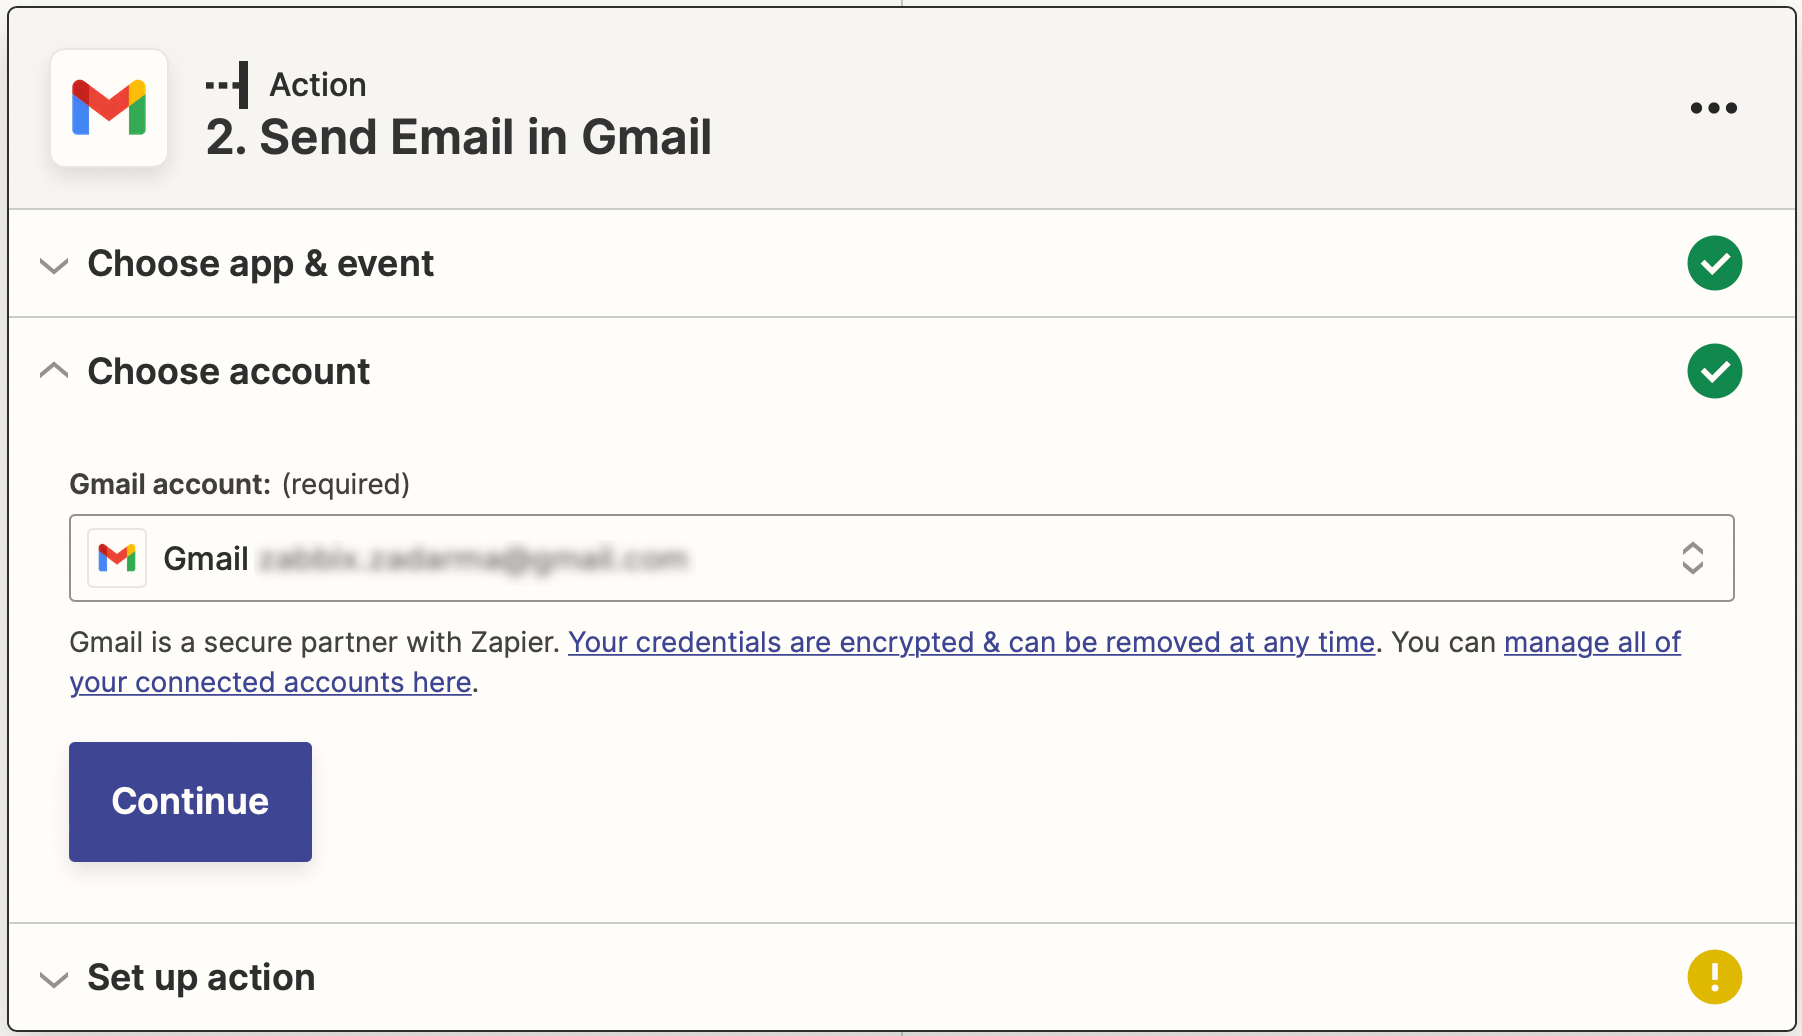
9. On the next page, sign in to your Gmail account from which the email will be sent and click Continue.
10. Enter the email address to which the emails will be sent, the subject of the email, the content, and any other necessary email parameters.
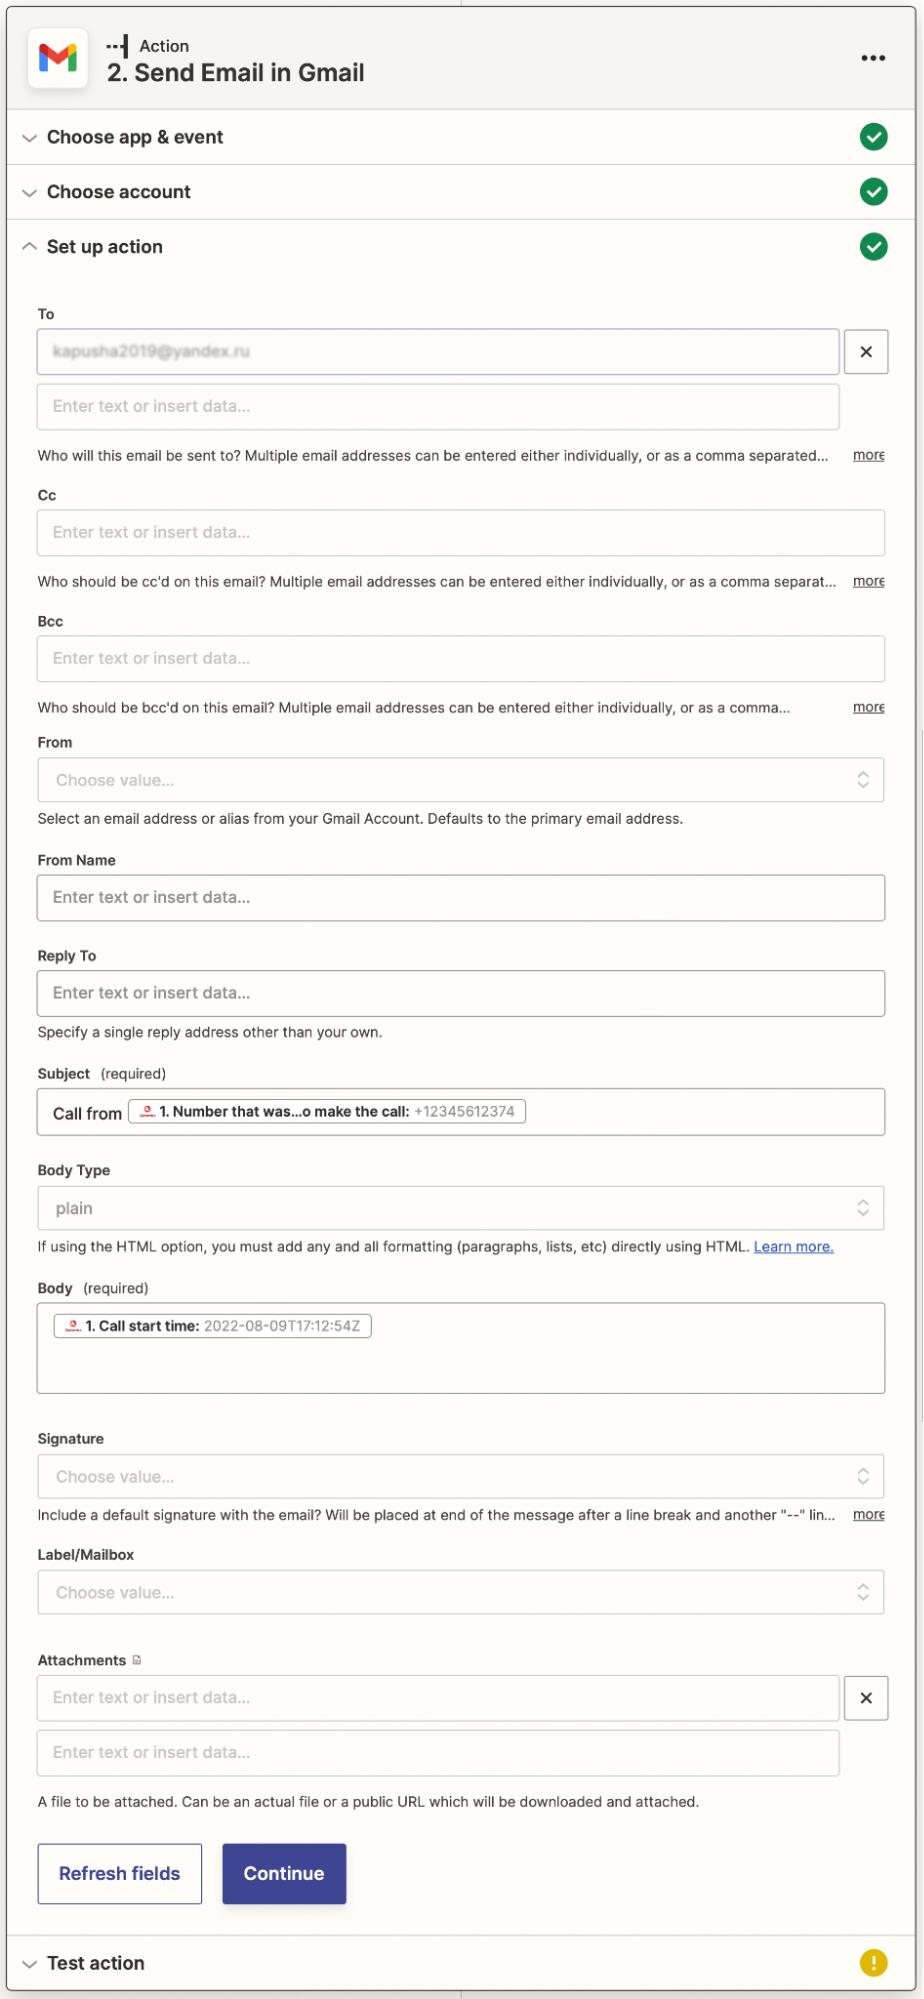
11. To test the trigger, click Test & Continue. Then, click Publish Zap
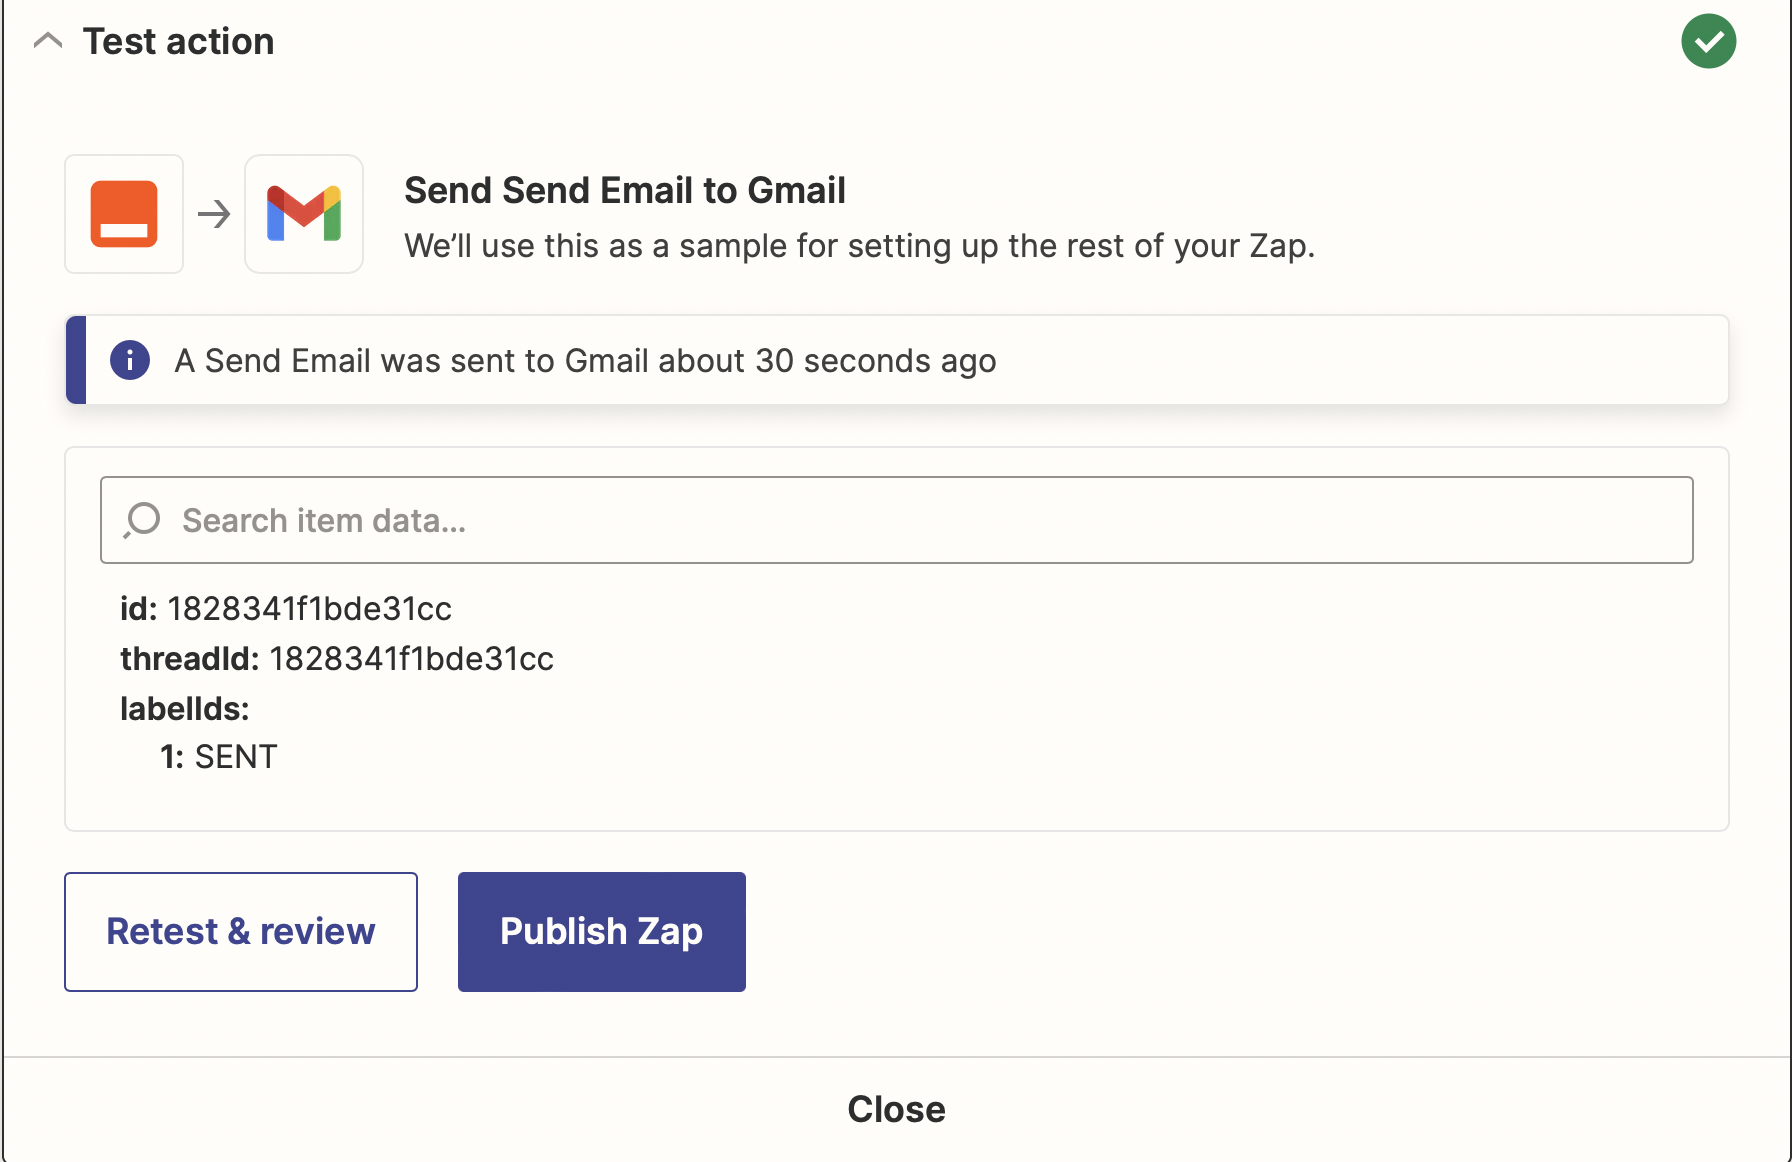
Setup is complete. A missed incoming call in the virtual PBX will trigger an action to send an email to the specified address. You can also configure any other action in Gmail or one of the other 5,000 available applications, such as Google Calendar, Microsoft Teams, Slack, Facebook Messenger, Twitter, Discord, and more. A complete list of applications is available here: https://zapier.com/apps
Sending SMS from Zapier ▾
In Zapier, the Zadarma app now includes a Send SMS action. The trigger for this action can be any event in an external system, such as filling out a form in Google Forms.
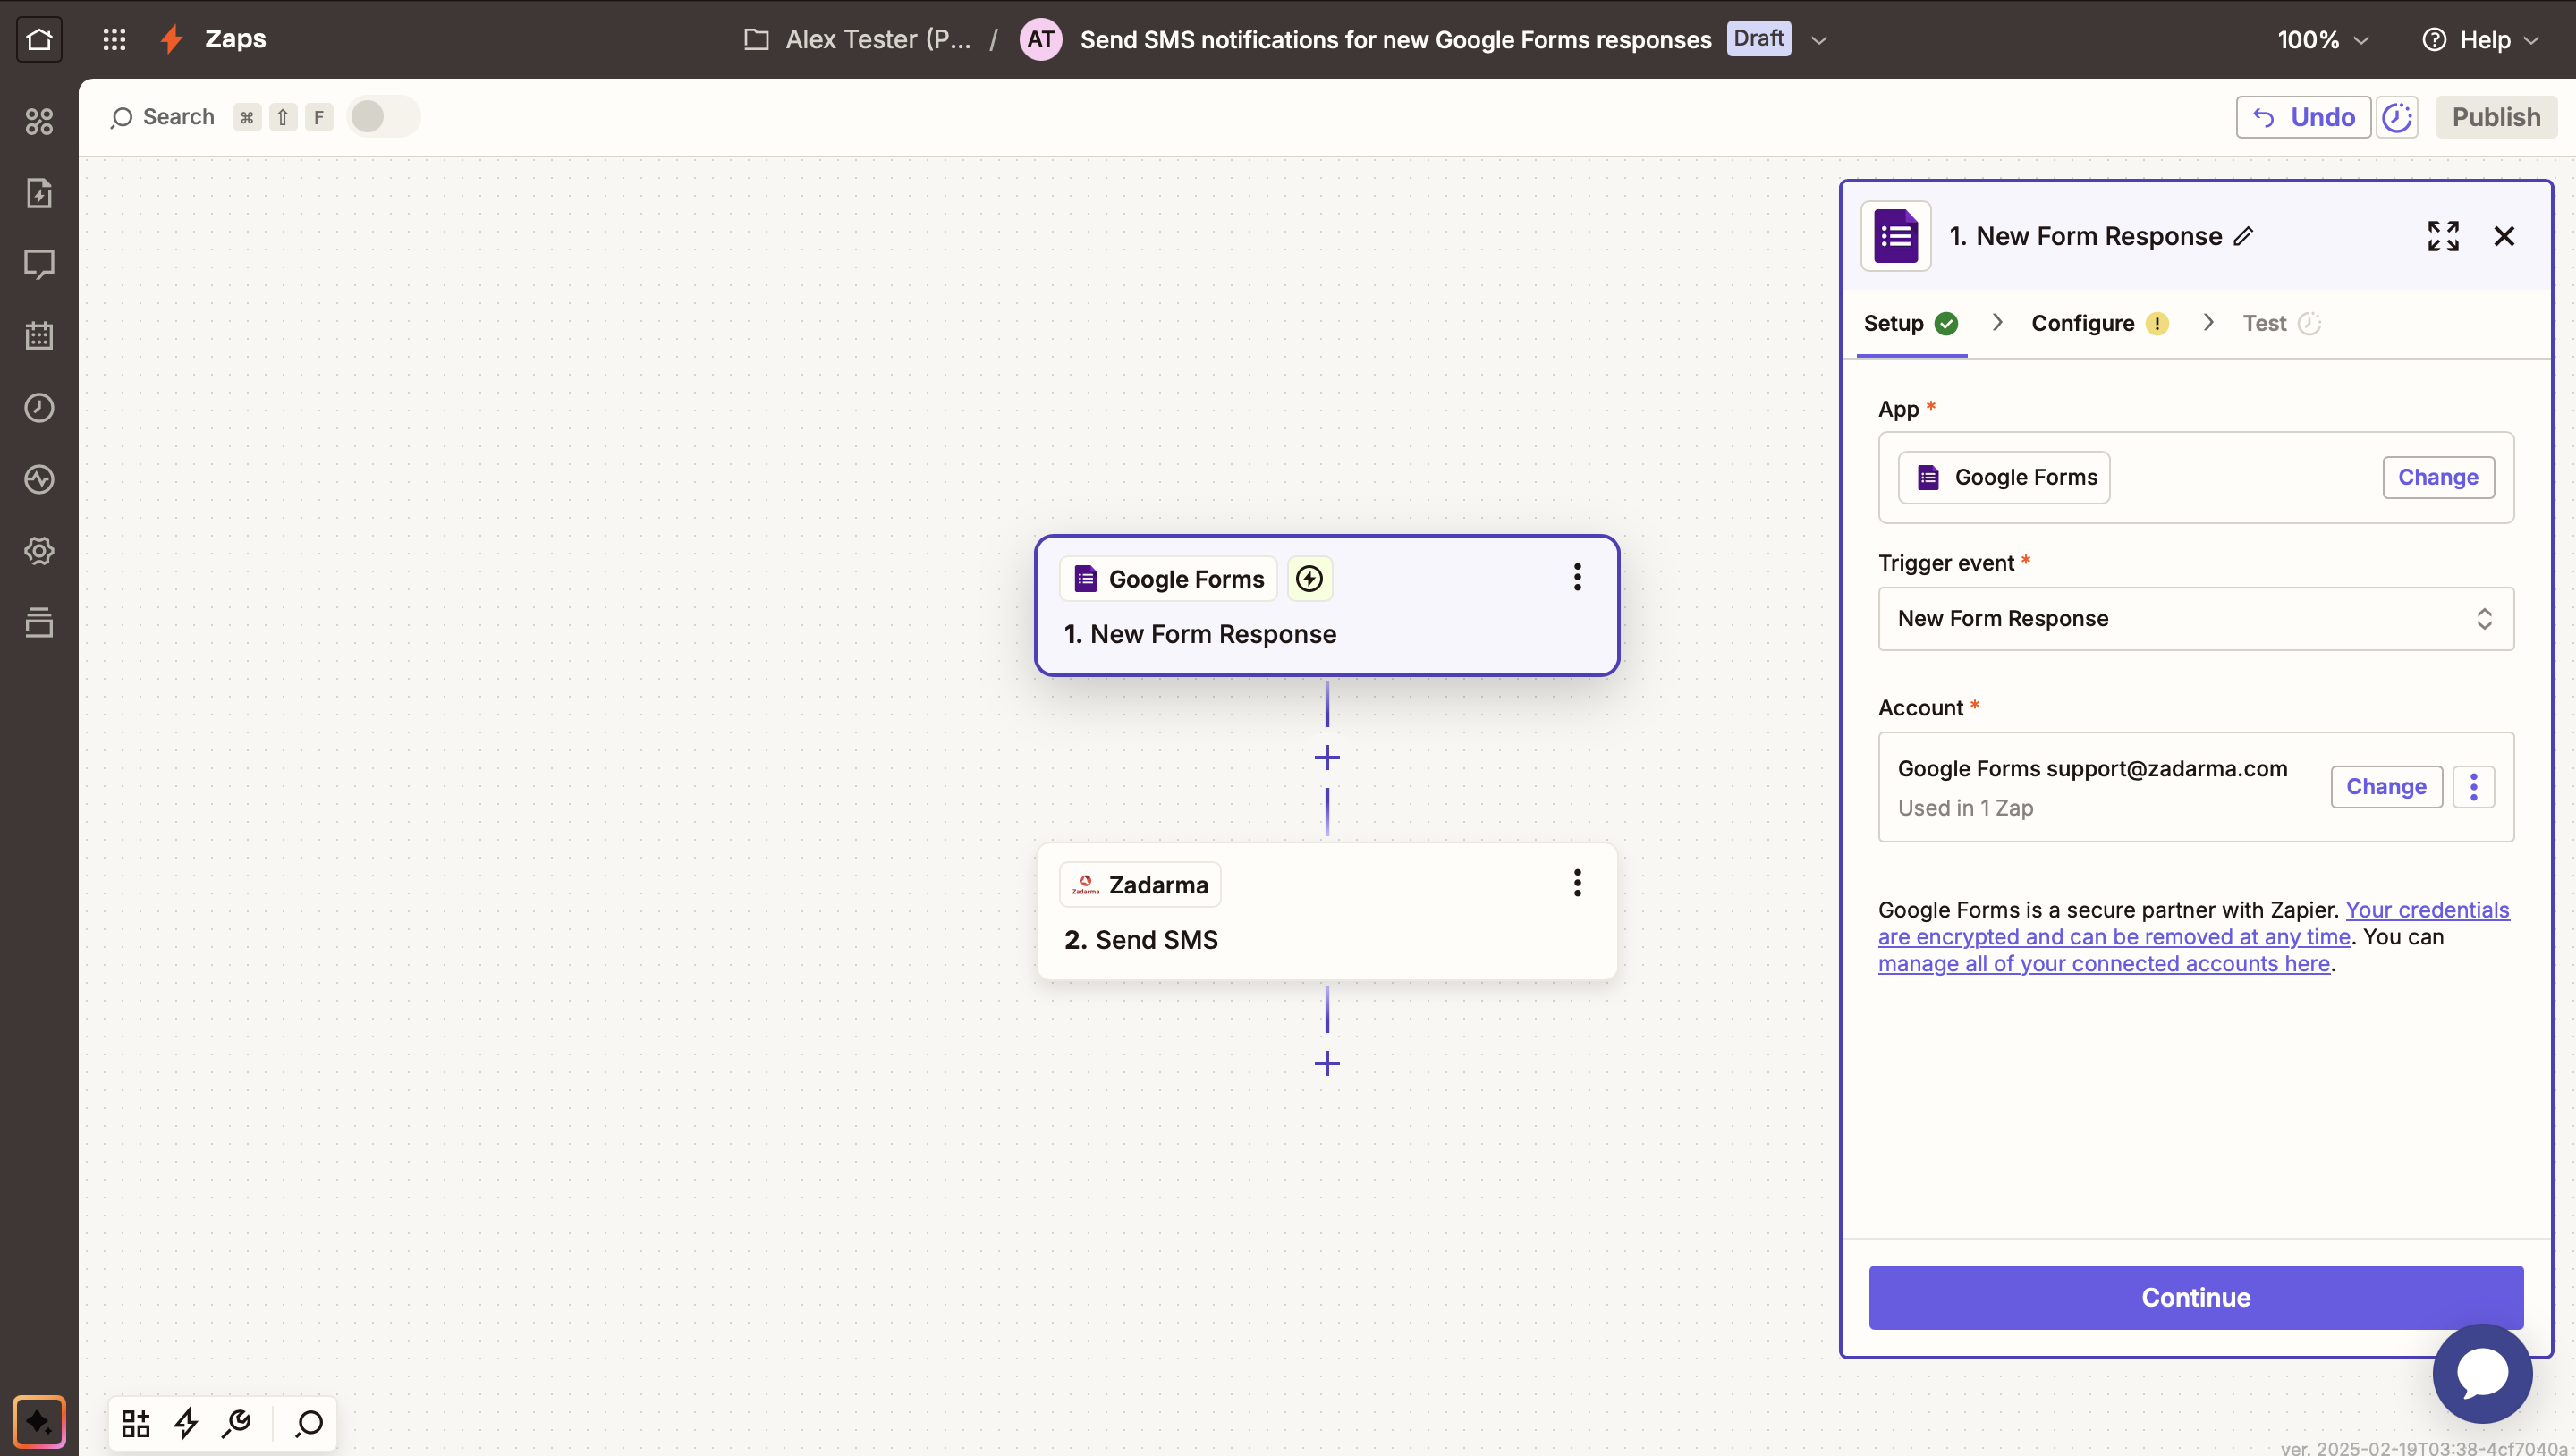
1. Log in to your Zapier account and select Create Zaps. In the Trigger block, you need to find and select the Google Forms app.
In the Trigger event field, select the event that will activate the trigger — New Form Response. In the Account field, sign in to your Google account, then click Continue.
On the second tab, Configure, in the Form field, select the name of your Google Form, then click Continue.
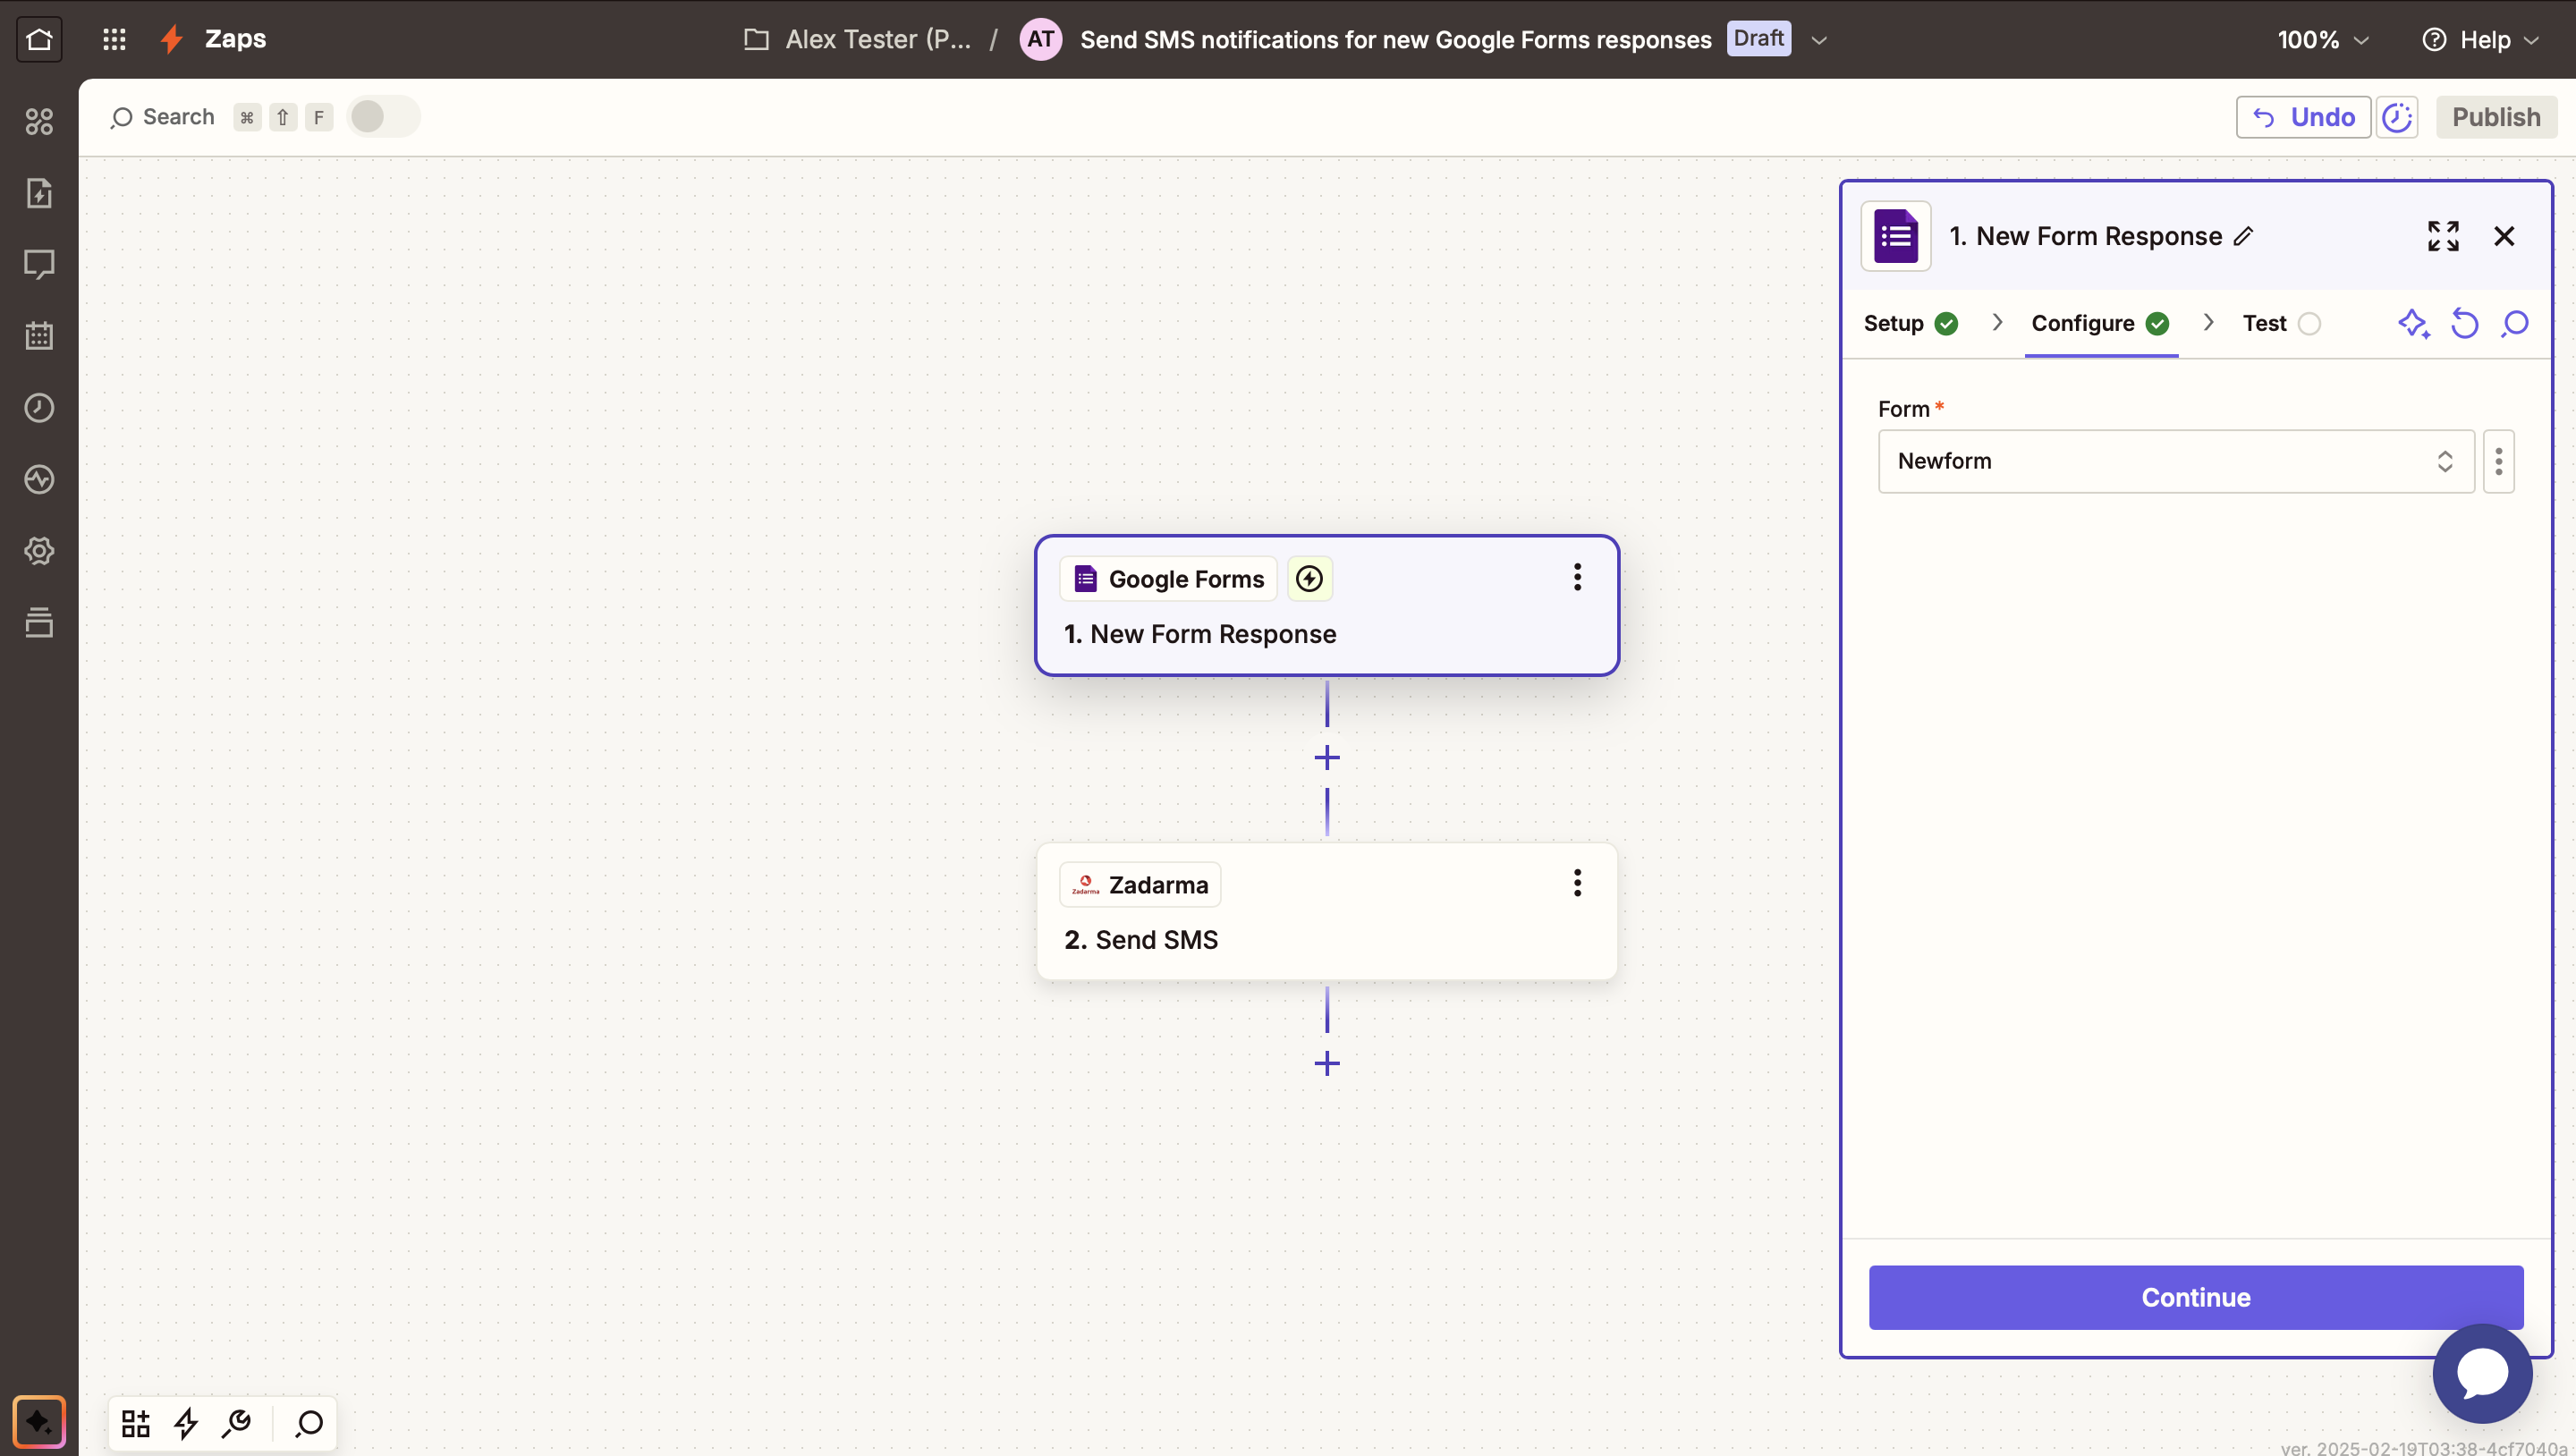
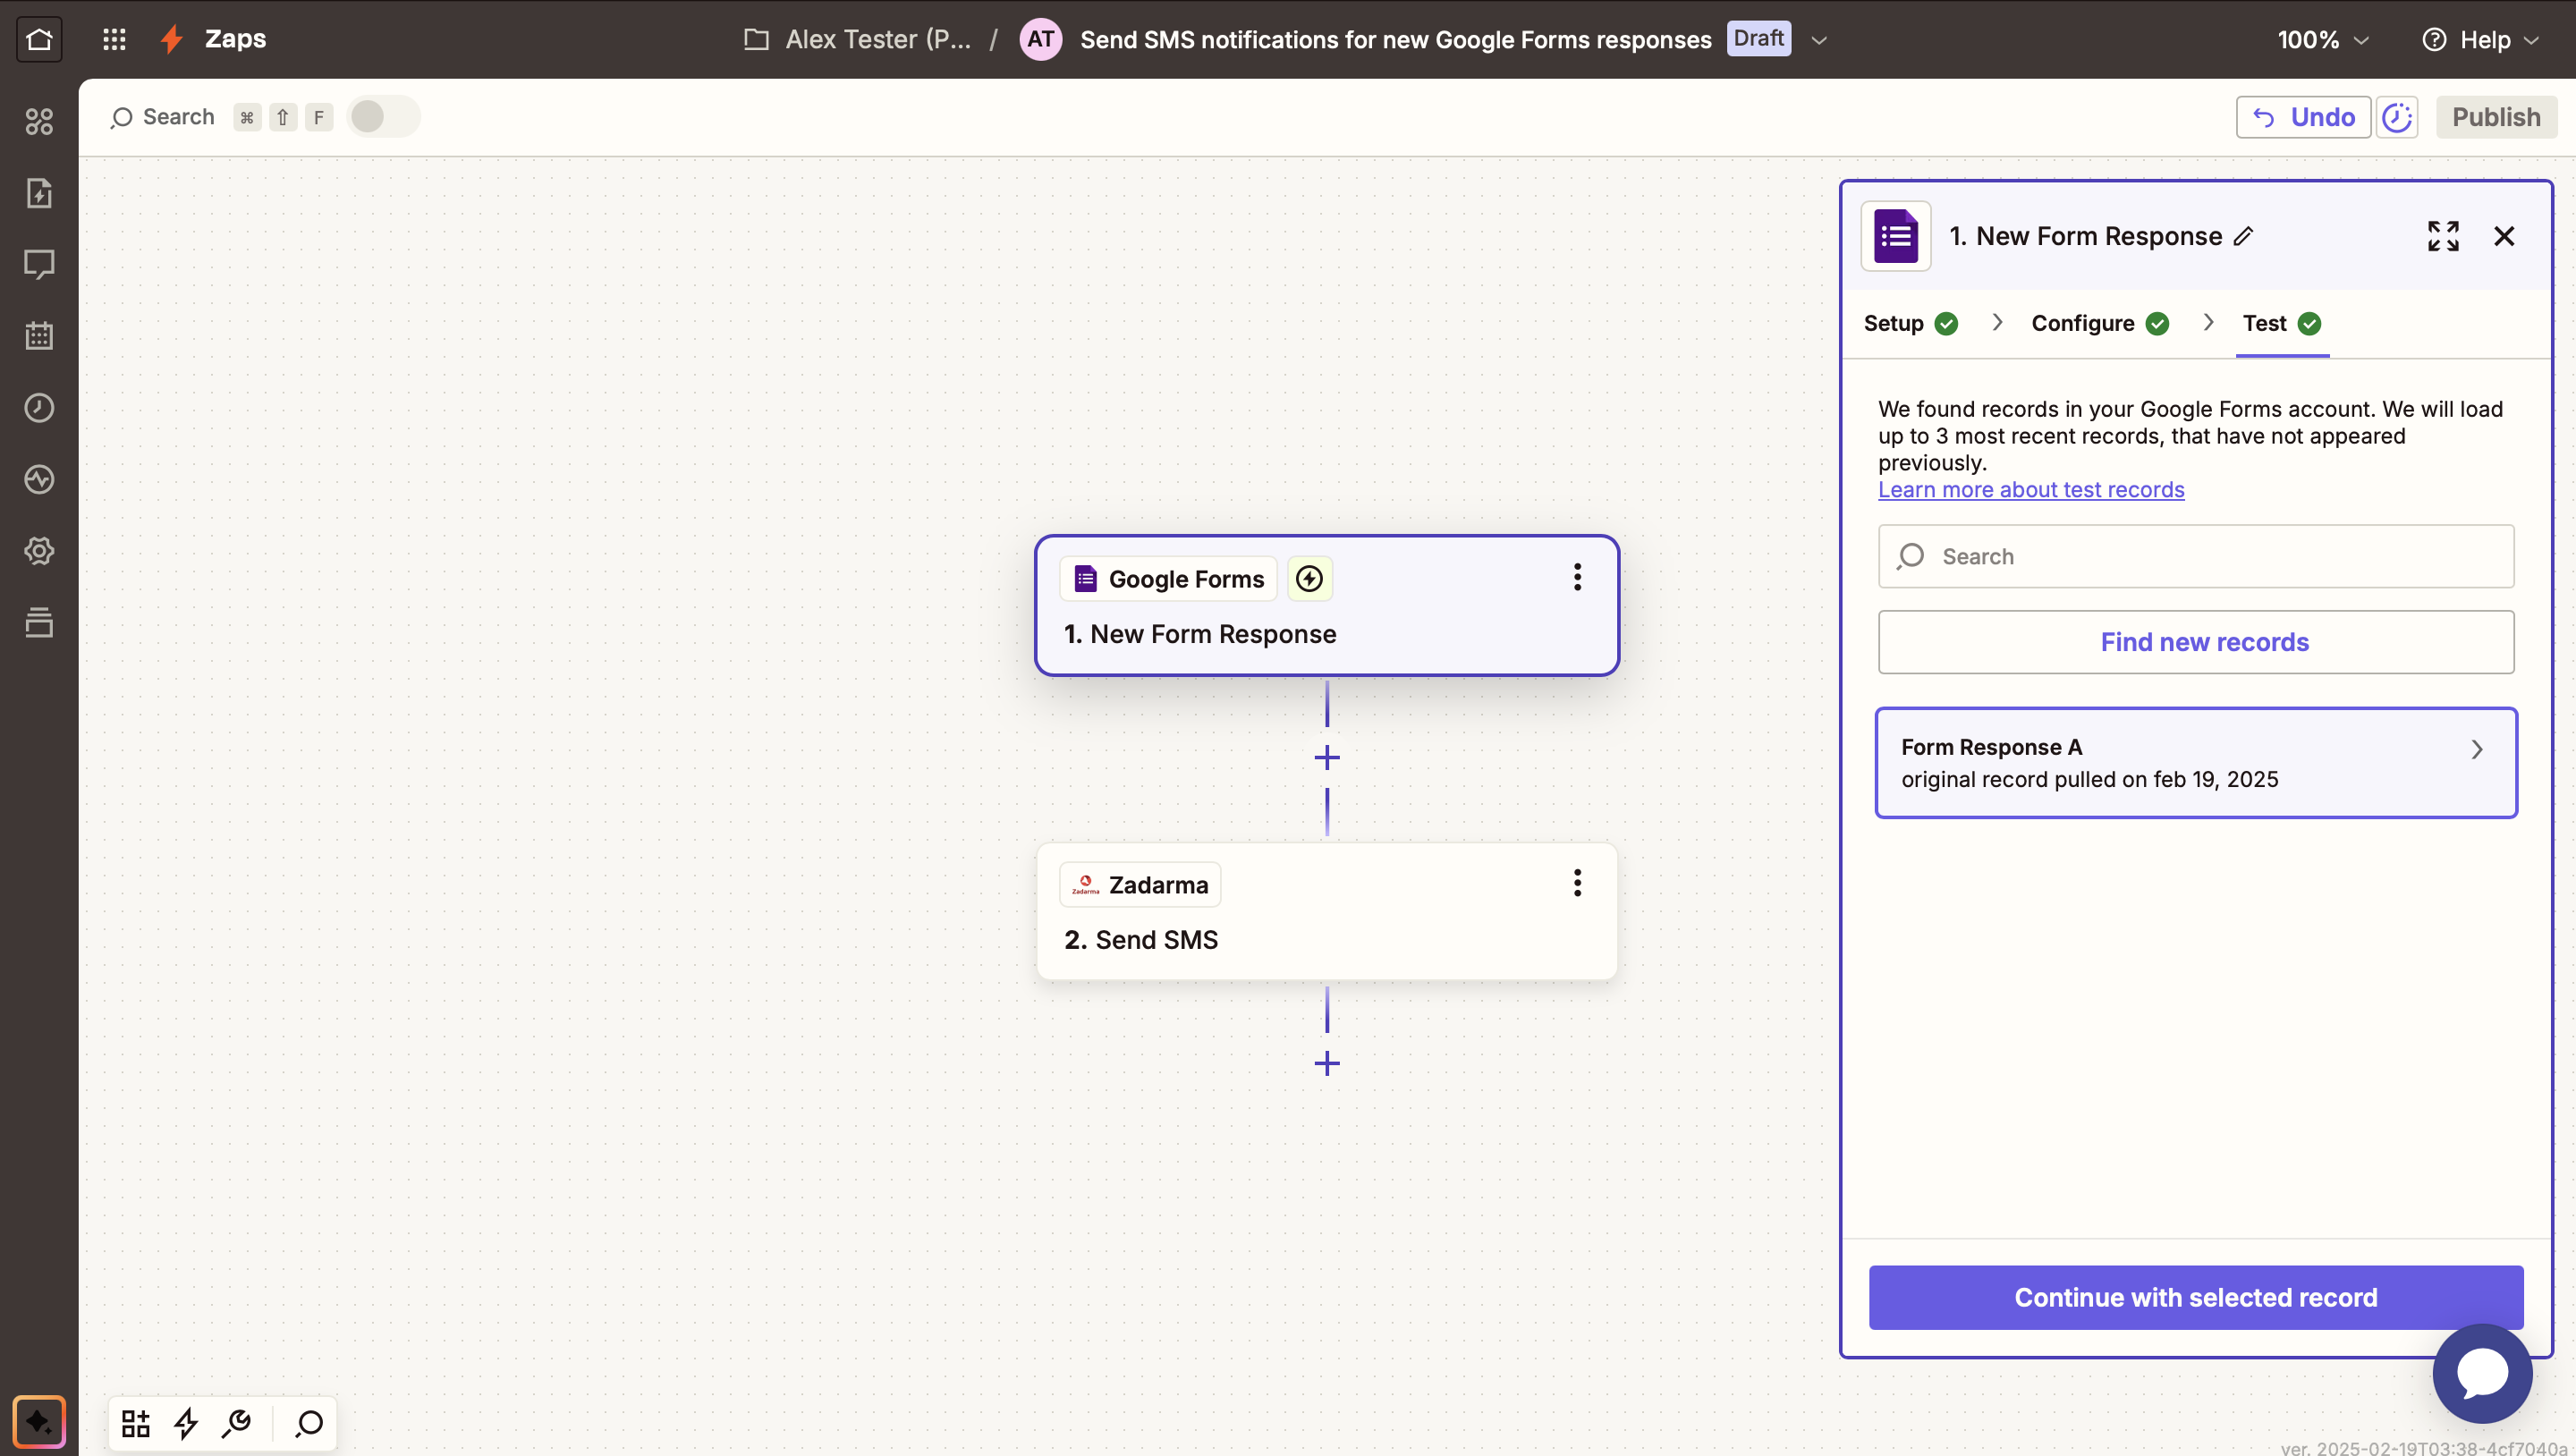
On the third tab, click Test trigger.
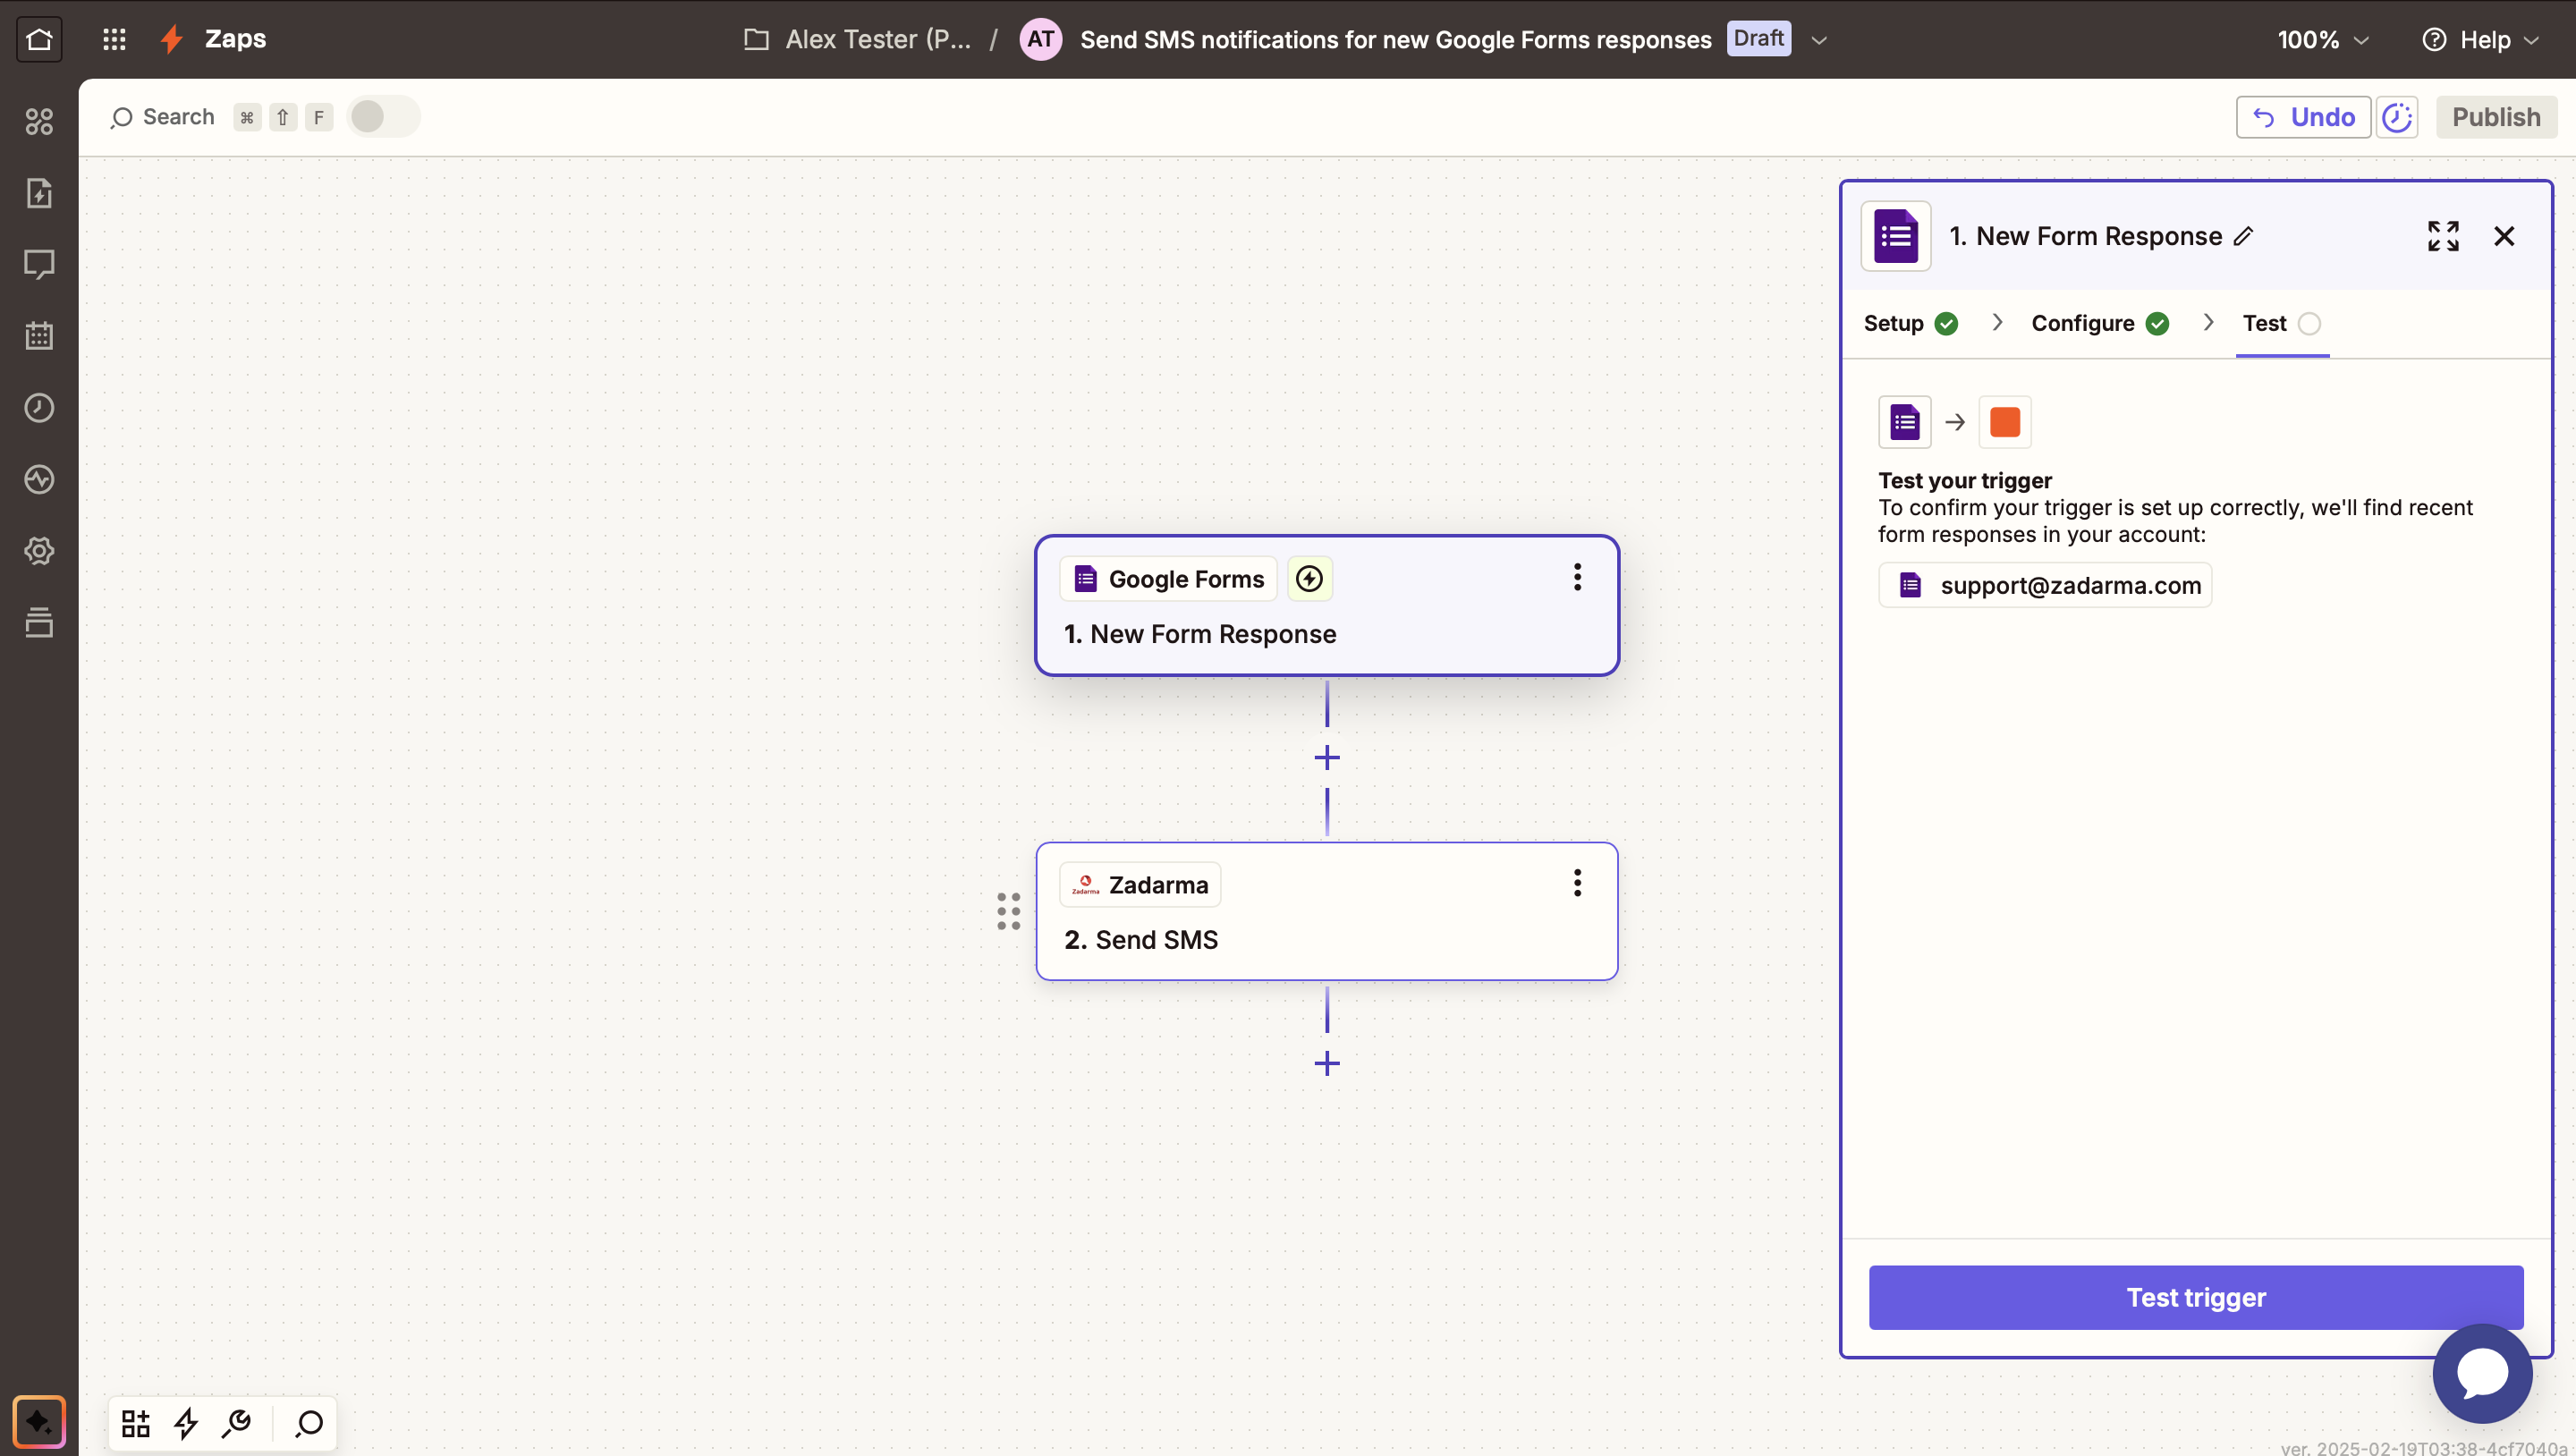
Click Continue with selected record.
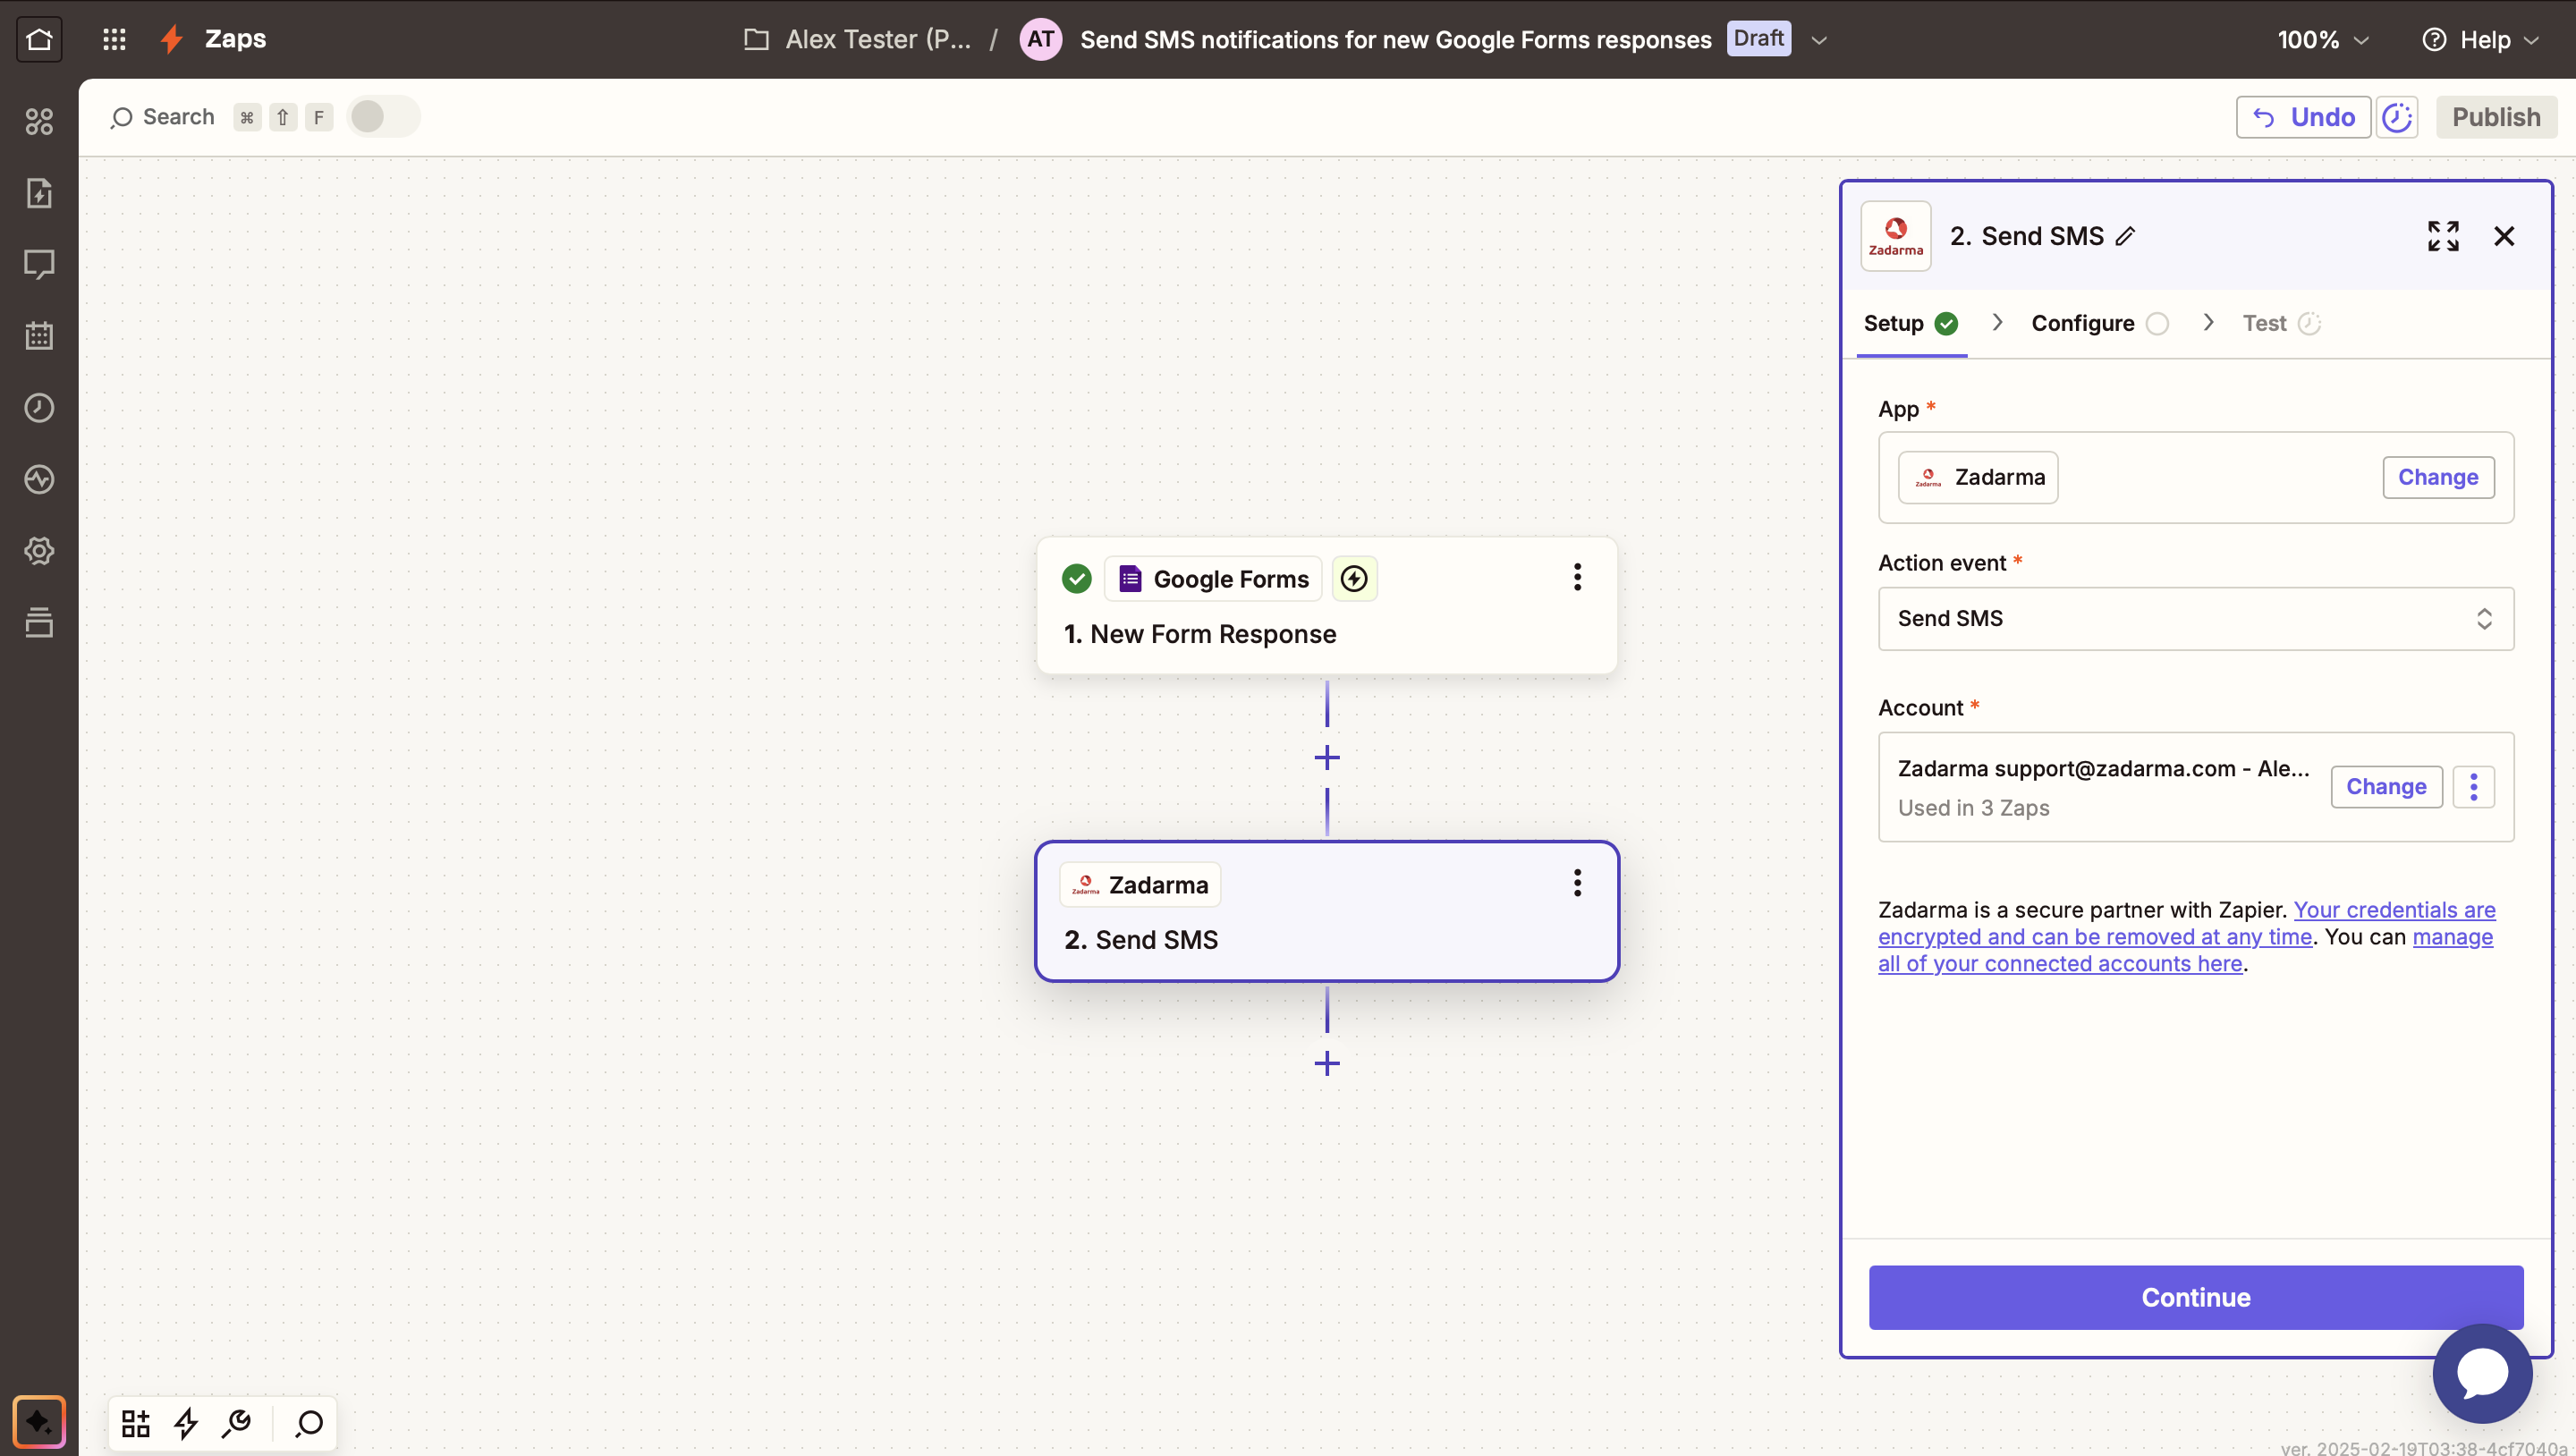
2. In the field Action event select Send SMS. In the Account field you need to sign in to your Zadarma account, then click Continue.
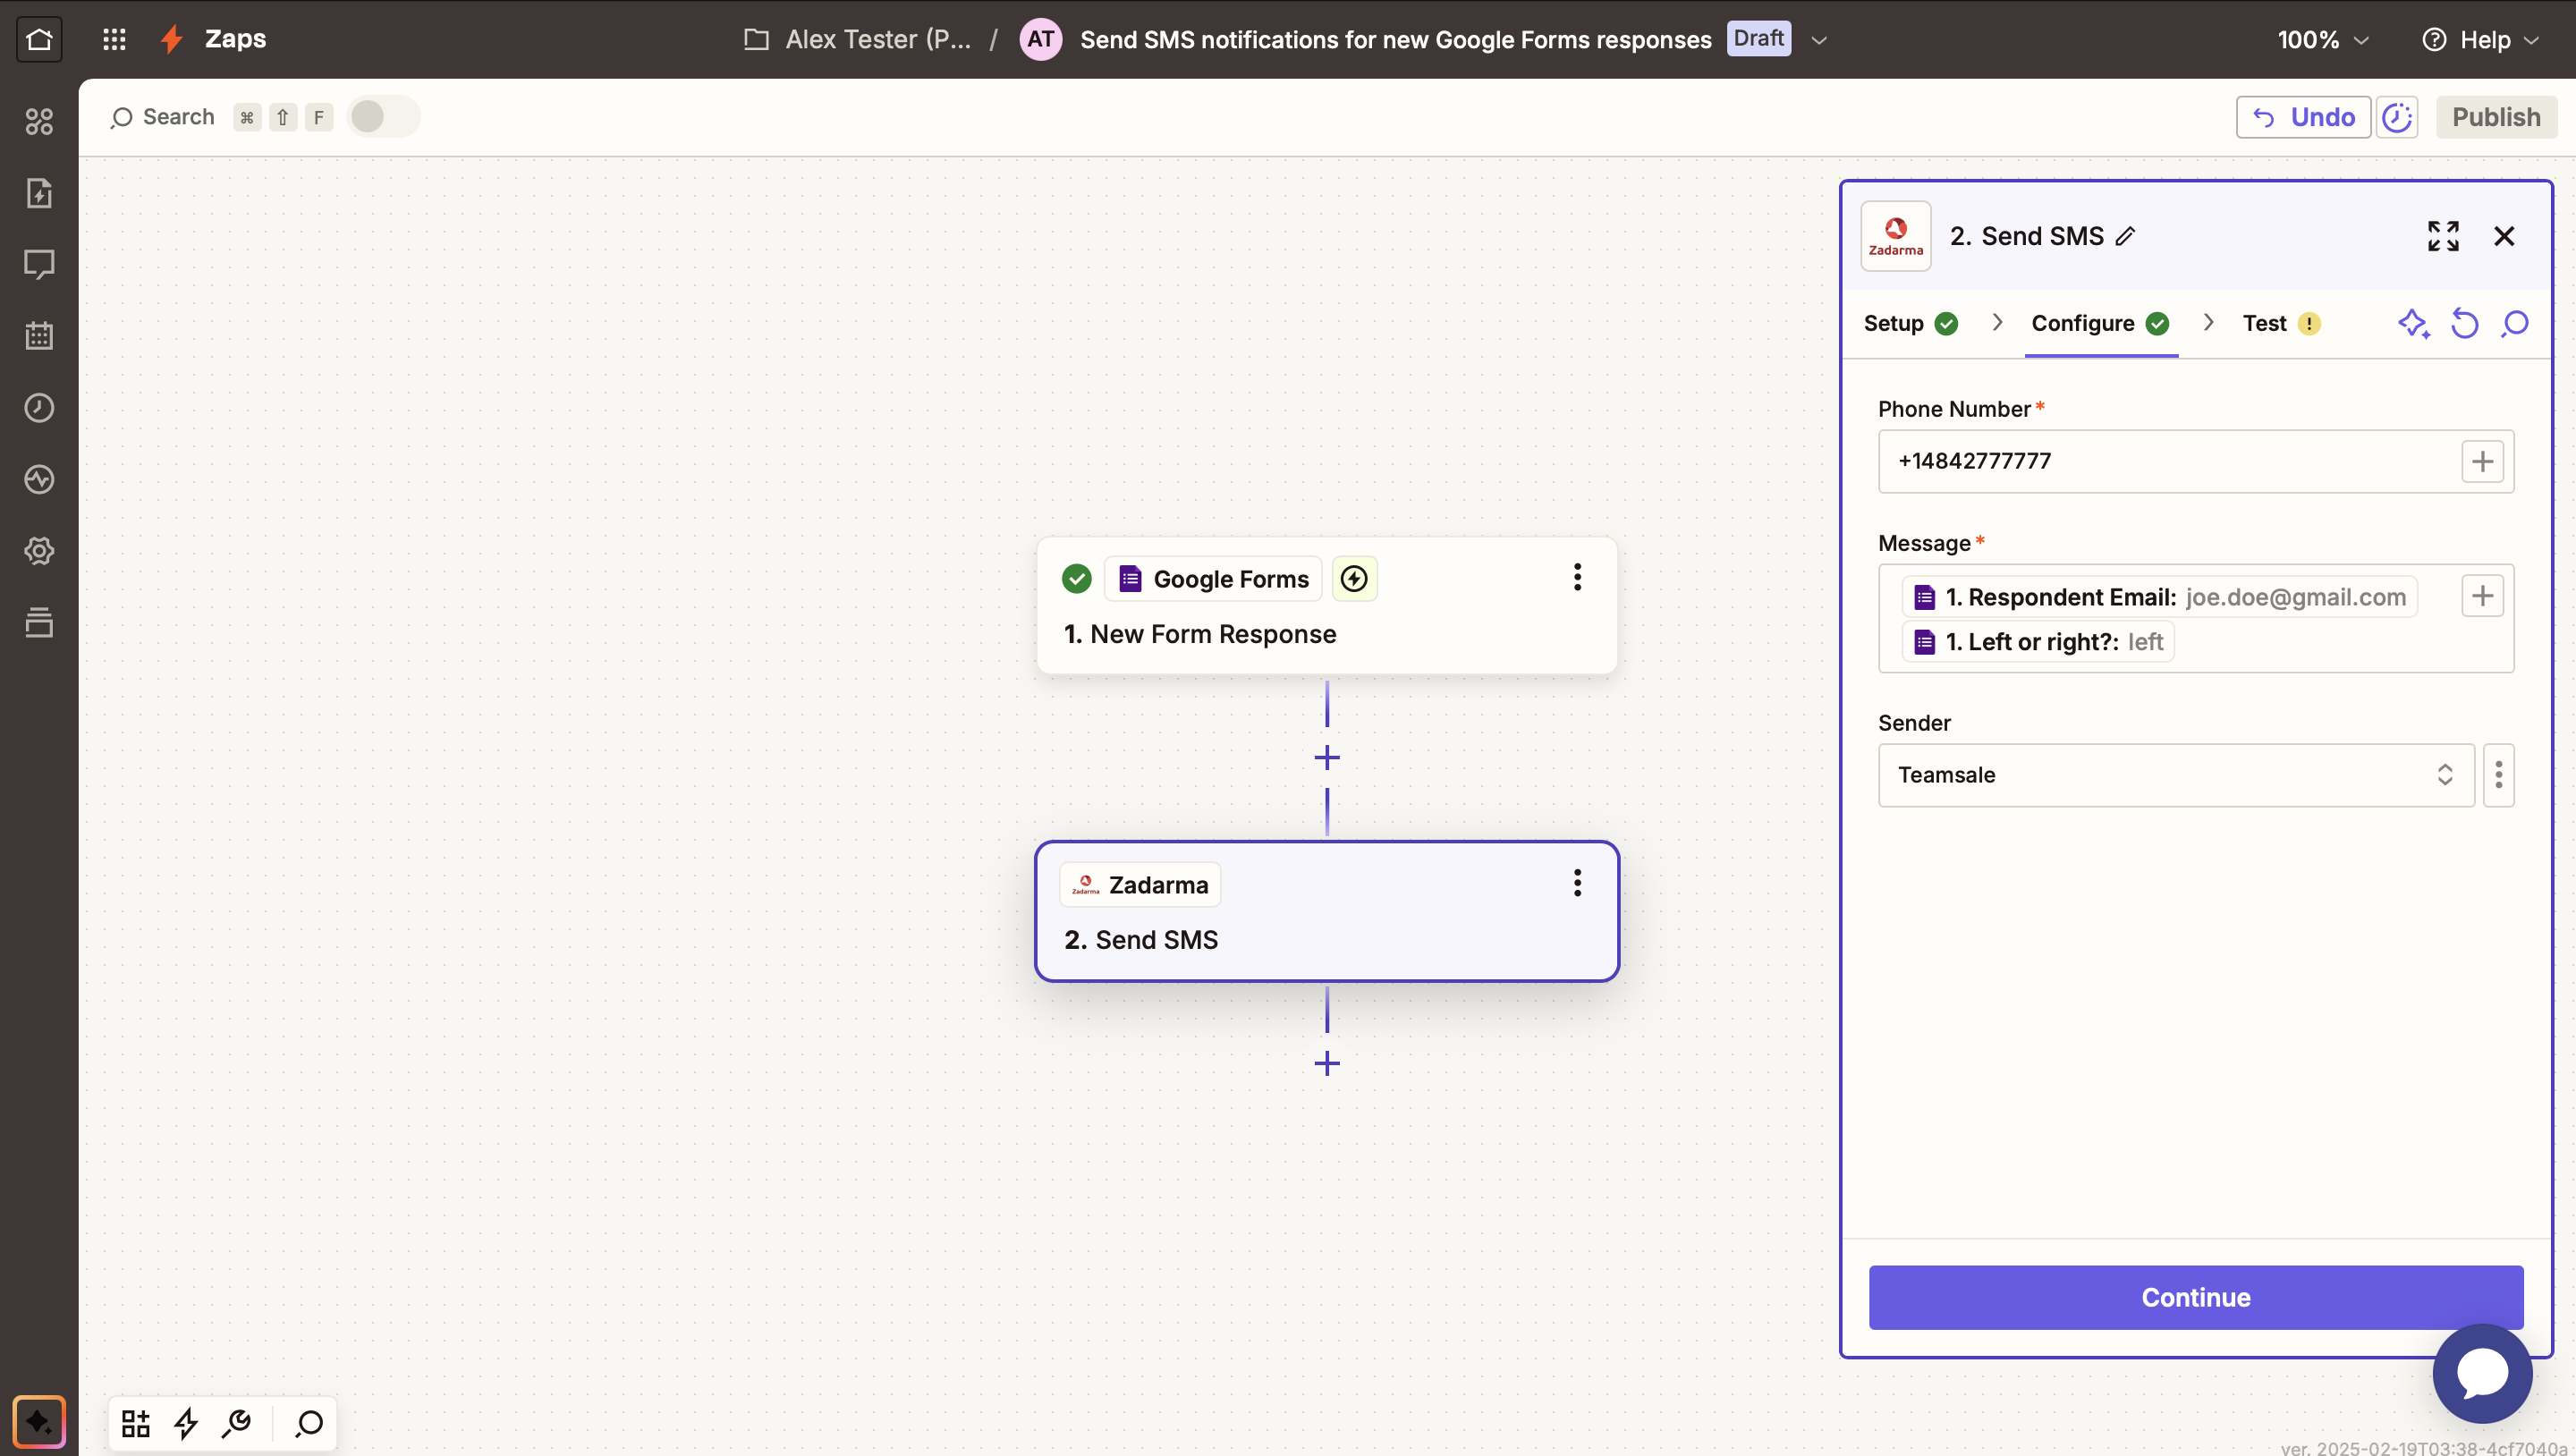
On the second tab, Configure, in the Phone number field, enter the phone number to which the SMS will be sent. In the Message field, choose which data from the Google Form will be included in the SMS. In the Sender field, select the sender for the SMS messages, then click Continue.
On the third tab, Test, you can check the message sending. To complete the setup, click Publish.
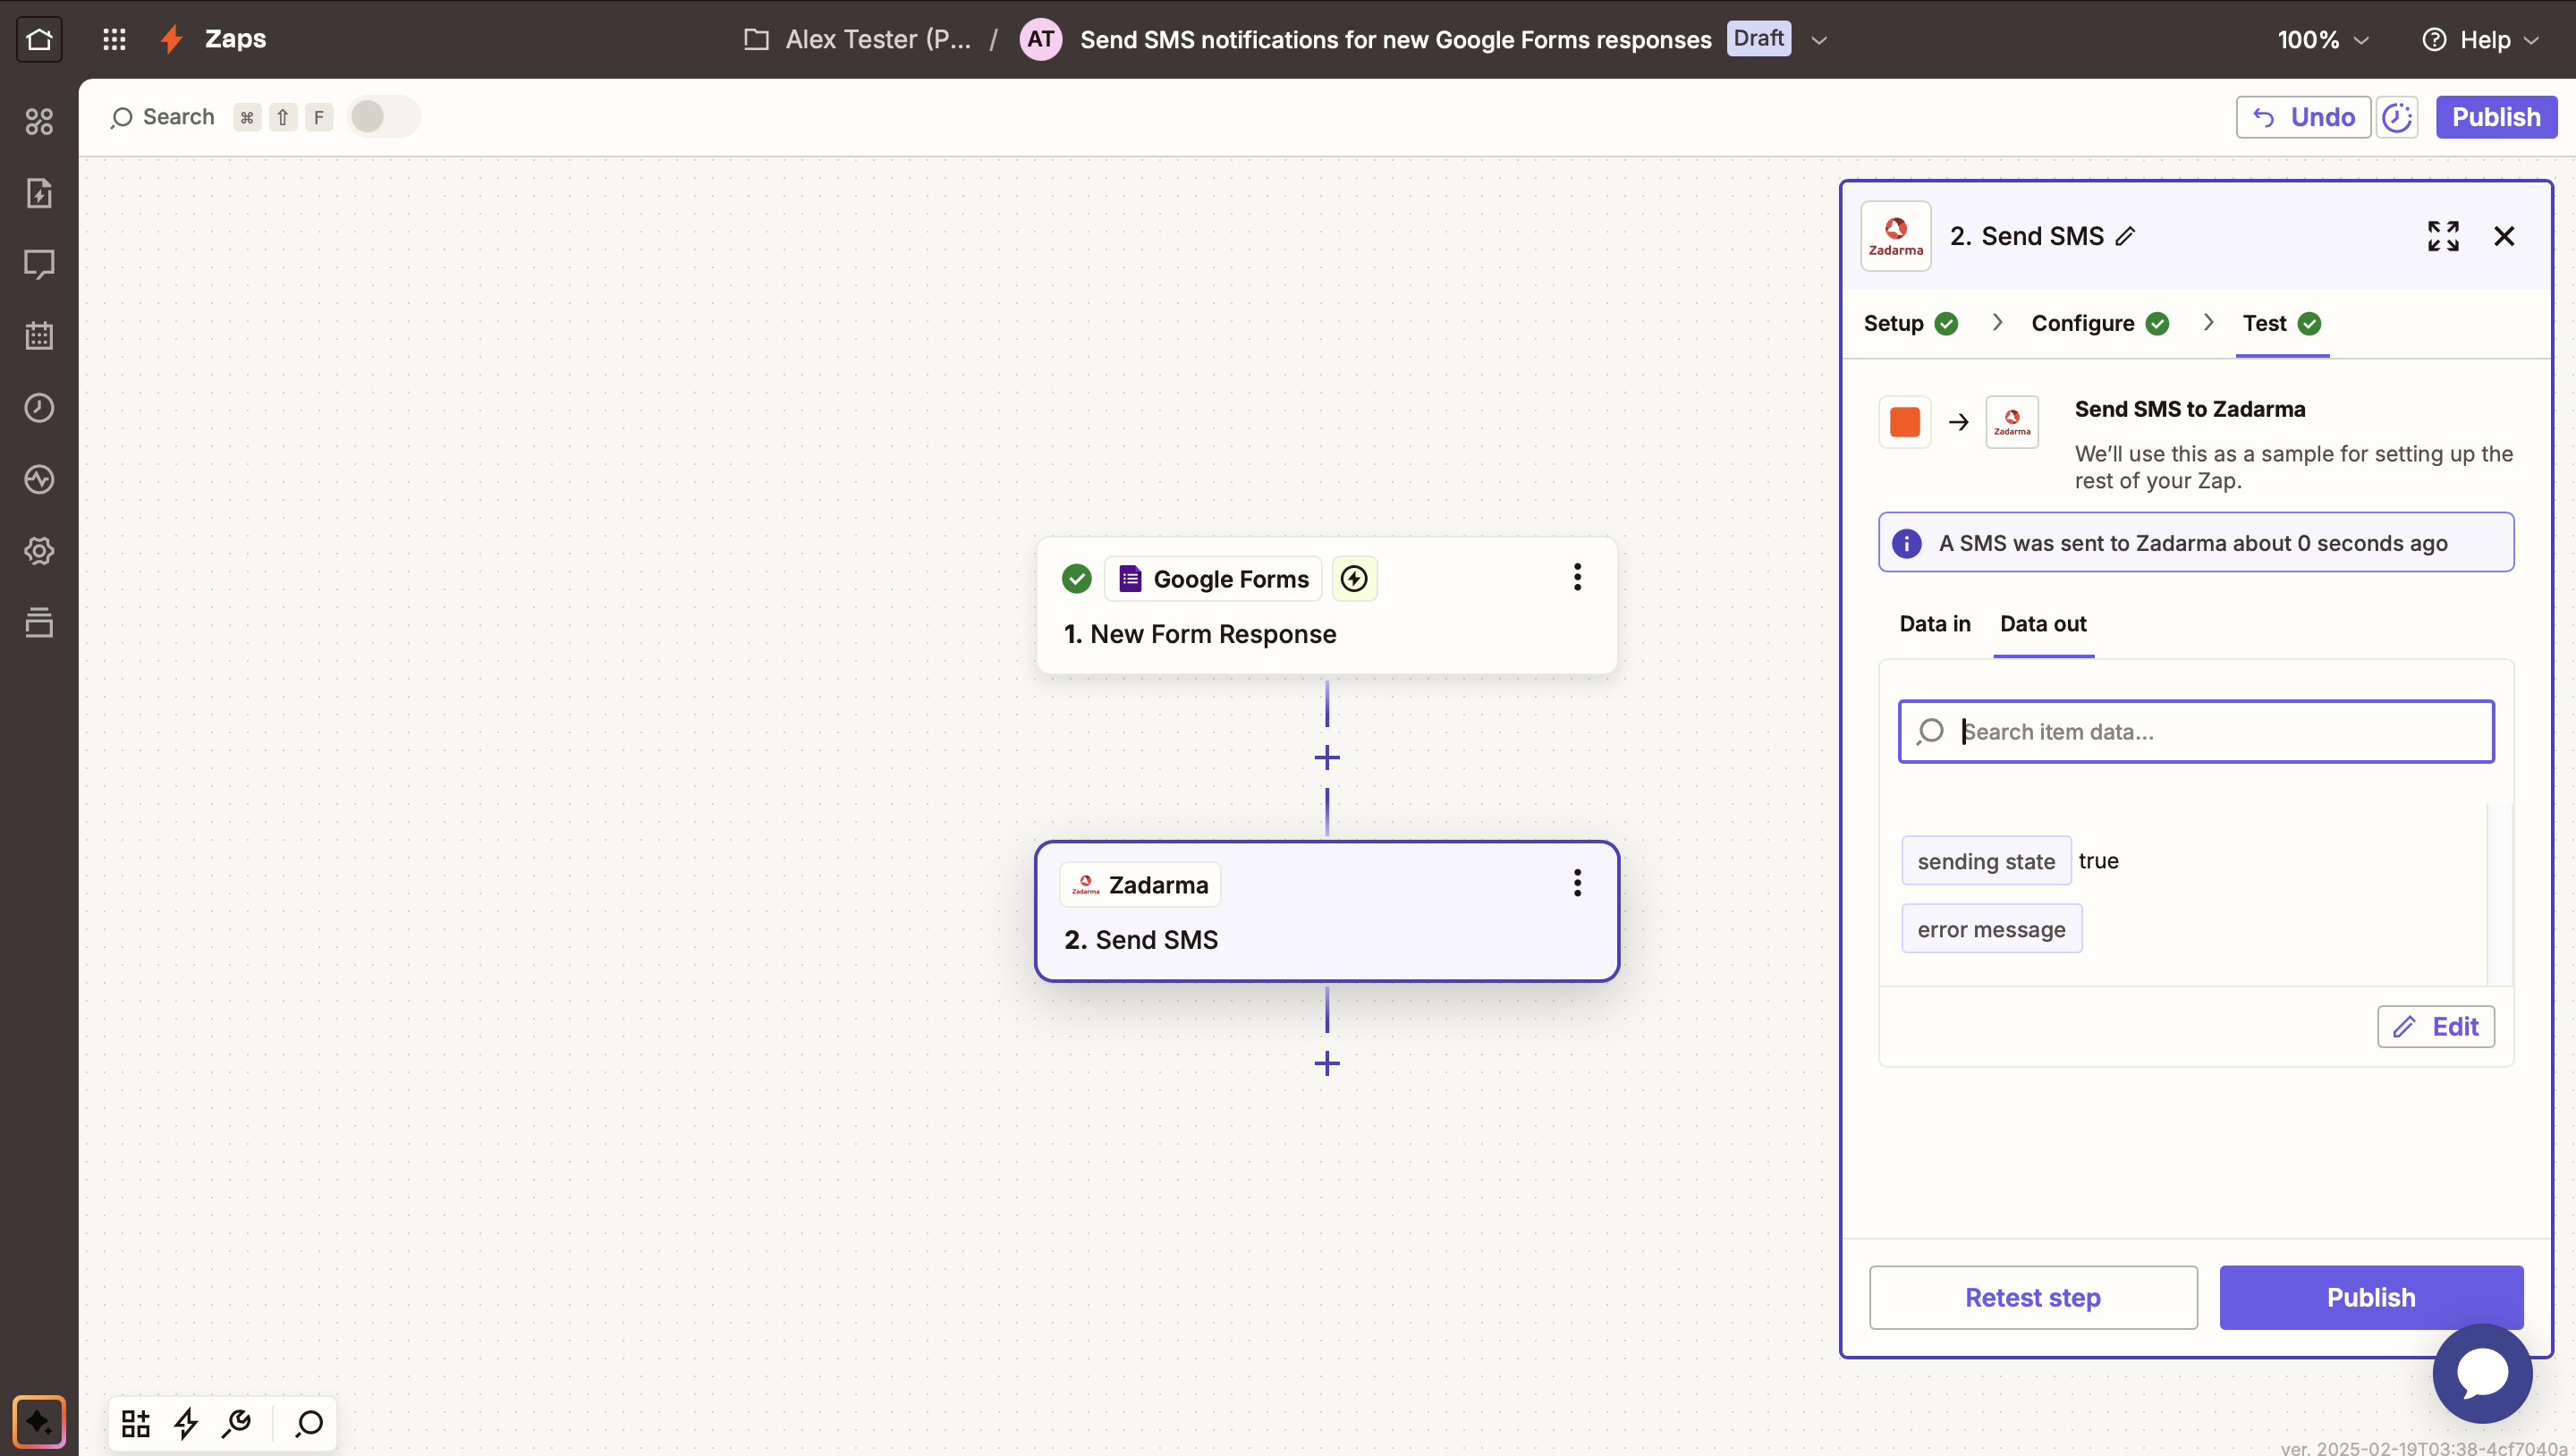
The setup is complete. Now, after someone completes the survey in your Google Form, you will receive an SMS with the selected option. Alternatively, you can choose which specific data will be sent from the Google Form in the SMS.