Calls
Calls
 Phone numbers
 SMS
SMS
 Business Phone System
 Call Tracking
 eSIM for Internet
 AI agent
 AI Speech Analytics
 Click to Call
 Video conferencing
 VoIP for Business
 Become a partner
 Integrations
 For whom
 Setup guides
 FAQ
FAQ
 Online chat
 Contact us
 Blog
Blog
- What Is a Call Flow and Why It Matters?
- How a Call Flow Works?
- Key Components of a Call Flow
- Planning Your First Call Flow
- How to Create a Call Flow
- Building Your Call Flow
- Key Tips for Creating Your Call Flow
- Frequently Asked Questions
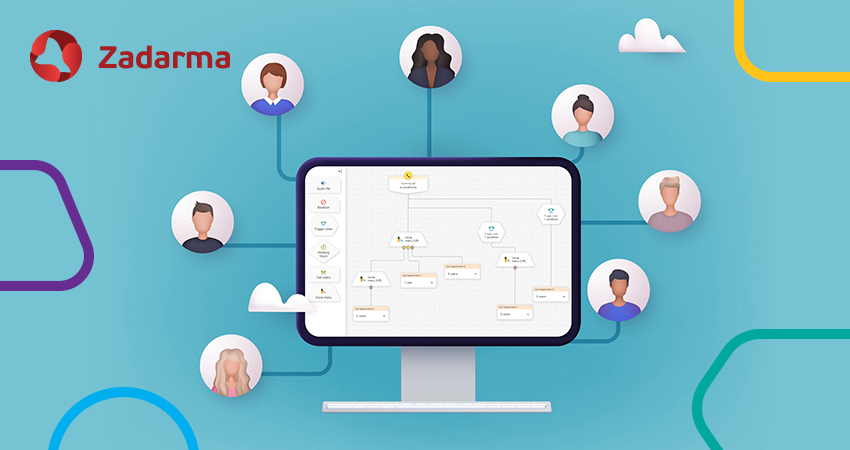
A well-designed call flow can improve your business’s professional image and reduce wait times. Automated call routing also reduces missed calls and decreases your team’s workload by directing callers to the right agent or department.
What Is a Call Flow?
A call flow is a pre-configured route that a phone call follows. It includes automated call handling and describes every step from the initial greeting to the final resolution.
A call flow covers system actions, (automated menus (IVR), call routing, etc.) and agent actions (gathering information, providing solutions, etc.). Its main goals are to improve the caller experience, manage call volume effectively and increase customer satisfaction.
Examples of common call flows include:
- A support line that routes callers to different departments
- A sales line that directs inquiries to the appropriate team
- After-hours routing that sends calls to voicemail, a mobile number, or a dedicated message
How a Call Flow Works?
A call flow is like a roadmap for your phone system. It tells the system what to do with every incoming call.
With a call flow, you can set up:
- Where the call should go: to an initial greeting, menu options, a live agent, or a department.
- What happens if no one answers: the call can go to voicemail, another agent or department.
- What happens after hours: the caller can be redirected to voicemail, another phone number, an extension, or a voice message.
- What to do if something goes wrong: a backup path (failover).
Simply put, a call flow is an advanced calling feature that guides callers step by step so they reach the right department without confusion.
Key Components of a Call Flow
IVR system (Interactive Voice Response) - also known as auto-attendant or Virtual Receptionist, is an automated phone system feature that allows callers to receive information or make requests using menu options. Instead of having a person answer every call, an IVR welcomes callers, presents menu choices, and routes them to the correct agent or department.
Extension - is a short internal number assigned to a specific employee, device, or department in a company's telephone system.
Ring groups or Departments - a collection of extensions that belong to employees working in the same team.
Call queue - a feature that lets you manage incoming business calls by placing them in a virtual waiting line whenever your team is busy. While waiting for the next available agent, callers hear hold music or brief messages.
Voicemail - lets callers leave a recorded message when you can’t answer the phone. At Zadarma, voicemail messages are sent to your email with the caller's phone number. This helps ensure you don’t miss important information.
Working hours - specific periods of time when your phone system is accepting and processing calls. Outside these hours, the system operates according to different rules, such as forwarding calls to voicemail, playing messages intended for calls outside of business hours, or forwarding calls to another number or department.
Call forwarding - redirects incoming calls when the original extension or department is unavailable. Calls can be forwarded to:
- an external phone number
- another agent
- another department
- a voicemail.
You can activate the call forwarding in situations, such as when the line is busy, not answered, unavailable, or after working hours.
Failover destination (fallback routing) - defines where incoming calls should be routed when the primary route is unavailable. This may happen if agents are busy, the queue is full, or the device is offline.
Planning Your First Call Flow
Before activating the free cloud PBX (Business Phone System) configuration, plan your call flow:
- Identify your departments, or your individual agents, if your business doesn’t have formal departments.
- Decide where each type of caller should end up. For example, existing customers can be routed directly to the appropriate agent or department. The new callers can be guided through the main greeting and menu options.
- Draw a simple call flow map, for example: main phone number - Sales - Agent 1 - Agent 2 - Voicemail.
- Plan call handling for both working hours and off-hours.
- Prepare audio messages or TTS (text-to-speech) prompts.
A call flow diagram helps you identify unnecessary steps and determine whether additional ones are needed. It also saves time when setting up the PBX.
How to Create a Call Flow
In Zadarma, creating a call flow is simple and doesn’t require any technical or programming skills. The platform is user-friendly. You simply select the options you need and join them together.
The call flow can be created in the cloud PBX (business phone system) which is included for free. Zadarma also offers a free trial so you can test everything before committing.
Getting Started
Before you start, make sure you have the following:
- Free Cloud PBX.
If you already have a Zadarma account and an active cloud PBX, skip this step.
If you don’t have a PBX yet:
- Go to the main page of your account, and in the Virtual Phone System section, click Set Up PBX.
- The system will guide you through a basic VoIP setup. It will create a simple call flow with direct calls to extensions, with or without a greeting message depending on your choices.
- Software or hardware phone.
To receive calls, each employee can use either software or hardware. For example, the Zadarma app is available for iOS, Android, macOS, and Windows devices.
You can find the login and password for each application in “My PBX - Extensions”. Each extension has its own credentials. The applications can be installed at any stage of a call flow setup.
- Phone numbers.
This step can be completed after you set up and test your call flow. To receive calls, you need at least one virtual number. You can order one in your Zadarma account under “Services - Order a Virtual Number”.
You can also:
Connect up to 20 phone numbers from another provider in “My PBX - External Line” or port your existing phone number from over 40 countries.
Building Your Call Flow
Add extensions
If you require more extensions, go to “My PBX - Extensions”. At the bottom of the page, click “Add an extension” and enter the number of extensions you need.
Note that a number of your available extensions depends on your price plan. You can increase this limit by upgrading your plan or purchasing an add-on in the same section (right side of the page, under “Extensions with call recording - Increase”).
Set up a greeting
Go to “My PBX - Incoming Calls and IVR” and click “Set Up” in the “Voice Greeting” section.
You have the following options:
- Upload an audio file (up to 5 MB).
- Use the free AI text-to-speech tool under “Read”: type your greeting, choose the language and voice, and the system will generate the audio.
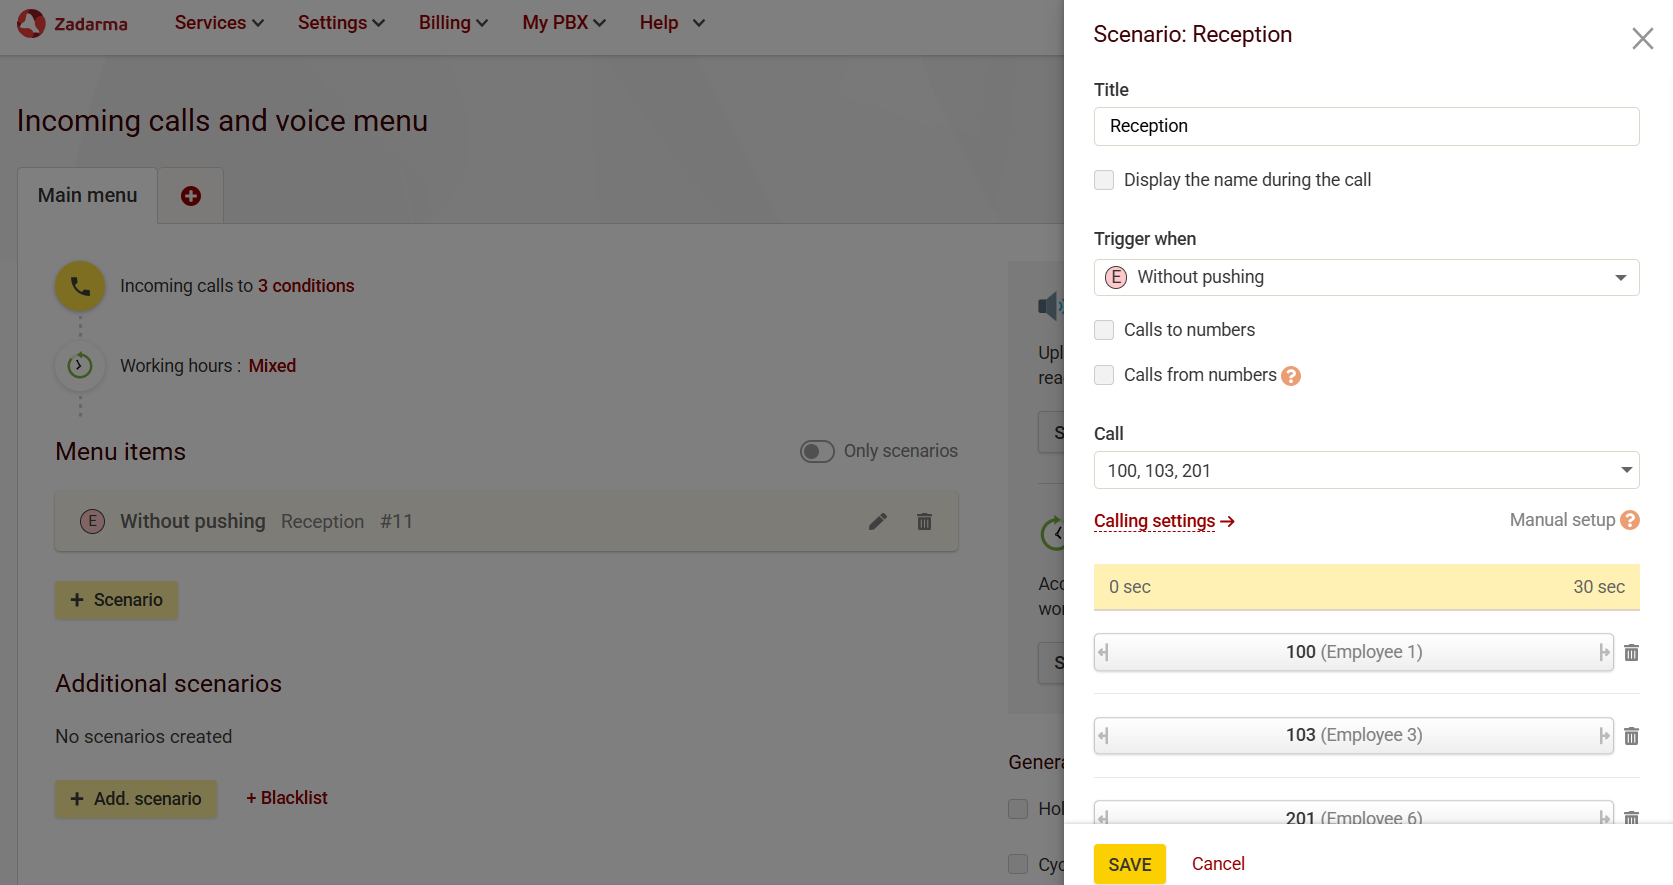
Configure the menu item “Without pushing”
This option triggers when the caller doesn’t press any buttons.
Click the menu item. In the pop-up window, you will see the following options:
- Select one or more extensions under “Call”
- Redirect calls to the same menu or to a different one, instead of extensions. To do this, choose “Transfer to voice menu” under “Call” and then select the target menu under “Go to”.
- See the section Add Additional Menus below regarding additional menus.
Set up working hours
In the “Working Hours” section, click “Enable”, select your operating hours, and set the off-hours behavior. Add a voice message as an audio file or a free text-to-speech prompt if needed.
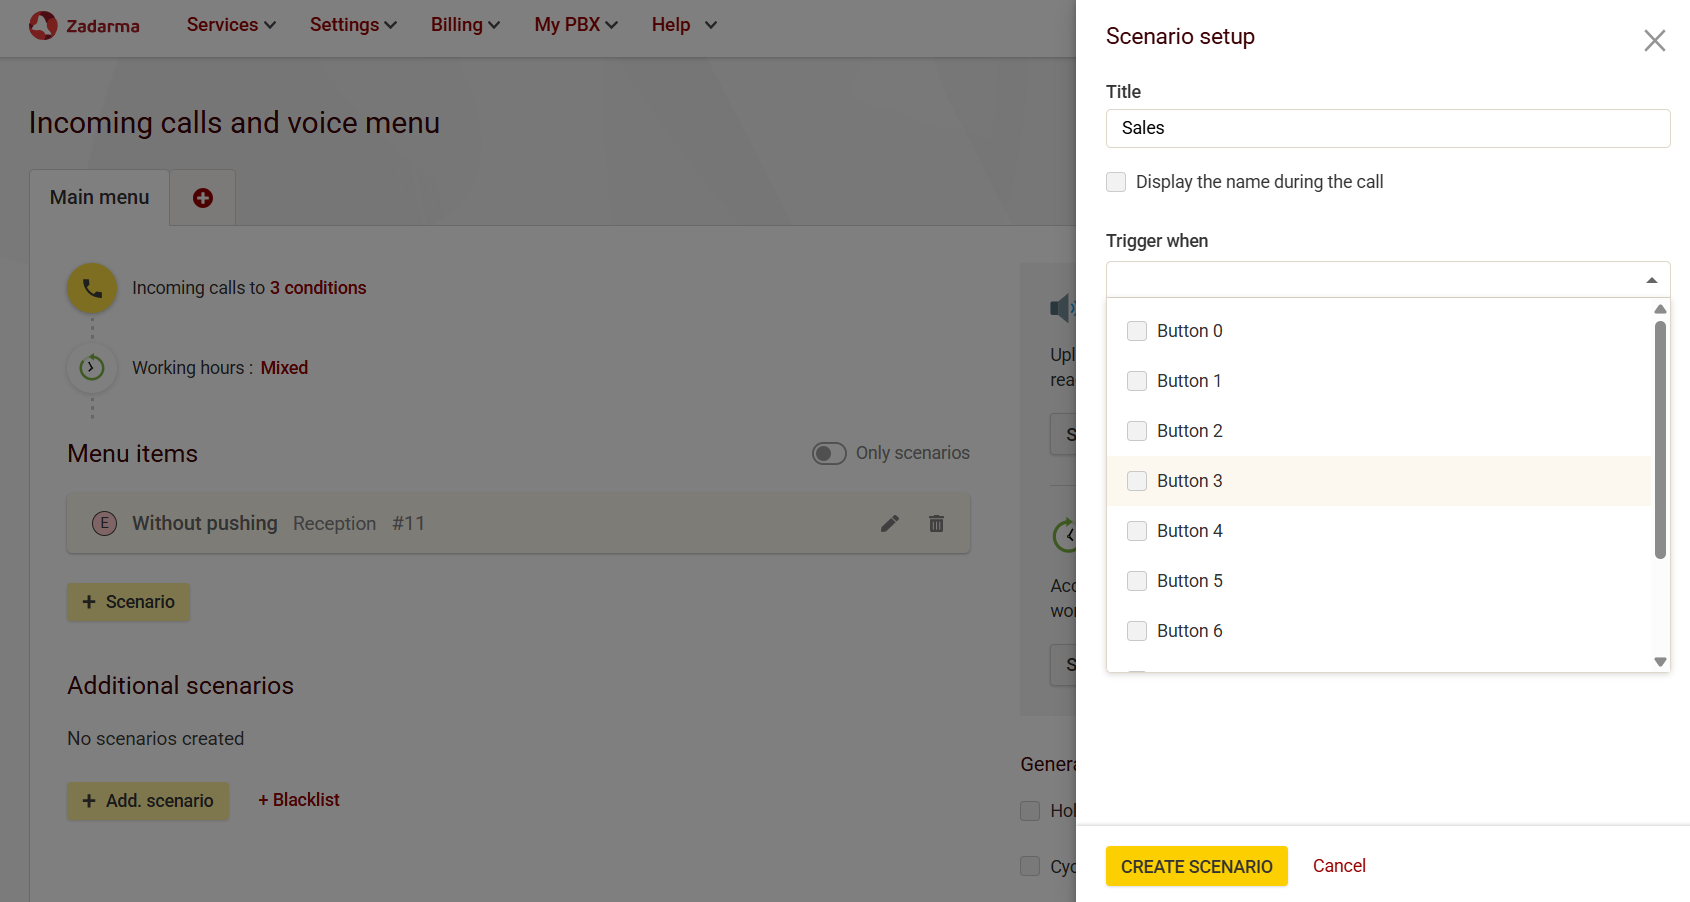
Add menu options (DTMF options)
This lets callers choose the options that connect them to the right agent or department.
- Under the “Without pushing” menu item, click + Scenario. Don’t confuse it with “+ Add scenario”, which is used for special cases like off-hours or holidays.
- Enter a title (for example, Sales).
- Under “Trigger when”, choose the button number.
- Under “Call”, select the extensions or another menu.
- Open “Calling Settings” and choose a call distribution type. For example, in order or simultaneously.
Set up hold music
- For the entire menu: go to “General PBX Settings”, located in the lower-right corner of the “My PBX - Incoming calls and IVR” section. Check the ”Hold Music” box, then upload an audio file or create a free TTS prompt.
- For individual scenarios: open the scenario, go to “Calling Settings”, and select a hold music.
Add a failover
If no one answers the call, open the necessary scenario, go to the “Calling Settings” section, and under “If no answer”, select what should happen next. For example, forward to another extension with a voicemail.
Voicemail and call forwarding
You can configure a voicemail or the call forwarding to an external phone number for any extension in the “My PBX - Extensions” section. Click on the extension and go to “Call forwarding and voicemail - enable”. Choose the desired call forwarding options and save the settings.
- As the final step in a queue when all agents are busy
- As a destination for off-hours routing
Activate a call queue
In the menu items where you want to activate a call queue, so the call will not be dropped or sent to voicemail if no one answers, follow these steps:
Click the menu item and go to the “Calling Settings”. Under the “If no answer” select “Repeat calling”. Close the first window, save the changes, and then close the second window.
Next, at the bottom of the page, in the lower-right corner, enable“Cyclic redial”.
Add Additional Menus
Click the + button next to Main Menu at the top of the page, select extensions, and click Create menu.
Here are a few examples of how you can use additional menus:
Multi-language customer support
Each language can use its own extensions or share existing ones, if the same agents are handling all the calls.
After creating a new menu:
- Return to the Main Menu.
- Select a scenario, for example, button 1.
- Under “Call”, choose “Transfer to voice menu”.
- Under “Go to”, select the new menu.
Another department in a different time zone during off hours
- In the Main Menu, go to the “Working hours - Set Up” section.
- Scroll down, and under the “Enable during off hours” select the new menu.
- Go to the new menu, and in the Working Hours configuration, adjust the hours to a different time zone. Then configure the menu following the steps described above.
As a separate PBX
Useful for:
- Calls to a different virtual number
- Calls from specific customers
After creating the menu, click Add triggers (next to the yellow phone icon) and choose:
- Calls to numbers - receive calls to specific virtual numbers directly in this menu by selecting the virtual numbers.
- Calls from numbers - direct specific callers to this menu by adding their phone numbers.
For additional features, please follow the guide.
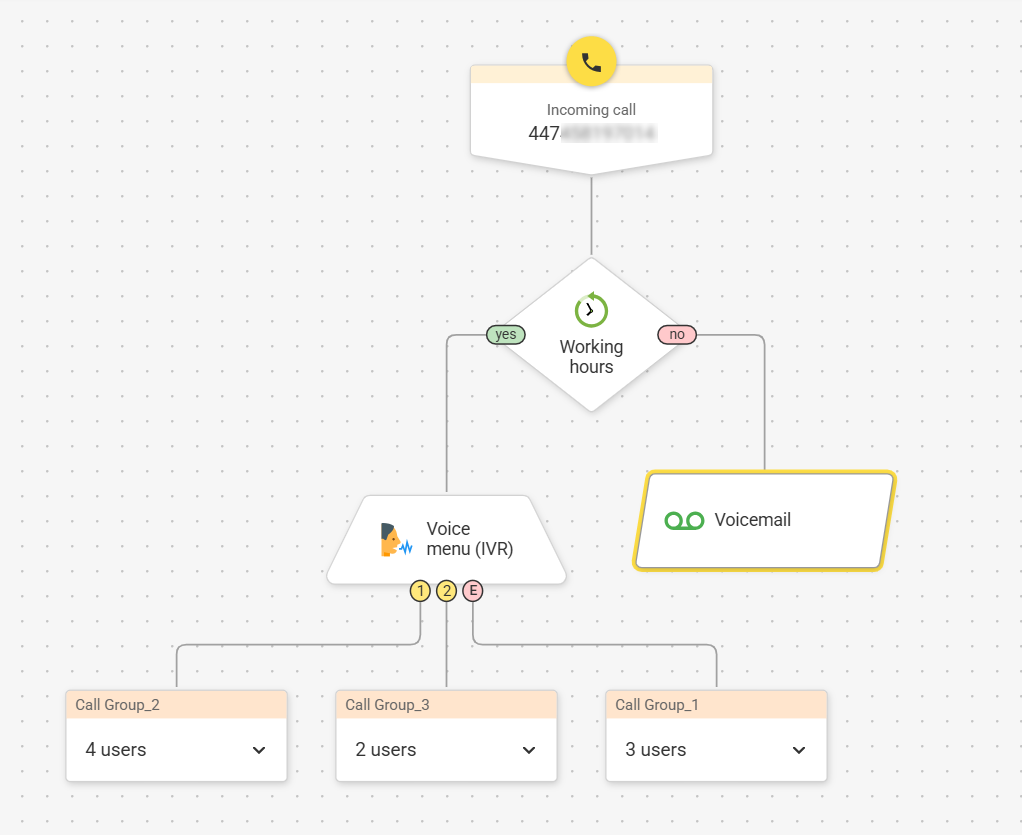
You can also use the Visual Editor, located in the top-right corner, for a simple drag-and-drop setup of your call flow.
Below is a call flow example for businesses created in the Visual Editor: it includes working and off-hours routing, three menu options, a failover if no one answers, and a voicemail option during off-hours.
Key Tips for Creating Your Call Flow
When building your first SIP call flow, try to keep it simple and intuitive. This way, the customers reach the right destination quickly. Here are some useful tips:
- You can update or expand your call flow at any time, so you don't have to create something complicated from the start. You can start with the basics and adjust as needed.
- Keep menus short (ideally 3 - 4 options). Long menus can confuse callers and increase hang-ups.
- Use clear, friendly wording in your recordings or TTS prompts.
- Avoid loops that send callers back and forth without reaching a real person or a final destination.
- Set reasonable ring times, such as 10 - 20 seconds per step, to balance agent availability with caller patience.
- Always define a failover route to ensure calls are handled even if the primary path is unavailable.
- Don’t forget after-hours routing, so callers always know what happens when your team members are unavailable.
- Avoid too many simultaneous rings, which can create confusion and disrupt agent workflow. Use structured distribution instead.
- Test the flow from a real phone before going live.
Bottom Line
With VoIP, a professional call flow is now accessible to any business. It’s an affordable, and often free feature, included with most phone systems. At Zadarma, you can build an advanced, free call flow in just a few minutes.
And the best part? There are no contracts or long-term commitments. Feel free to try it using our free trial and reach out to our 24/7 support team if you need any help or have questions.
Frequently Asked Questions
Can I use my existing phone numbers with a cloud PBX?
You can port phone numbers from more than 40 countries to Zadarma. You can also add up to 20 phone numbers from another provider, without porting them, in the “My PBX – External Lines” section.
What devices can I use to receive VoIP calls?
At Zadarma, you can use any software or desk phone that supports the SIP protocol. Zadarma also offers free apps for iOS, Android, macOS, and Windows, as well as a built-in webphone, a Google Chrome extension, and calling through the free Teamsale CRM.
What is an IVR?
An Interactive Voice Response (IVR) is the automated phone menu you hear when you call a business. It greets callers and lets them choose options, such as “Press 1 for appointments” or “Press 2 for cancellations,” so they can reach the right department or service.
Can I use text-to-speech for my phone greetings?
Yes, you can use TTS (text-to-speech) for your initial greeting, off-hours message, voicemail greeting, and even for hold music. At Zadarma, the text-to-speech feature is free.