Calls
Calls
 Phone numbers
 SMS
SMS
 Business Phone System
 eSIM for Internet
 AI agent
 AI Speech Analytics
 Click to Call
 Call Tracking
 VoIP for Business
 Become a partner
 Integrations
 For whom
 Setup guides
 FAQ
FAQ
 Online chat
 Contact us
 Blog
Blog
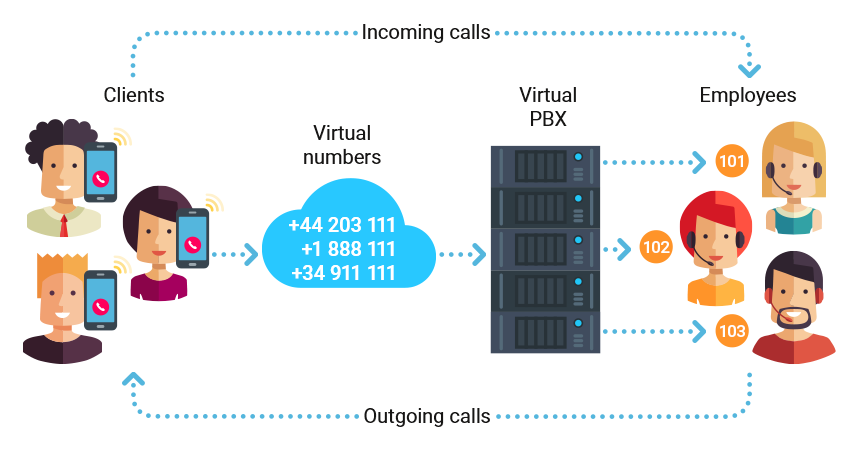
Why do you need virtual PBX?
If your company has more than one employee, virtual PBX is necessary for voice communication. Free PBX allows you to connect as many phone numbers in regions convenient for your clients as you need and direct calls to the appropriate employees.
- Call recording and statistics will help control the operators and analyze the calls
- Call forwarding, voicemail and missed calls notifications will not let a single call go unnoticed
- Voice menu and working hours will simplify the working process and increase company’s prestige
- Integrations with popular CRM systems and our own free CRM will help you keep track of all client records and deals
- Speech analytics and recognition will assist with controling calls and employee performance without having to waste time listening to the calls
How to set up PBX? Setup wizard
Setup wizard will assist you with the basic settings. To launch the wizard, click Create PBX in your personal account.
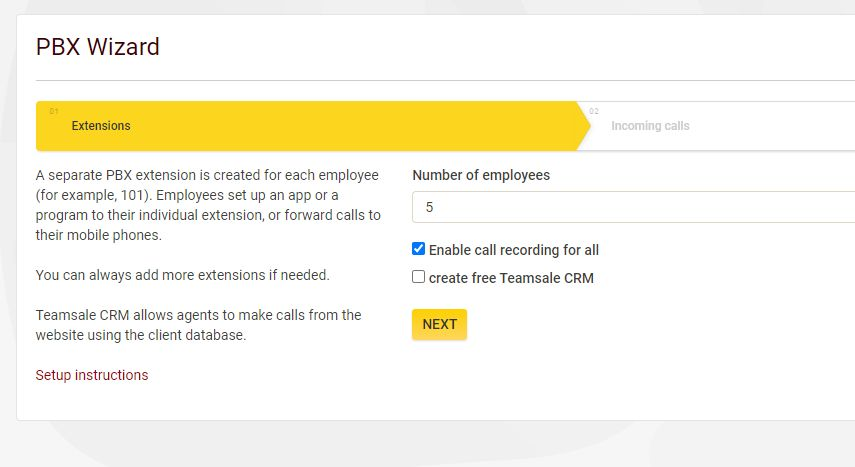
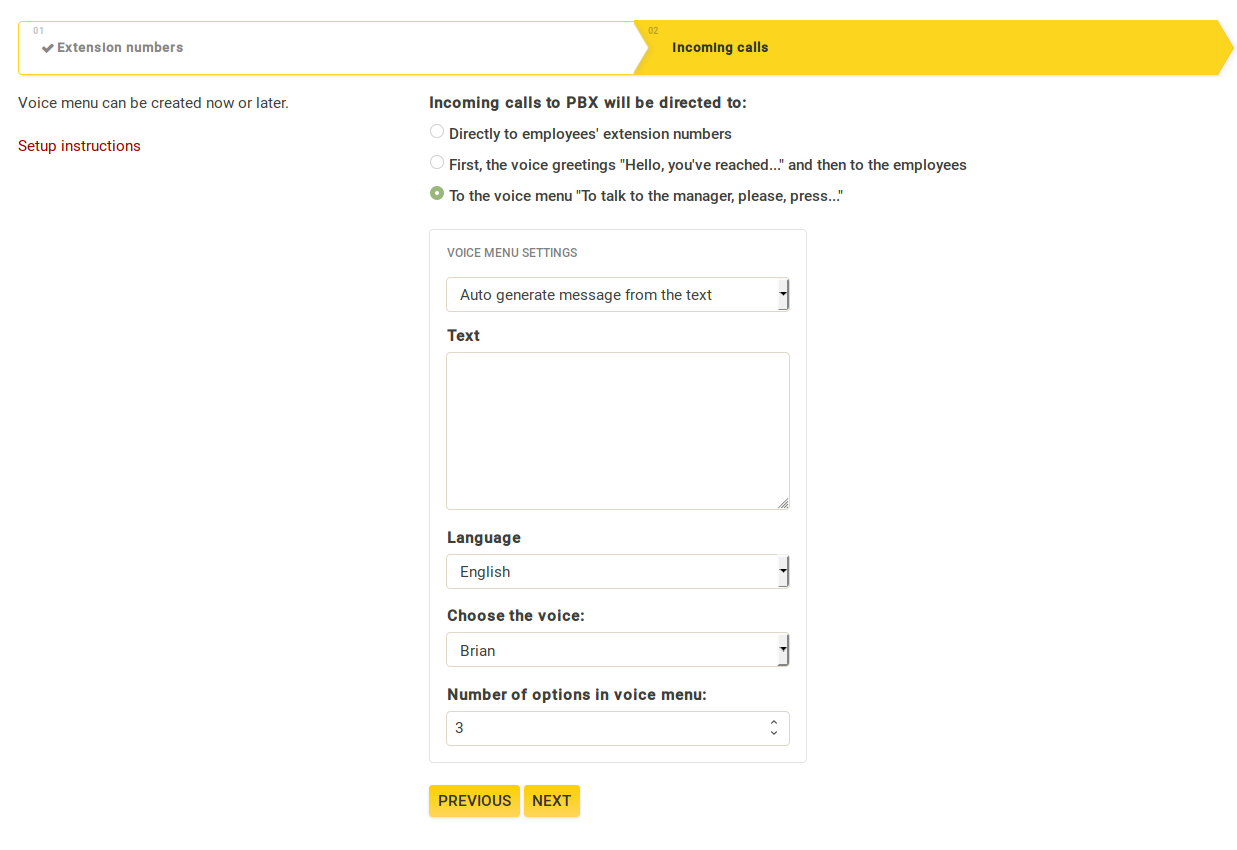
There are only two steps in the setup wizard. First, choose how many extension numbers (one for each employee) you need. Then, choose the call scenario: what the client will hear when they call you.
Done! The basic setup is complete. It might already satisfy all your needs. However, we recommend learning about other PBX features: call queues, auto-responder during off hours, additional scenarios, missed call notiifcations to your messengers.
Now on to setting up call apps or equipment.
Downloading and installing a program on a device
Congratulations, the basic PBX setup is complete. Now you need to figure out, how your employees will answer calls.
If you have enabled Teamsale CRM and want to receive calls via the browser, you can skip this step. You can also make calls via Google Chrome browser using the plugin.
To receive and make calls you can use any software or equipment that works using SIP protocol.
Examples of some popular software and equipment you can find in “Help” section - Setup manual. We recommend using our offical Zadarma app for Windows, macOS, iOS, Android.
- To connect equipment or a program use settings from “My PBX” page - “Extensions” (server, login, extension number password). One extension can be used with one Zadarma mobile app, one web phone, and up to 10 programs/devices with permanent registration. If the previously created extensions are insufficient, you can add more on this page;
- You can also receive calls on your existing mobile or landline number with call forwarding. Information regarding detailed call forwarding setup can be found here. Call forwarding is a paid feature and is charged for as an outgoing call. You can find out call forwarding pricing on this page.
Connecting a virtual number
Now you can make calls! To receive incoming calls from clients, you need to connect a phone number to your PBX. You can choose one or several virtual numbers in 110 countries on the “Settings” page “Virtual numbers”.
If you have a previously connected number from a different provider, you can connect it to the PBX as well on the “Additional external line” page, the manual can be found below.
Congratulations! You can start using PBX or configure additional features.
Incoming calls and voice menu
Basic settings already allow you to make and receive calls. Let’s review other important incoming call settings.
Menu items and calling order ▾
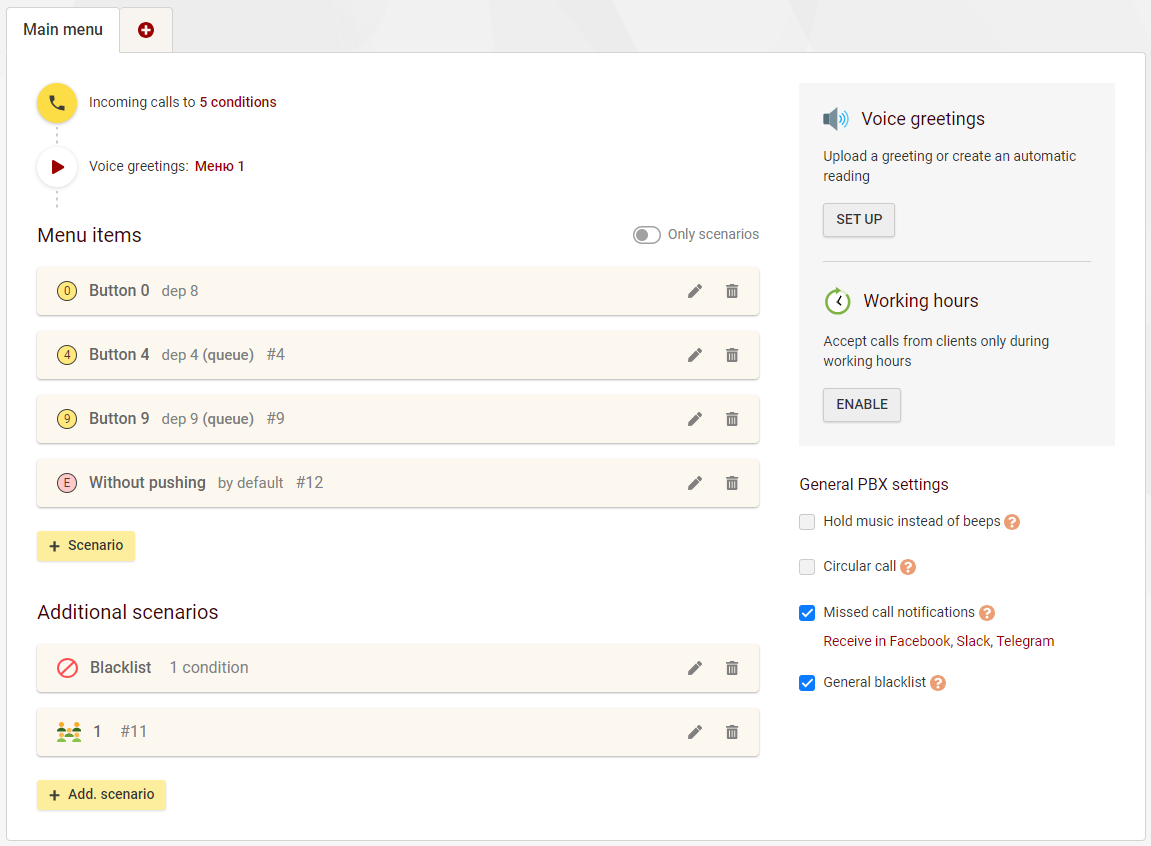
Menu items (scenarios)— a group of extension numbers that will receive an incoming call under the chosen conditions (for example, when pressing 1 in the voice menu or calls from a certain city numbers).
On “My PBX” - “Incoming calls and IVR” page you can edit existing incoming call scenarios, add new or delete redundant ones.
To create a scenario click “+ Menu item” button. You will see scenario settings menu in the block on the right side of the screen.
Trigger when — button that will trigger the scenario when pressed. The scenario can be triggered not only by pressing a certain button, but also when a call comes from a certain number or a group of numbers (for example, +4420*), as well by a call to one of your numbers at Zadarma.
Call group — employees (extension numbers) that will be able to receive that call. You can create a new call group or choose an existing one.
Transfer to menu — voice menu choice for further actions (for multilevel voice menu configuration).
After choosing a button in “Trigger when” and creating or choosing a call group, a link for calling settings will appear.
Calling settings - choosing call distribution algorithm ▾
In the “Calling settings” tab you can configure call queues, hold music, calling duration (when the incoming call needs to be dropped if not answered), action if the call is not answered (end, repeat or send to voice menu), enable call queue order notifications and random call distribution.
Strategies of call distribution among PBX extension numbers
In order — call will go to extension numbers in order in case the previous employee did not answer, you can set up the required order and time between calls (for example, you can choose 20 seconds between calls, meaning that in case the first employee does not answer, the call will go to the second one in order and so on).
Equally — equal call distribution depending on the time of the last call to the extension number or number of calls it has received. For this type of strategy, you can enable notifications for your client with their order number in the call queue.
Simultaneously —calls will go simultaneously to all extension numbers in the call group.
Manually — default option, using the slide you can visually configure the call order. Below you see the example, where a call withing 2 minutes first goes simultaneously to extension numbers 201 and 203, and then in 60 seconds from the beginning to employee with extension numbers 202.
Randomly — calls will be distributed to randomly chosen extension numbers. Just like for the equal distribution, here you can also enable queue number notifications.
Important: equal and random call distributions are not compatible with call forwarding (all selected extensions will receive calls, regardless of call forwarding settings).
Voice menu, voice greeting, several voice menus ▾
To add a greeting file click “Set up” in the “Voice greetings” block.
You can either upload a file or enter a text that will be voiced by the machine. Over 15 languages and 100 different voices are available for text voicing. You can use the file as a greeting, voice menu (including level 2+) or hold music.
If each virtual number requires a separate voice greeting or different working hours, on the “My PBX” - “Incoming calls and IVR” add a new menu (the "+" tab), enable Trigger when Calls to numbers and choose a required number.
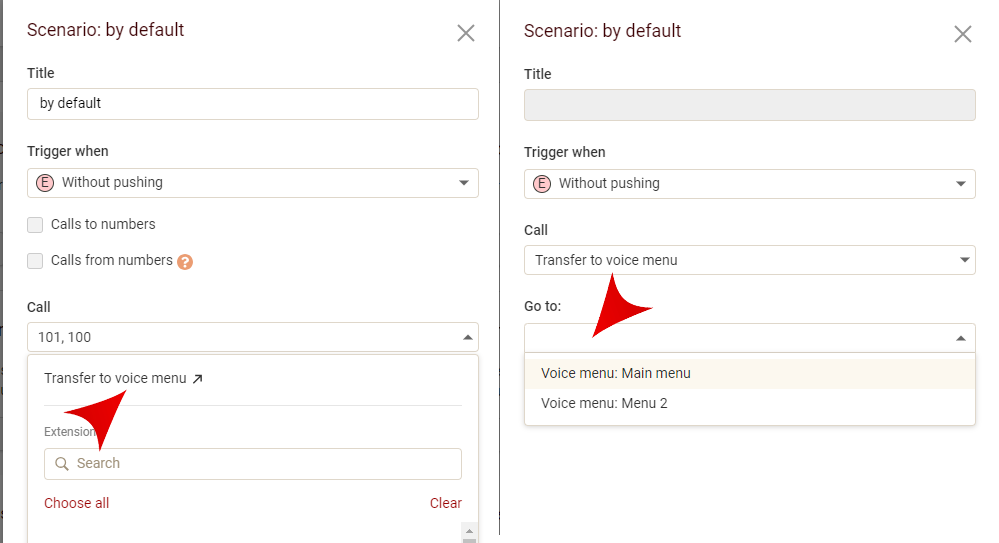
Multilevel voice menu▾
In the latest PBX version you can create several voice menu levels.
- First add IVR files in the “Voice greetings” tab.
- Add all required menus (second and further levels) by clicking + next to the Main menu.
- In any item (scenario) of the main menu choose transfer to that menu.
Receiving calls on the number being dialed ▾
If you have several phone numbers with Zadarma, you can direct each number to:
1. Certain employee/employees
Under “Additional scenarios” click “+ Add. scenario” and “Call employees”. In the pop-up window on the right choose phone numbers ("Calls to numbers" option) and extension numbers (the "Call" field) that will answer calls. Call to this call group can go through simultaneously, in order or according to manual settings.
2. Department (voice menu)
2.1 Create a new voice menu (click + next to the Main menu) and configure it (set up greeting and menu items)
2.2 In the new menu click “Trigger when” and “+ Add triggers ", there you choose “Calls to numbers” and specify the numbers, calls to which will trigger the menu.
Call reception by caller’s number ▾
If you need to direct calls from a certain client to a responsible manager, you can create a separate scenario for that. Enable in its settings Trigger when “Calls from numbers”, enter the number in an international format and click Save. You can also add a mask for country and area codes, for example, +4420*, in order to direct calls to different employees depending on the caller’s region.
Calls from specified numbers will be directed to scenario’s extension logins bypassing voice greeting. If you need to add a separate voice greeting you can do that in the additional menu.
Blacklist ▾
On the page “My PBX” - "Incoming calls and IVR" you can create a menu option “Blacklist” and add numbers that you don’t want to receive calls from, as well as a mask of numbers starting with a country and city/provider code, (for example 44*).
Working hours and autoresponder ▾
To accept calls only during working hours, on the page “My PBX" - "Incoming calls and IVR" turn on feature “Working hours” and select your working days and set working hours.
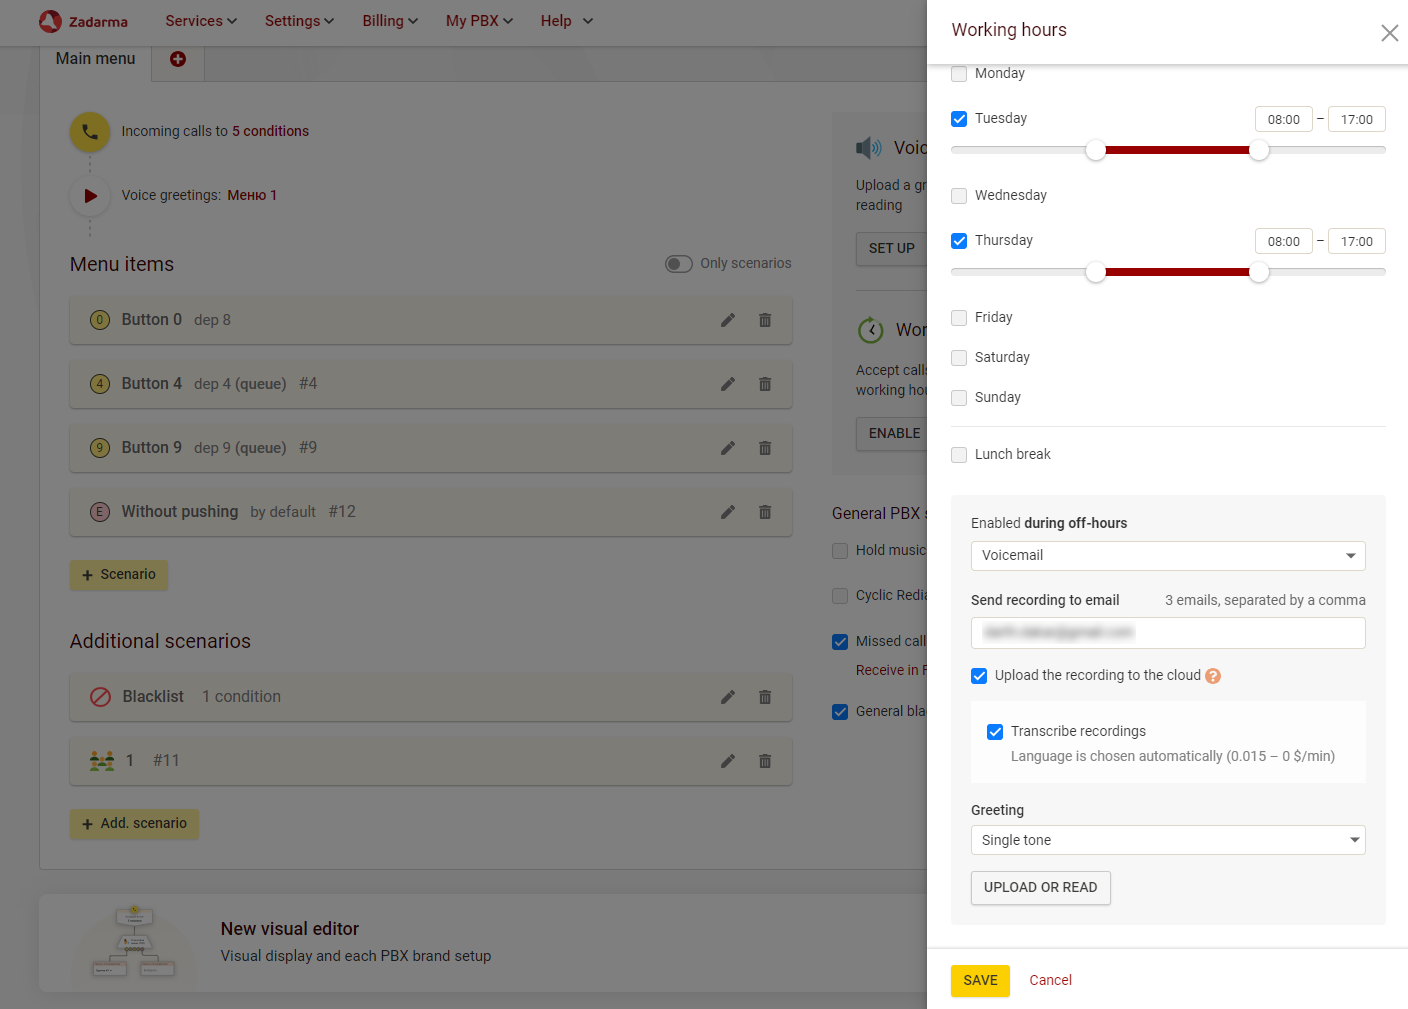
You can also set lunch breaks and holidays. In the holidays tab, you can find lists of official national holidays for different countries, add to or delete a holiday from the chosen calendar.
Calls outside working hours can be directed to a separate scenario, for example, to a certain employee or a voicemail so the caller can leave you a message. To do this, in the "Working Hours" section at the bottom of the block, under the "Enabled during off-hours" select the option "Voicemail."
To configure the autoresponder, send calls to extension number(s) that have call forwarding to voicemail enabled on them (you can set up call forwarding for all numbers on the My PBX - Extension numbers page).
Visual PBX editor▾
Visual PBX editor will allow you to clearly view how PBX is configured, what are the conditions for triggering different call scenarios. On this page, you can see and set up PBX work using easy to understand block schemes.
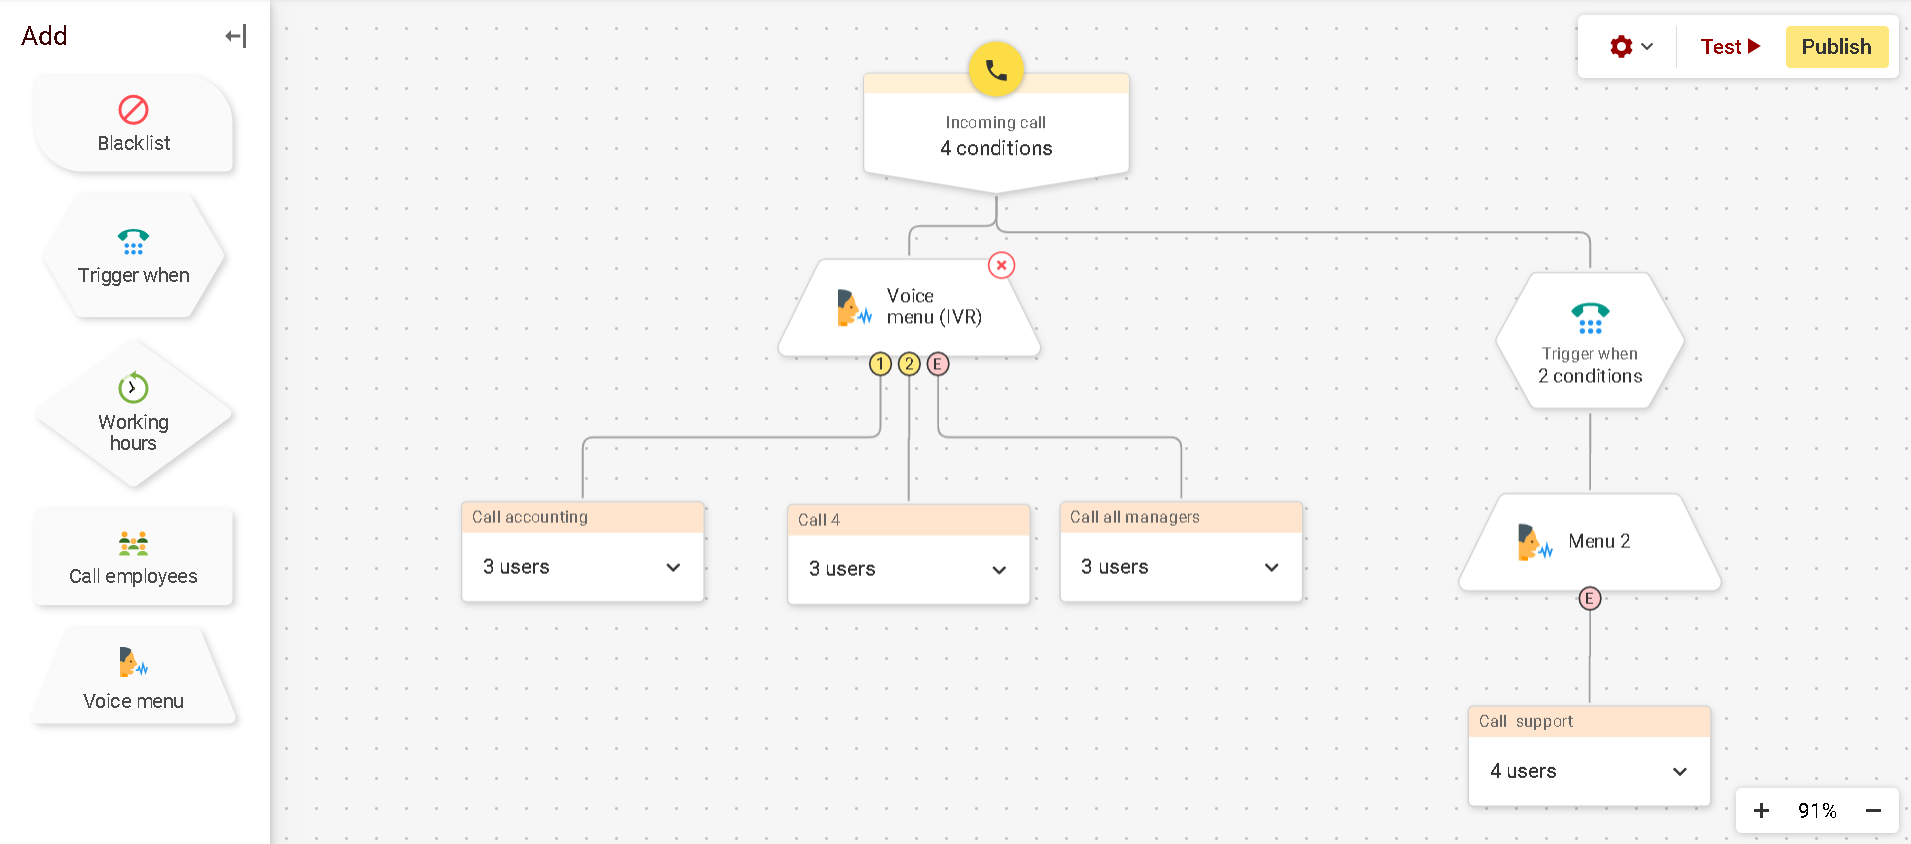
You can go to visual PBX editor by clicking “Open editor” button on My PBX - Incoming calls and IVR page. Here you can see your PBX call routes. You can add any block from the left side to the chart and set up connections between the blocks.
To check PBX work click “Test”, to save changes made in PBX use the “Publish” button.
Important conditions for PBX visual editor to work
- “Working hours” block is added before the menu, so the link from the "Yes" branch can only be with the menu, and the link from the "No" branch can lead to blocks "Call users", "Audio file", "Voice menu" and "Working hours"
- The link from the "Call users" block signifies an action when no one from the Call group has answered a call and can be looped with the same block (repeating calling) and lead to other "Voice menus"
- "Audio file" block can only be in one place - as a file played before "Call users" scenario when following the "No" link after the "Working hours" block. The only possible order of blocks is Working hours (no) -> Audio file -> Call users
Additional PBX features and abilities
The wizard has assisted you with the basic PBX setup, but there are other essential PBX features that you can utilise for your individual needs. Here is more about each feature.
1. Call transfer and interception ▾
To transfer a client to a different extension number press #, the extension number and again #, for example, #101#.
To transfer a call with a voice note press *, extension number and #, for example, *101#. In this case, you will be connected to the extension number first and will be able to notify why you are transferring the call. After one of you finishes the call, the client will be connected to the second number.
If the dialled extension number does not answer the call in 25 seconds, the client will be returned to you.
To intercept an incoming call, if your extension number was not added to the incoming calls scenario, enter 40 and press the call button.
To transfer a call to the scenario (department) dial scenarios number in the voice menu, for example #1#
2. Dialing format ▾
The dialing format for calls and forwarding is set in the section "Outgoung calls - Prefixes and codes". By default, numbers are dialed in the local format according to the country specified in the “Settings - My Profile - General Information” section.
You can disable local dialing in the “Settings - My Profile - General Calls - Calls” section by turning off the “Call without country code” option.
When disabled, numbers will be dialed in the international format, either with or without a plus sign.
For example, +442011111111 or 442011111111.
In the PBX prefix settings section, you can choose from pre-defined prefix rules or set your own from the list on the right.
"Country Prefix" - this specifies the country code that will be used for outbound calls from the PBX, without dialing prefixes or in local format.
"City Prefix" - this specifies the city code that will be added when dialing without prefixes, in local format.
"International dialing code" - this prefix will be removed when used, and only the previously specified numbers will be dialed.
"Intercity dialing code" - this prefix will be replaced by the “country prefix + city prefix” mentioned above when used.
For example
For dialing a number in the United Kingdom:
Country code: 44
City code: 20
Intercity dialing code: 0
International dialing code: 00
To call a number in London, United Kingdom (e.g., +442011111111), you need to dial 02011111111.
For calls to other cities in the United Kingdom - 0(area code)(phone number), for example, 01611111111 for Manchester.
To call a number in another country, you need to dial starting with the prefix 00 or in international format with a plus sign.
For example, to call a number in the USA 12345678901, you should dial 0012345678901 or +12345678901.
3. Call recording ▾
You can enable call recording for one or several PBX extension lines. Records are sent by email or stored in the cloud (on our server).
You can record calls on 3 extension numbers for free (8 numbers in “Office” price plan and 20 numbers in “Corporation” price plan). The cost of each additional extension number recording is $2 per month.
The size of the free cloud storage is 200 MB for “Standard” price plan, 2000 MB for “Office” price plan and 5000 MB for “Corporation” price plan (5000 MB is over 250 hours of calls).
You can listen to the recordings saved in the cloud on “My PBX” page - “PBX statistics” or download with the help of API. After turning off call recording the records will be stored in the cloud for 180 days.
You can turn on call recording on “My PBX” page - “Extension numbers”.
4. Integrating Zadarma PBX with CRM and other business systems ▾
You can integrate Zadarma PBX with one of top CRM and other business systems. Integrations are set up on “Settings” - “Integrations and API” page. Detailed instructions on integrations can be found on an appropriate page.
Currently the following official integrations are available and completely free: Bitrix24, Zoho CRM, Kommo, Salesforce, RetailCRM, ZohoDESK, PlanFix, WireCRM.
5. Call Forwarding ▾
Call forwarding is the process of redirecting a call to another mobile or landline number. It is necessary to receive calls without additional software or equipment and without an internet connection.
To ensure you don't miss any calls, you can set up conditional call forwarding to your mobile or landline number.
To enable call forwarding on the “My PBX” page - "Extensions" go to the settings for the desired extension and on the left, in the “Call forwarding and Voicemail” field, click "Enable".
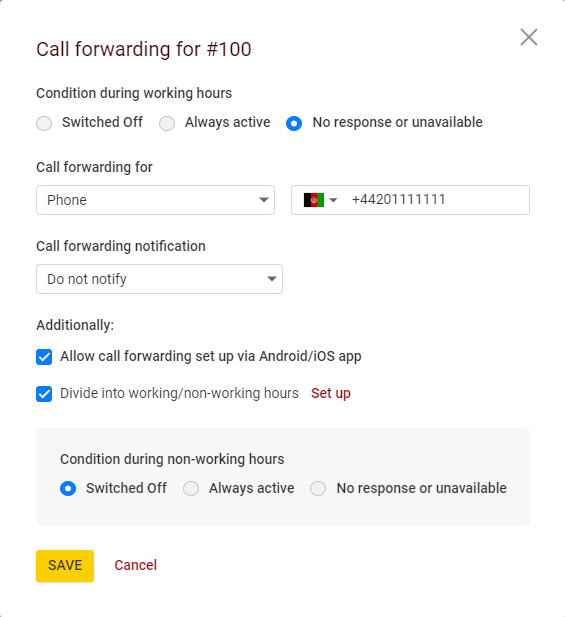
In the new window, choose the forwarding option "No response or unavailable" to enable conditional forwarding or "Always" to enable unconditional forwarding.
In the first case, the call will first be routed via the internet to the software or equipment you have set up, and if it is turned off or no response is received within 20 seconds, the call will be forwarded.
When unconditional forwarding is enabled, the call will be immediately directed to the forwarding number, regardless of the active software/equipment. Forwarding can be set to the following elements:
- to a number: forwarding to another operator's number specified in international format. The number format will change when using local dialing (in the ""Settings - My Profile - General Settings - Calls" section) and PBX prefixes ("My PBX - Outbound Calls - Prefixes and Codes").
For this type of forwarding, a "Call forwarding Notification" message can be played to the forwarding number after the call is received and before connecting with the client. This option is useful if you need to differentiate the forwarded call from other calls to the forwarding number.
Example: Conditional forwarding is set to your SIM card with a mobile number. The "Call forwarding Notification" is activated with the phrase "Forwarded from Zadarma".
- Voicemail: Forwarding to voicemail. You can set a greeting that will be played to the caller before they can leave a message. You can upload your file (mp3, wav up to 5 MB) or create one by entering text for robot reading.
- Forwarding to SIP number: Forwarding to another extension of the same PBX or SIP number of your account. "Call forwarding Notification" can be used (features and functionality described above in "to a number").
- Voice Menu: Forwarding to a specific scenario or voice menu of the same PBX.
For extensions, you can set separate working hours (option "Divide into working/non-working hours").
When enabled, you can specify working hours by day of the week and time, and set a holiday calendar.
If you have a Teamsale CRM account, you can synchronize the working hours of the extension with the schedule of the employee in Teamsale CRM to whom this extension is assigned.
For non-working hours, a separate forwarding can be set, allowing more flexible call reception setup. For example, if an employee uses one mobile number during working hours and another during non-working hours. Or during non-working hours, the call should be answered by another employee (PBX extension).
"Enable call forwarding setup via Android/iOS app" - when this option is enabled, employees can change the forwarding number from the Zadarma mobile app.
6. Voicemail ▾
Voicemail is a feature that allows recording voice messages if a call was not answered.
To enable voicemail, enter your email address in the call forwarding settings. Please note, we do not recommend using voicemail in the scenario with other numbers, as it will pick up the call first.
You can upload a file, voice over a text or choose one of the default messages for client notification.
7. Notifications in messengers ▾
Receive notifications about missed calls, account balance, number and price plan renewal and SMS messages in popular messengers - Telegram, Facebook Messenger, Slack, or an additional email address. You can configure notifications in your personal account, Settings-My profile-Notifications page.
8. Conference ▾
During a call PBX users can enter 000 command – conference creation.
After entering 000 you need to enter caller C’s phone number and confirm by pressing #, for example 000102#
While adding another user, caller B will hear the music, callers A and C can communicate:
# - confirm adding caller C (during the call)
* - reject caller C and go back to the call with user B or to the conference
*# - return to caller B or to the conference.
When user C is added, you can enter 000 again and add another caller, while the call between the existing users will continue. After creation the conference will exist while there is more than one caller left.
Caller C can be any number (number format as during a regular call from PBX, for example 00018571111111#).
9. Determining the number by call destination (CallerID) ▾
CallerID is the number that will be displayed for outgoing calls.
You can set any connected number for CallerID.
You can use different CallerIDs when calling from different devices or to different destinations (countries and cities).
To set your CallerID by destination, on the page “My PBX” - "Outgoing calls" on the right click “CallerID by called destination”. Enter country and/or city code that you call (for example, 44 for Great Britain or 1 for the US etc), choose a CallerID and click “Create”.
10. Additional external line ▾
You can connect up to 20 numbers from a different provider to Zadarma virtual PBX on the page “My PBX” - "External lines".
If you have a traditional landline number connected through a copper line, you need to use VoIP gateway with FXO port, enable an external line in the gateway mode and specify settings from the website for the gateway. If your number supports SIP operation, you can just enable the line in Server mode and specify number settings.
Your provider needs to provide data for connecting: server, domain (can be the same as the server), login, password.
On our side the connection to the number is realized from the following IP addresses:
185.45.152.167
185.45.152.184
185.45.152.185
195.122.19.26
195.122.19.16
37.139.38.70
37.139.38.71
185.45.155.13
185.45.155.27
You can also port (transfer) a number from a different provider to Zadarma. Numbers available for porting can be found on this page.
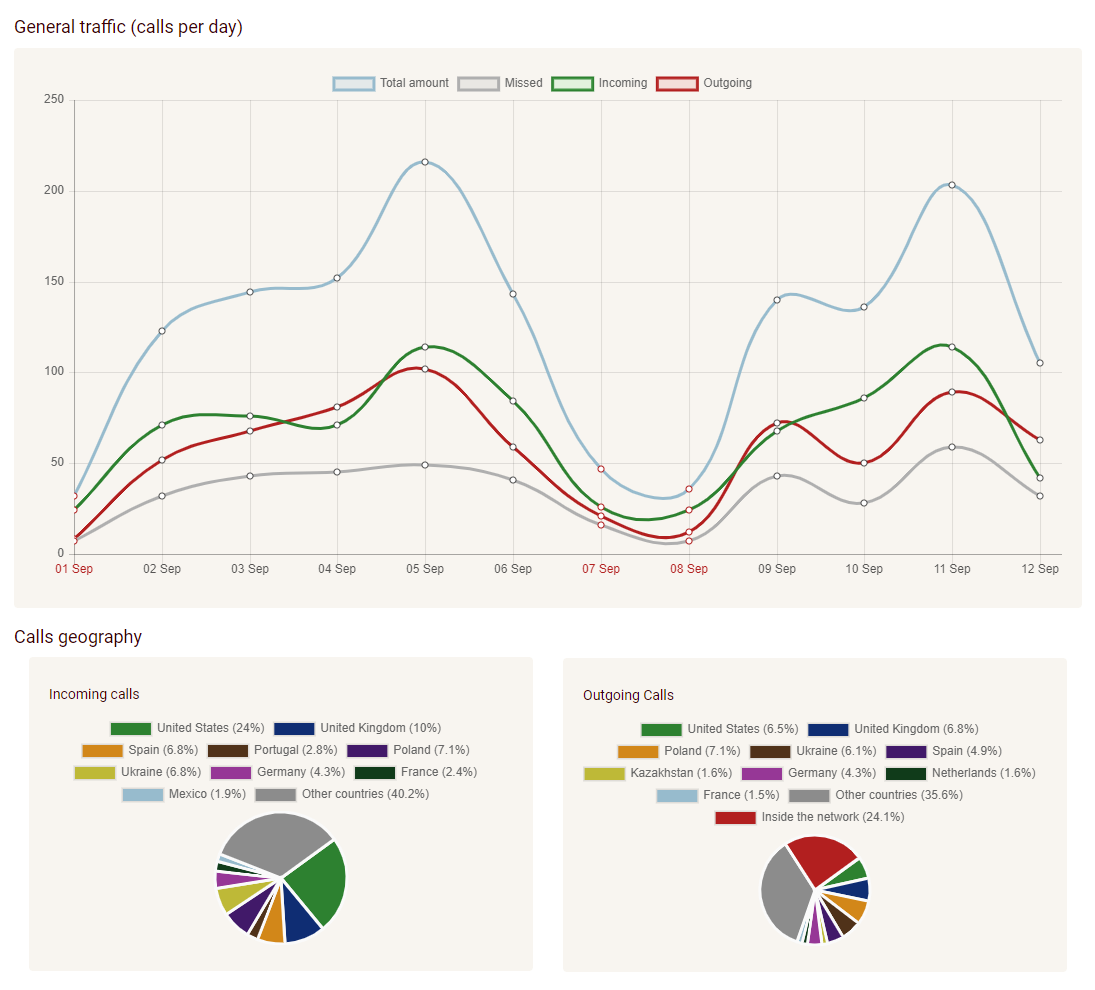
11. PBX statistics ▾
Detailed statistics of PBX calls can be found on “My PBX” page - “PBX Statistics”. Here you can set statistics timeframe, compare different periods, see charts and geography of calls. Statistics and charts are available both for all calls and calls on certain virtual numbers (or external lines).