 Calls
Calls
 Phone numbers
 SMS
SMS
 Business Phone System
 eSIM for Internet
 AI agent
 AI Speech Analytics
 Click to Call
 Call Tracking
 VoIP for Business
 Become a partner
 Integrations
 For whom
 Setup guides
 FAQ
FAQ
 Online chat
 Contact us
 Blog
Blog
Go to «Services», «Callback button» and click on «Create a widget».
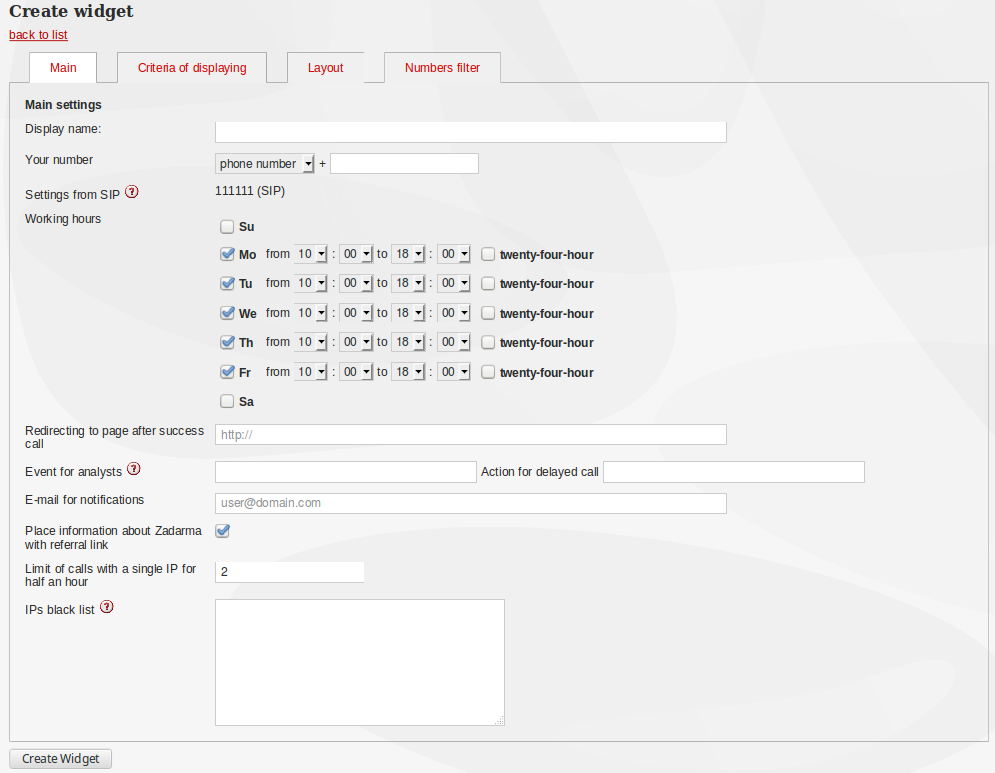
1. Main
- Display name — set any value. Only you will be able to see this in your personal account.
- Your number — when your website visitor requests a call, our service sends a call to your phone number (or a SIP number, extension number or a cloud PBX scenario). After you have answered this call, our server sends a call to the phone number left by your website visitor and they will join you in a conversation.
- SIP Connection — SIP number or the PBX extension number used as the CallerID for calls made from the widget. This number is also conveniently displayed in the call statistics.
Note: if you select the SIP number or the PBX extension number in the «Your number» field, this number is used as the CallerID, and the «Your number» field is not displayed. - Working hours — you can set working days and hours during which you wish to receive calls from the widget. During the non-working hours, visitors to your website can leave a request for a delayed call. Information about this is sent to your email and is also displayed in the widget statistics and in the «Delayed calls» section of the Layout settings. When you click on the callback widget, the call is made at the visitor's requested time to your phone number first and then to your client's number.
Note: if you set all days as non-working, the widget will not work. - Redirecting the page after a successful call — after a request for a callback, the client will be offered to respond either «I got the call» or «There was no call».
In the first case, you can redirect the client to the desired page, for example, to the online shopping cart or to the contact's page.
In the second case, the client can send the request again. In widget statistics, the current call will be marked as «failed» (even if the call was successful). - Event for analytics, Event for a delayed call - you can specify a tracking system event in these fields. For example: Google Analytics. Enter the JavaScript code in the appropriate fields. This code is executed by clicking on «Waiting for call». Only enter the Javascript code in this field. Entering other values will result in an error when a call is requested.
- Email for the notifications — an additional email address for the notifications with requests for delayed calls.
- Place information about the Zadarma Project with a referral link — information about our website is displayed in the widget window with your referral link. More information about our affiliate program.
- Limit calls with a single IP to half an hour — limit the amount of callback requests from the same IP address to avoid spam calls from your widget and not to waste your balance.
Callback request limit from the same client's number - an antispam limit for a callback request from the same number. If enabled, the second call can be requested after an hour, and the third only after 24 hours. - Blacklist of IP addresses - You can block callback requests from certain IP addresses, for example, if inappropriate calls are requested from it. The widget statistics include information about IP addresses from which callback requests were made.
- Analyzing visitors' behaviour - each of the visitor's actions can be given a specific amount of points. When the visitor makes the specified actions, all of the points are added up.
- Display the widget when the criteria sum has reached - when the sum of points is equal to or greater than the value set in this field, the visitor automatically receives an offer to request a callback.
- Display the widget when leaving the website and when the criteria sum has reached - this event is triggered when the mouse cursor is outside of the website’s boundaries (if the total number of points is equal or greater than the value set in this field).
- Countdown from — set the number of countdown seconds from the time of clicking on the «Waiting for call» button. The countdown is seen by the visitor. You can set any value — this does not affect the connection time.
- Image – the picture of the manager on the button and in the callback window.
- Button position – the position of the widget on the website.
- Offset – offset from the edge of the website to the widget.
- Auto substitution of the country prefix – auto substitution of the country prefix in the number field. The prefix is set according to the geolocation based on the visitor’s IP address.
- Text for the button – text displayed on buttons 2 and 3.
- Agreement checkbox – if you would like to receive visitors’ agreement for using their numbers, you can describe the conditions and the purpose of requesting the number in the agreement text. This checkbox will appear in the widget if all three fields are filled in: Title, Text for the link to read the full agreement and Full agreement.
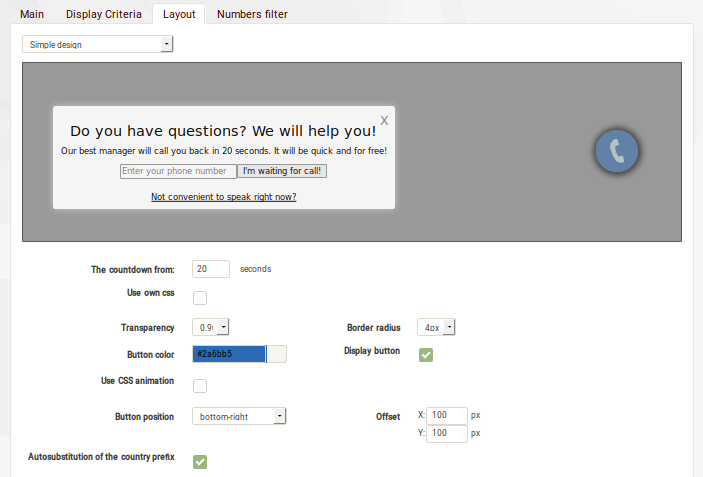
- Countdown from — set the number of countdown seconds from the time of clicking on the «Waiting for call» button. The countdown is seen by the visitor.
- You can set any value — this does not affect the connection time.
- Use your own css - you can manually change the widget/button layout by changing the css style.
Download the css file and redefine the desired styles.
You will then have to upload this file on your server and connect it to the pages where you chose to place the widget using the tag . When the option "Use own css" is enabled, the widget will not download the css styles from our website.
Example: <link rel="stylesheet" type="text/css" href="/css/zcallback_widget.css"> - Display button — you can disable the button display, so the widget appears only after the criteria sum is reached.
- Use CSS animation — enable/disable the animation that appears on the widget button.
- Auto substitution of the country prefix – auto substitution of the country prefix in the number field. The prefix is set according to the geolocation based on the visitor’s IP address.
2. Display criteria
Zadarma's system can identify the clients' irregular behaviour on the website and automatically show them the widget with an offer to request a free callback.
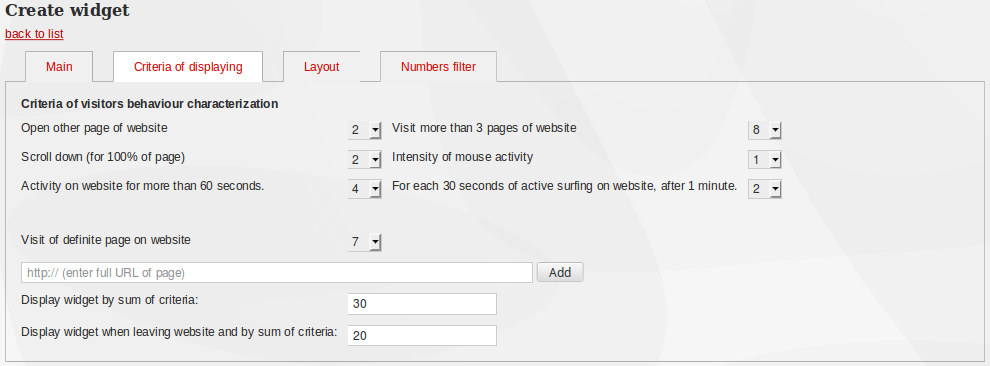
If you set the value to 0, the widget appears immediately after the visitor’s first action.
Note: all client actions on the website are saved in their browser cookies. If the widget's window is closed once, it will not appear by itself the second time.
Also, the last 5 website pages viewed by the visitor are saved in the cookie files. When moving between the same pages, the points for each action are only added once.
3. Layout
In this section you can set up and view the widget layout (before placing it on your website).
There are 2 widget design options: “New” and “Simple”. Each of them has its own advantages.
New design
Allows to easily create a nice-looking widget using existing templates without entering any additional settings.
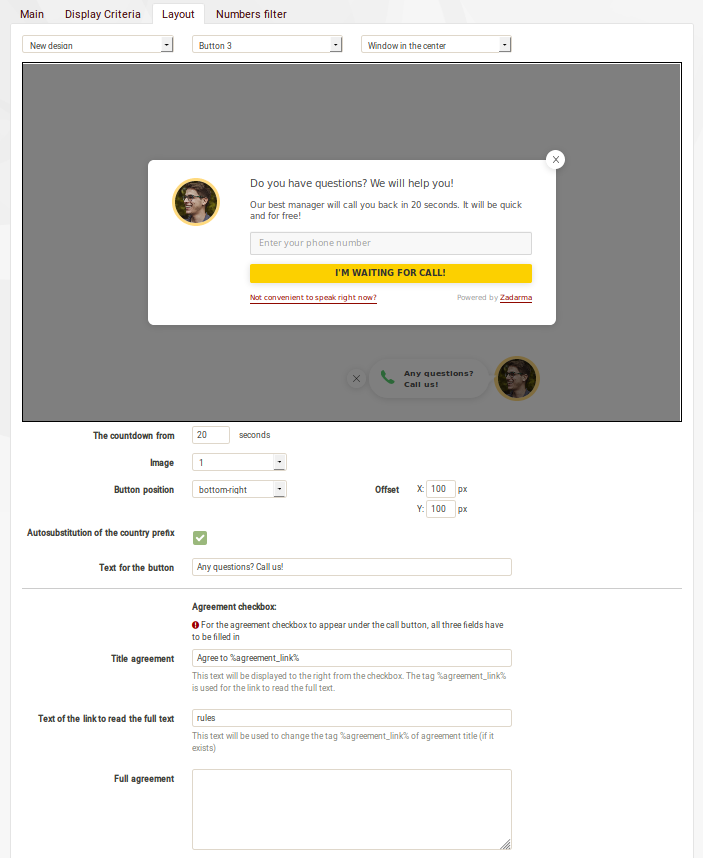
Above the widget example you can choose one of the three available options of the button triggering the callback widget, as well as the design of the callback window itself (side panel or in the center).
Simple design
Allows to use the older version of the widget with a simpler design and an ability to edit its layout (using css styles).
Signatures — text fields in the callback request window. You can change the complete text in the widget (in both design options).
4. Numbers filter
The filter enables you to reject or allow call back requests to phone numbers from certain countries.

To add a country to the filter, find it in the list and click «Add».
5. Website settings
After the widget has been setup, click «Save the Widget».
Copy the received code and embed it in your website anywhere within <body> tag.
When changing settings there is no need to change the code of the widget on your website.
Your new settings are active within 10 minutes (not instantly).