 Calls
Calls
 Phone numbers
 SMS
SMS
 Business Phone System
 eSIM for Internet
 AI agent
 AI Speech Analytics
 Click to Call
 Call Tracking
 VoIP for Business
 Become a partner
 Integrations
 For whom
 Setup guides
 FAQ
FAQ
 Online chat
 Contact us
 Blog
Blog
CRM is a multifunctional system for managing relationship with new and existing customers. Free Teamsale CRM is fully integrated with cloud PBX – make and receive calls via a build-in WEB-phone, create customer cards and tasks, monitor the performance of your agents, build the right business format with Teamsale CRM.
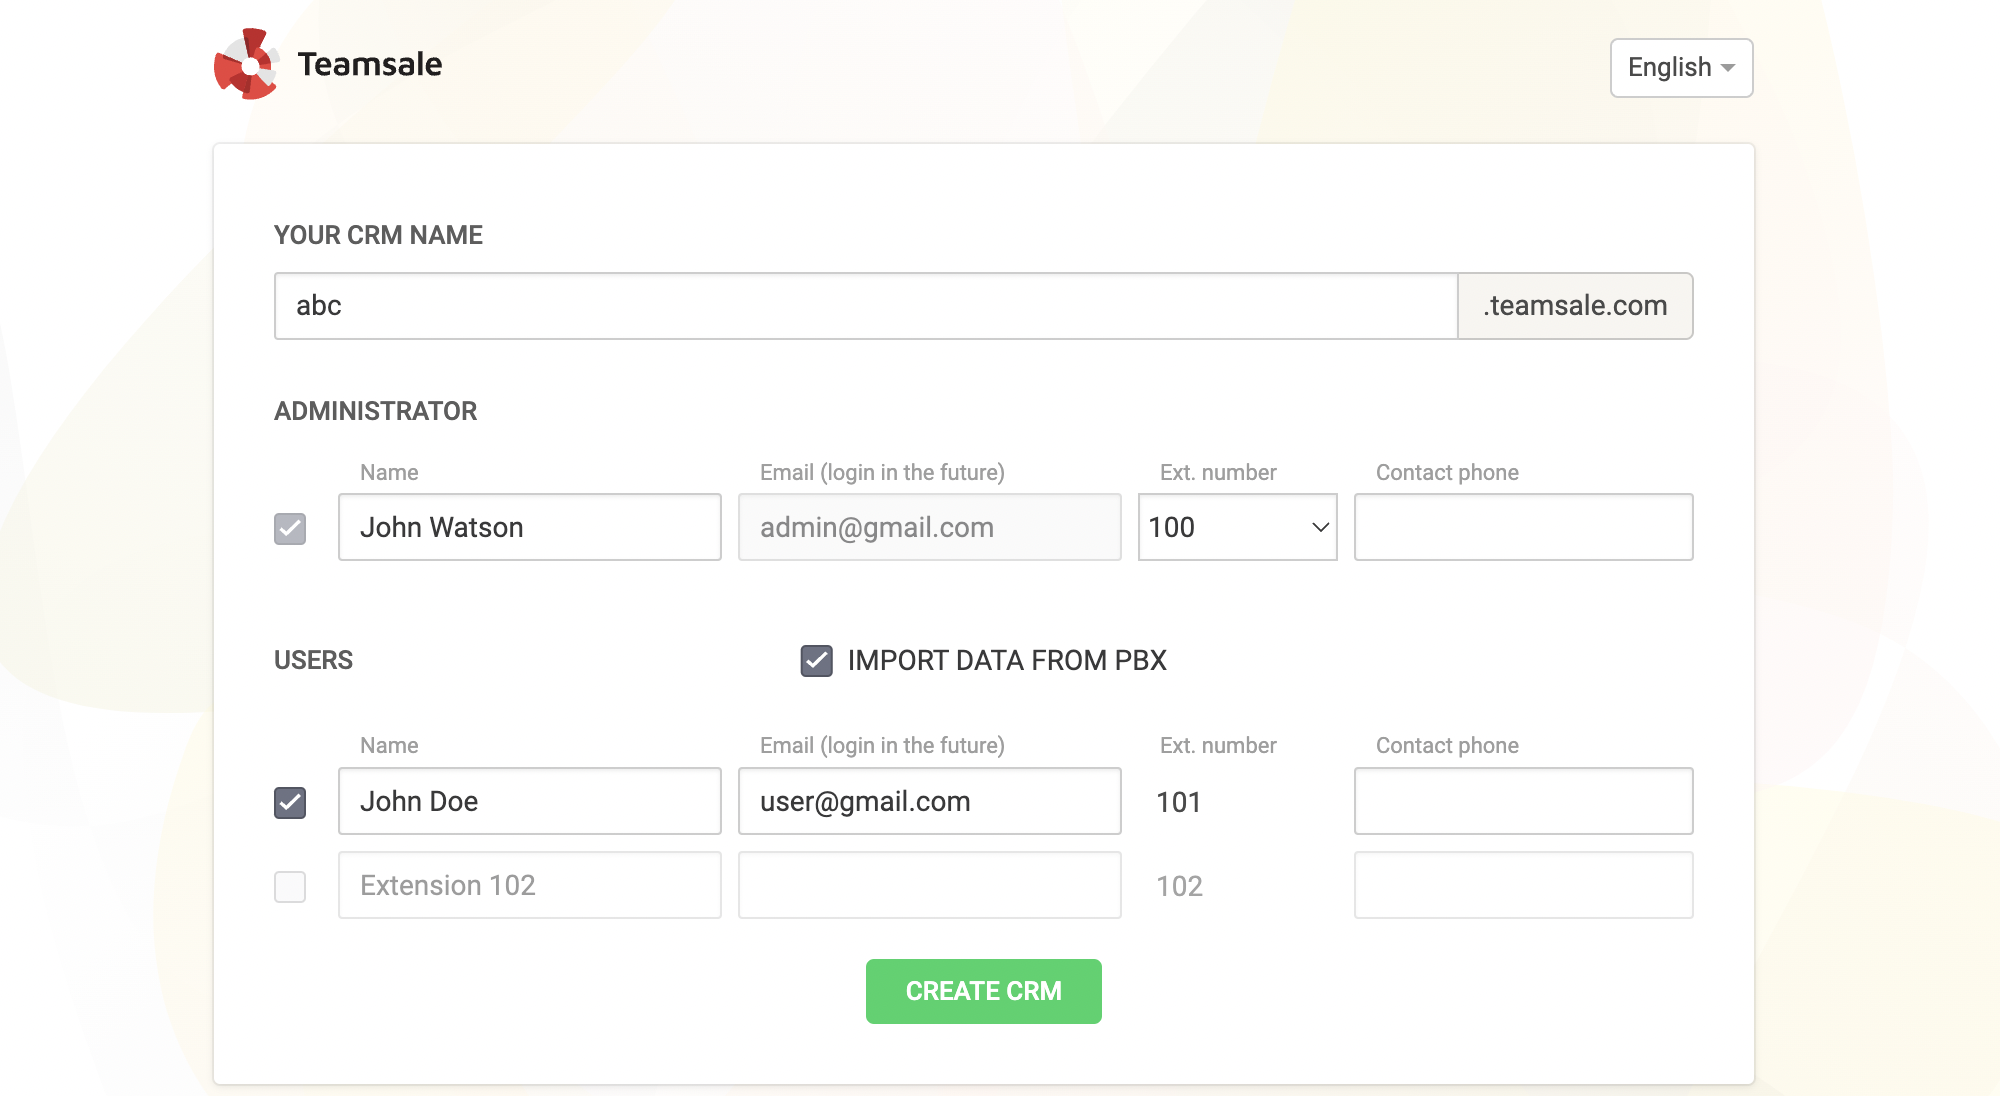
1. CRM wizard
If you have a created and activated PBX, in your personal Zadarma account go to Services – CRM, click "Enble" the integration and then "Go to" CRM account. If you haven't created a PBX yet, please use the PBX setup wizard and choose the appropriate option in the first step. During the CRM creation stage, enter the Name of your CRM in Latin and select an extension for the Administrator account. You can create additional users on this page or add them later. Click "Create CRM" to finalise the process.
2. Dashboard
This page contains widgets that display useful information about current events, widgets can be hidden/shown and moved around the page.
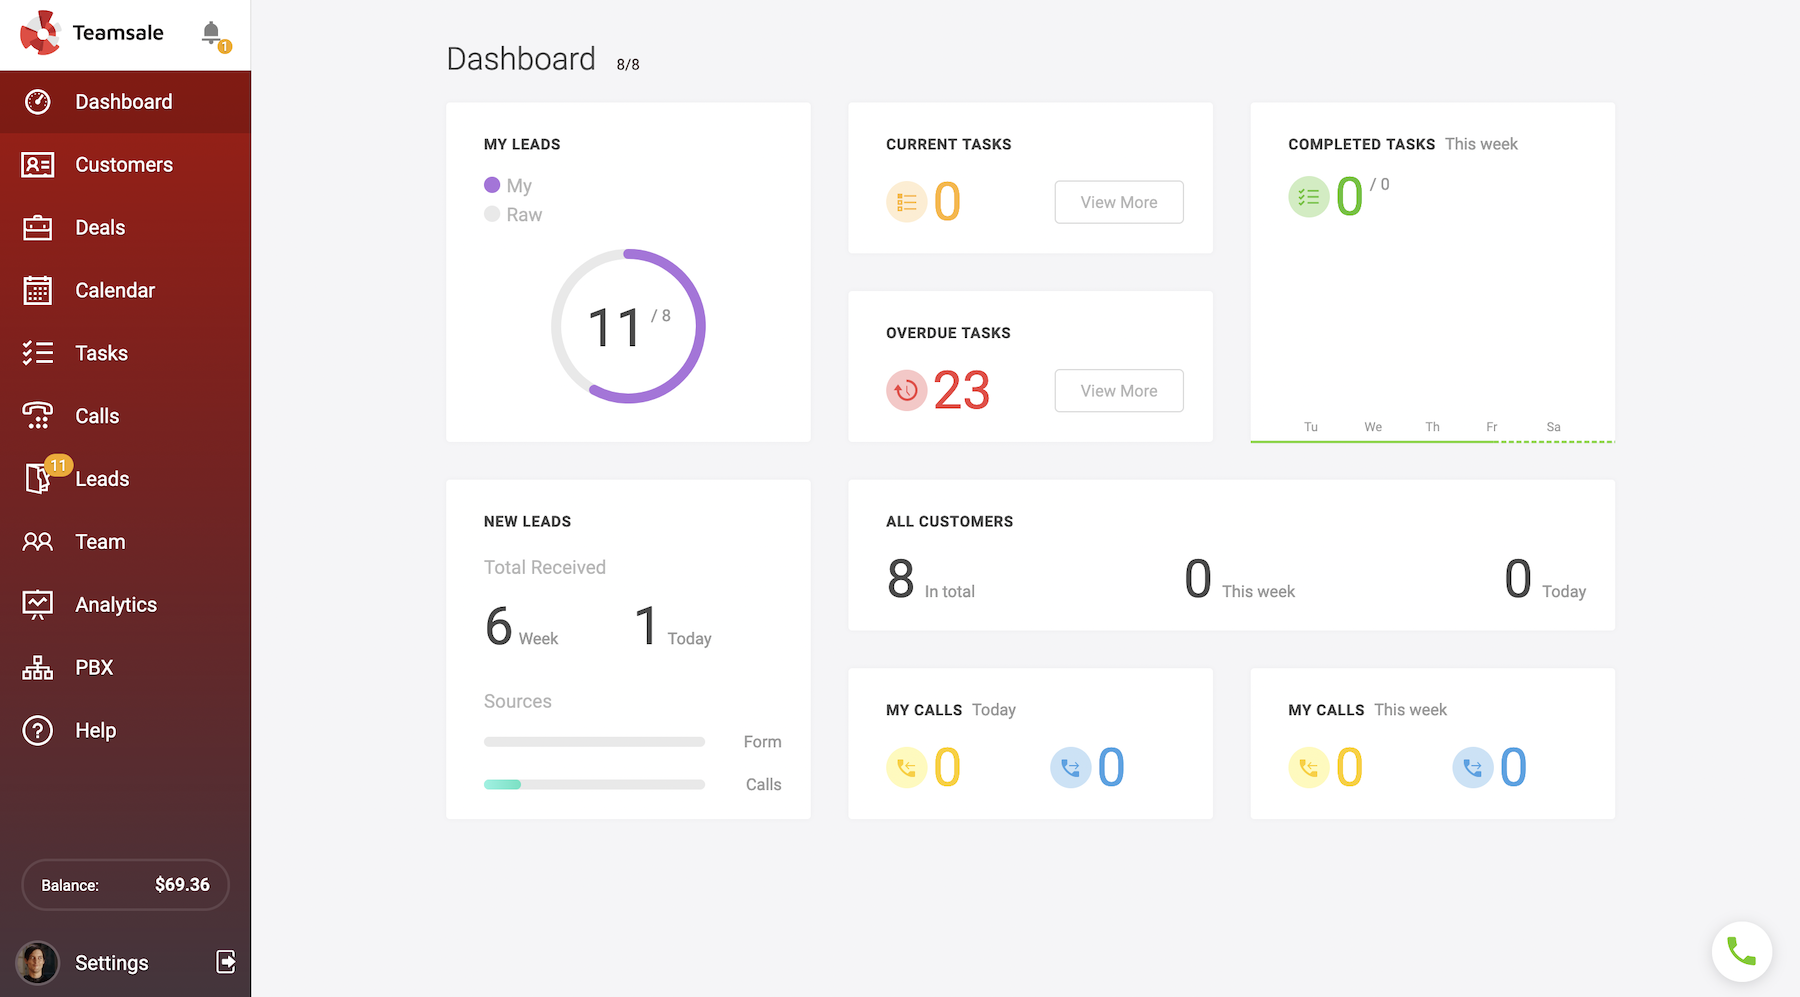
Widget list:
- Customers - the total number of customers, number of new customers this week and today.
- My leads - the number of agent leads and number of raw leads in the pool.
- Completed tasks - the number of tasks completed this week in relation to the total number of tasks.
- Overdue tasks - the number of tasks assigned to the current user that were not completed on time.
- Current tasks - the number of current tasks.
- My calls - the number of incoming and outgoing calls for today and for this week.
- New leads - the number of new leads for today and for this week.
3. Customers
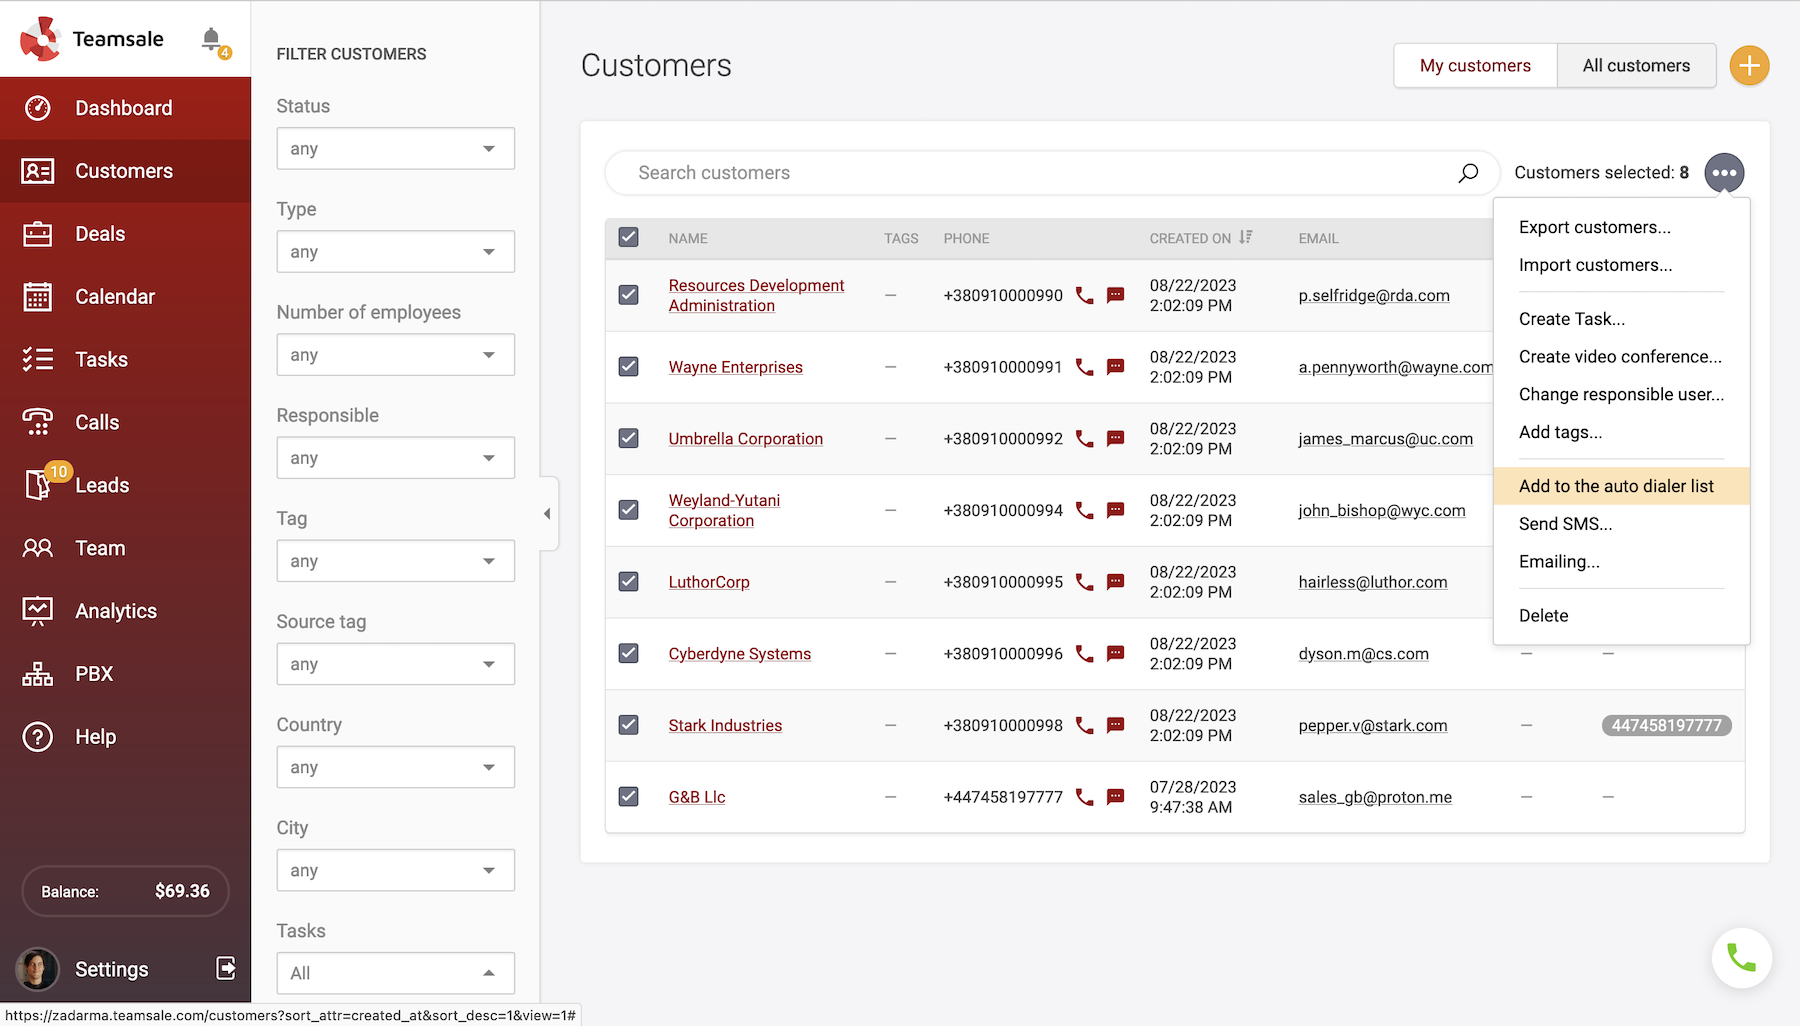
On the left side of the page there is a section with filters for searching customers, which can be hidden by clicking the arrow. You can also use the general search field on the top of the page. To the right, there is a “+” button for adding new customers. By clicking on the ••• button you can import and export customers.
Customers can be added to tasks, attached to video conferences, marked with tags, or have their responsible agent changed.
In a separate tab "My Customers", customers for whom you are responsible are shown. "All customers" displays the full list of customers added to the CRM.
Using tags, you can group similar customers for convenient searching later.
Customer card.
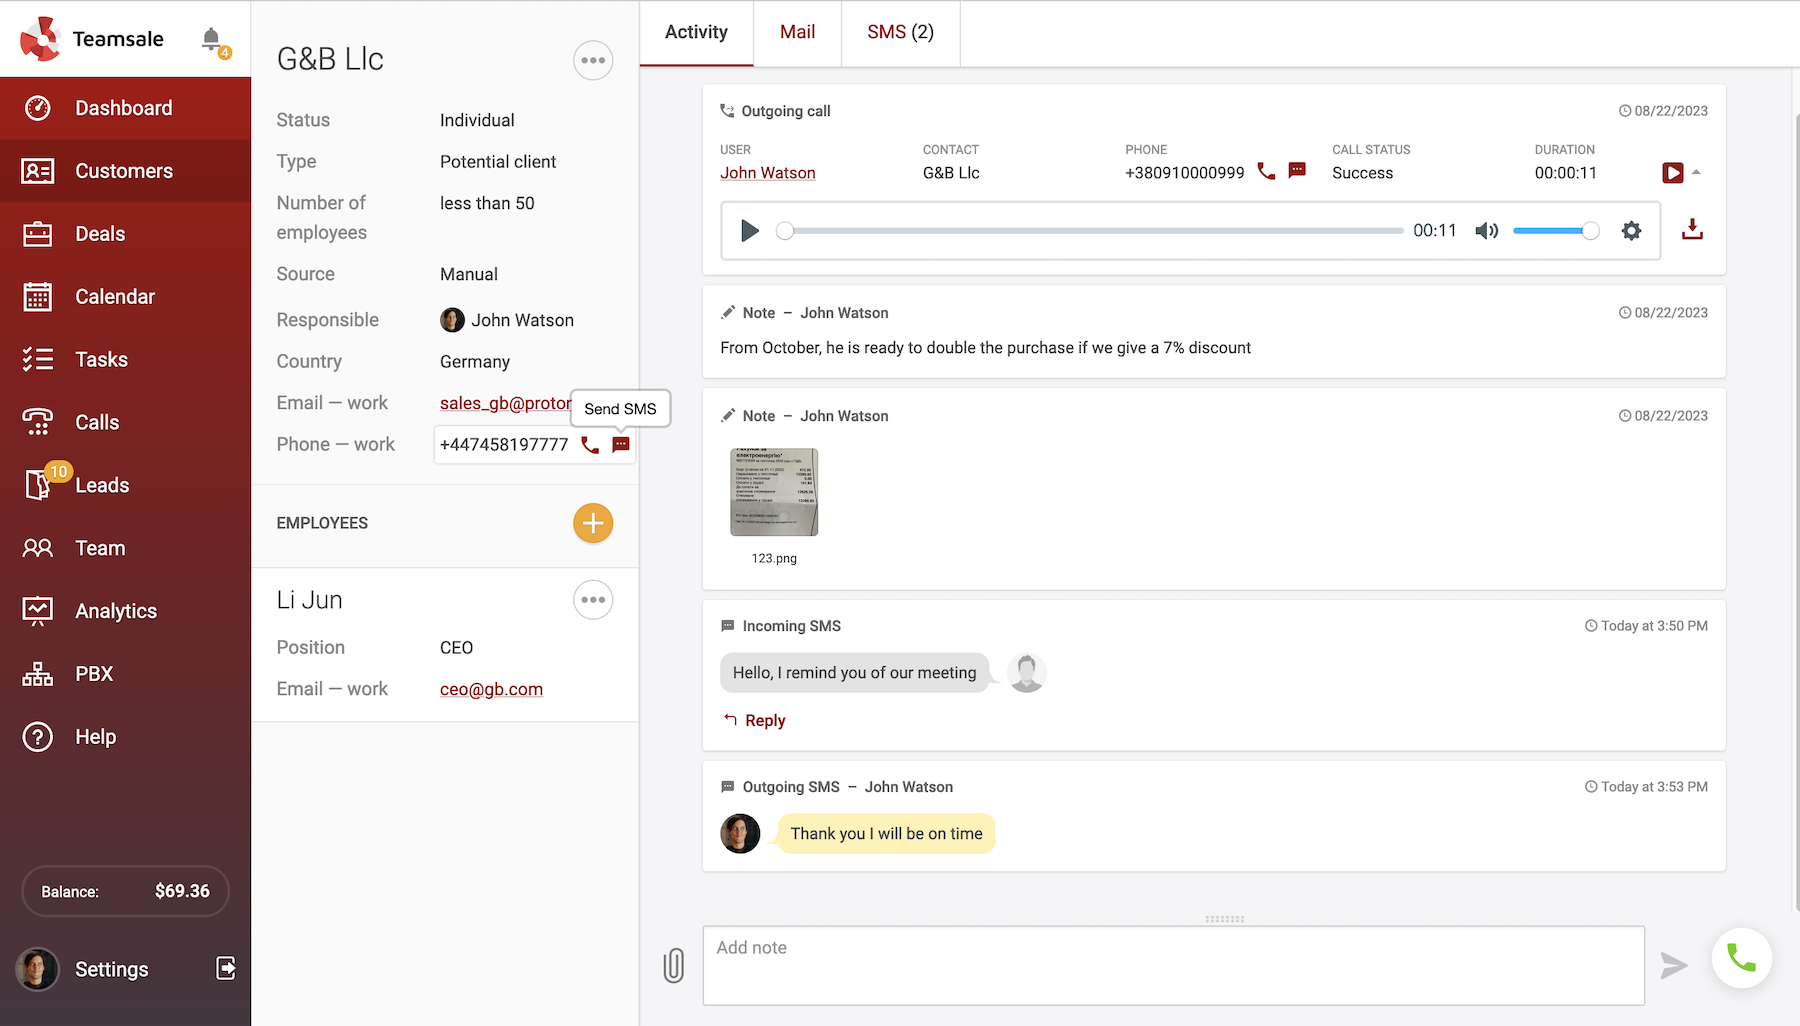
On the left side of the page, customer parameters are displayed With one click, you can send an email, make a call, or send an SMS to the customer. In the ••• menu, options for editing parameters, creating deals, tasks, and video conferences are available.
If you don't have enough options in editing mode, you can add custom customer properties in the "Additional Properties" section.
To the right is the customer activity feed, displaying all events related to this customer, including calls with audio recordings, notes, created tasks and deals, email and SMS correspondence, and much more.
Select several customers and the following actions will be available to you:
Add to the auto dialer list ▾
Automatic dialing
With the web phone, you can make calls from a selected list of numbers. The system will automatically dial the numbers starting from the first one. If the called party hangs up or doesn't answer, the system will start dialing the next number in the list after five seconds. You can pause the dialing process and resume it later.
You can create a call list in the Leads or Customers section, or simply by opening the web phone and selecting the Auto Dialer section. If you're calling unknown numbers, leads will be automatically created after successful conversations.

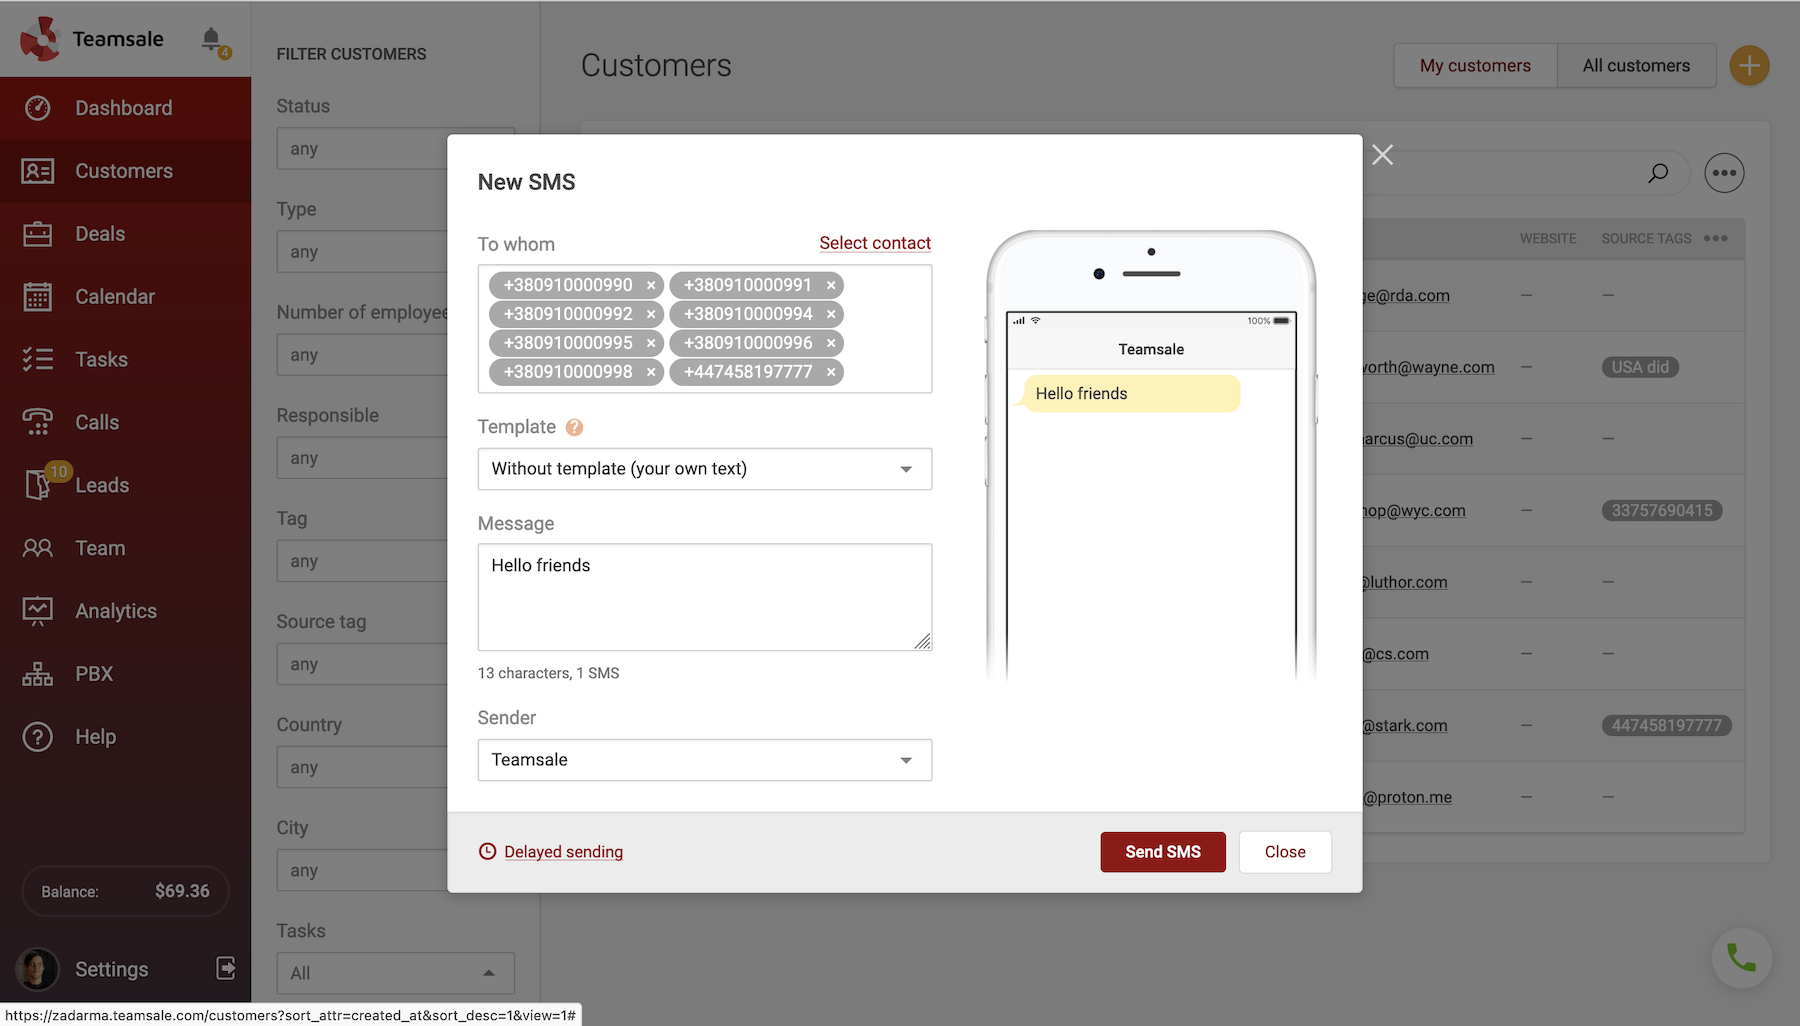
Send SMS ▾
You can conduct an SMS campaign to the numbers of selected customers. Choose an SMS template or enter text manually, then press Send SMS. After sending, you will see a delivery report.
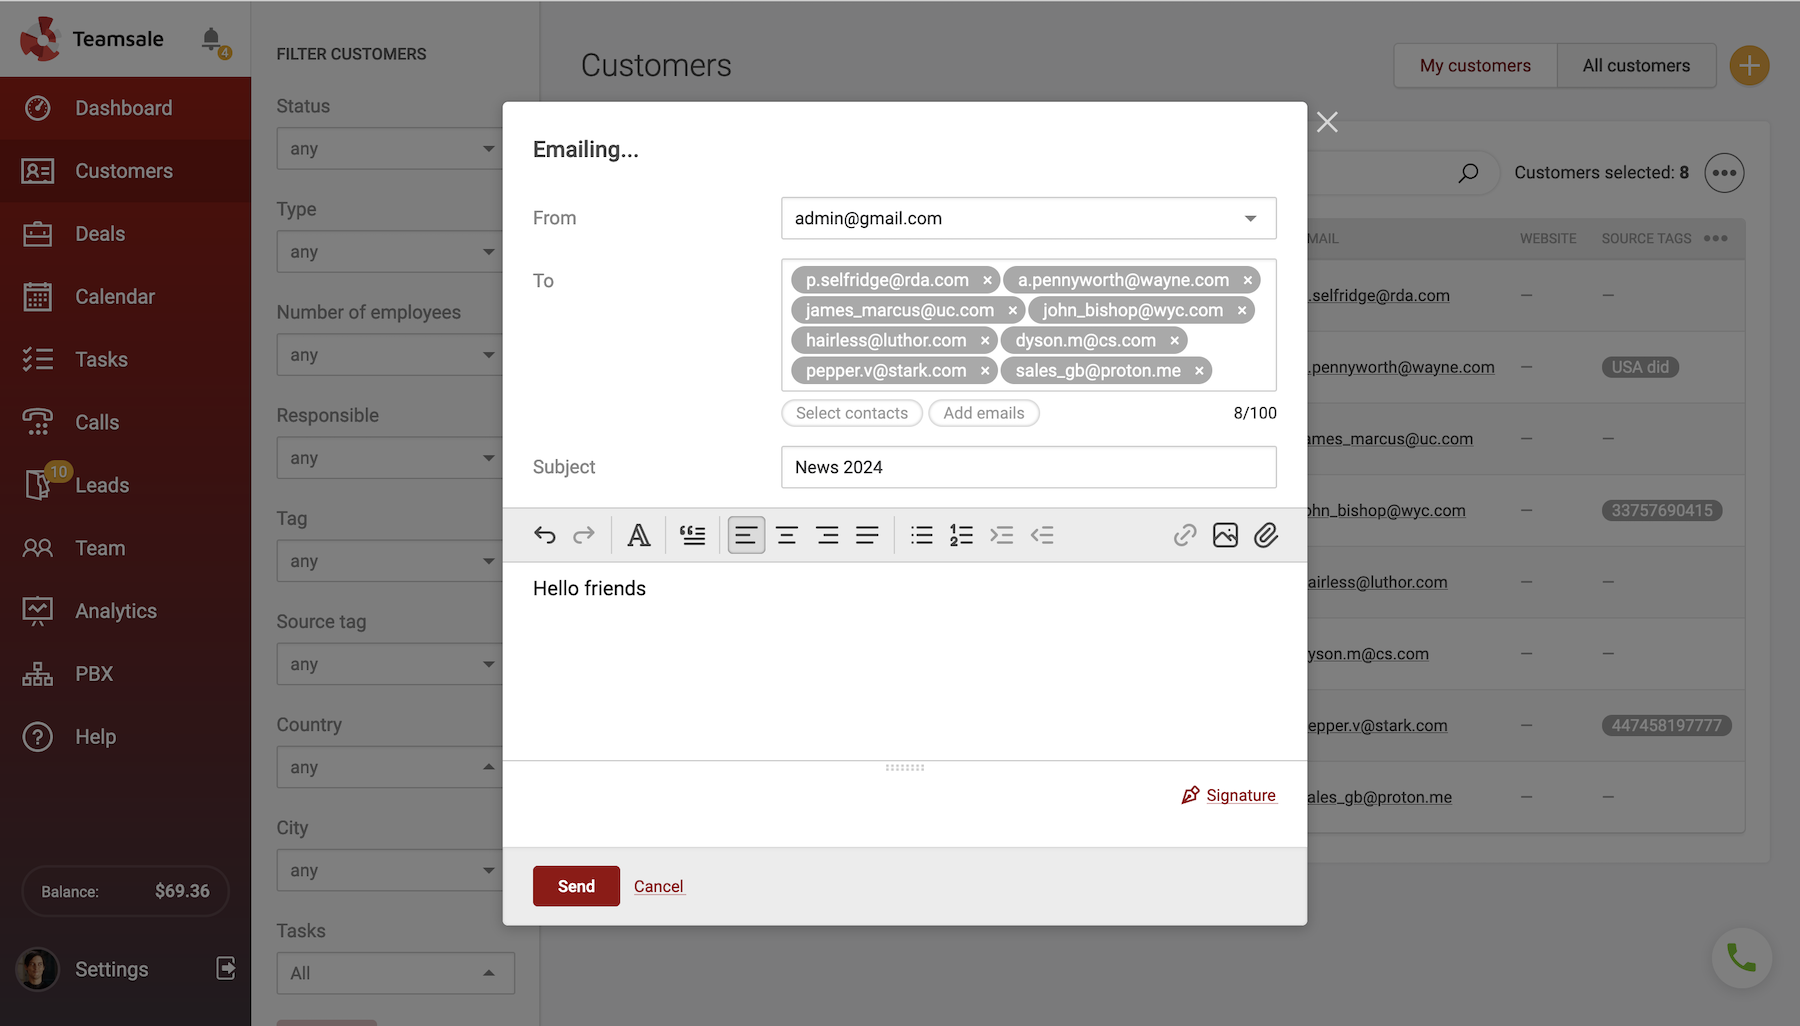
Email Campaign ▾
Email campaign for selected customers. You can add or remove recipients. Enter the subject and text of the email, select a signature template, and click Send
Importing Customers▾
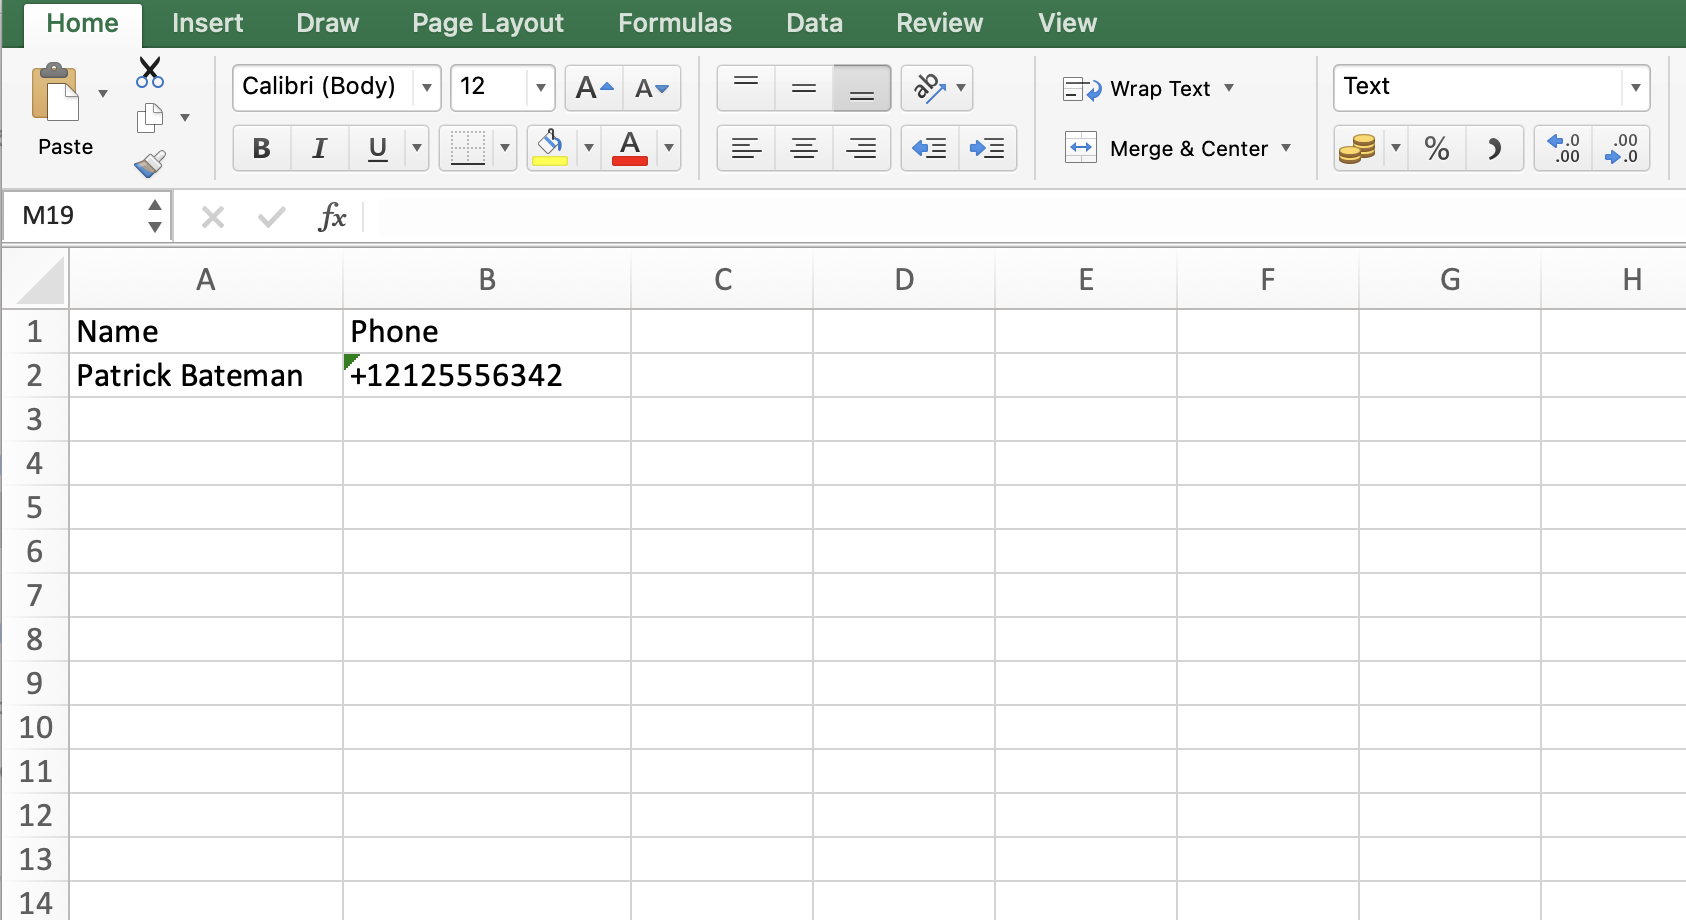
You can import your list of customers into Zadarma CRM from any other CRM. In the "Customers" section, click on ••• and select "Import", then upload a .csv or Excel file.
The phone numbers in the file must be in international format. If customers are from different countries, phone numbers should be specified with a '+', and the cell format in the file should be Text. The import window will show the names of the fields from your file on the left, and the corresponding values in the CRM on the right. For example, if your file has a "Customer Name" column, you select "Name" as the value next to it. Assign the “Phone number” column to “Phone -Work” and so on.
If the customer has several phone numbers, they should be listed in one cell in the imported file and separated by commas. Then, during the import process, all the phone numbers will be transferred to the CRM. If there is a need to remove recently imported customers after the import, it can easily be done by clicking on ••• and selecting "Cancel Import" (the system retains the entire import history with the option to cancel).
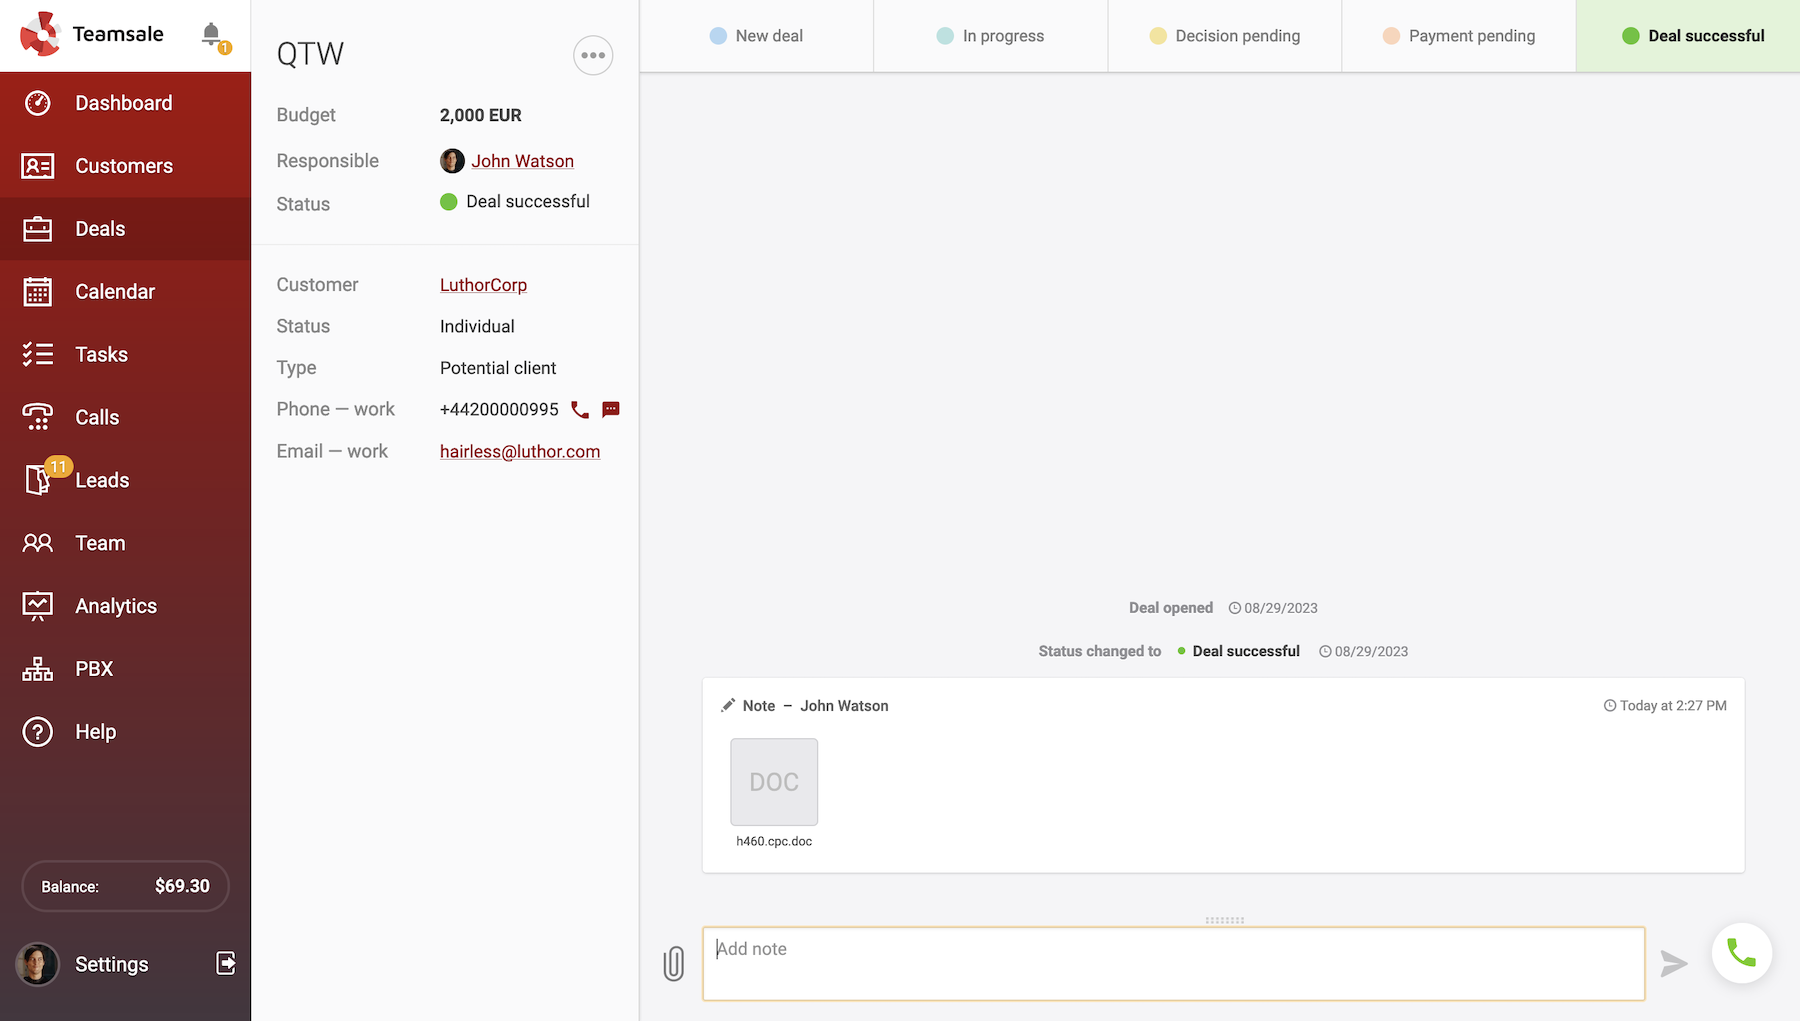
4. Deals
The deals can be displayed in both Kanban view and list view.
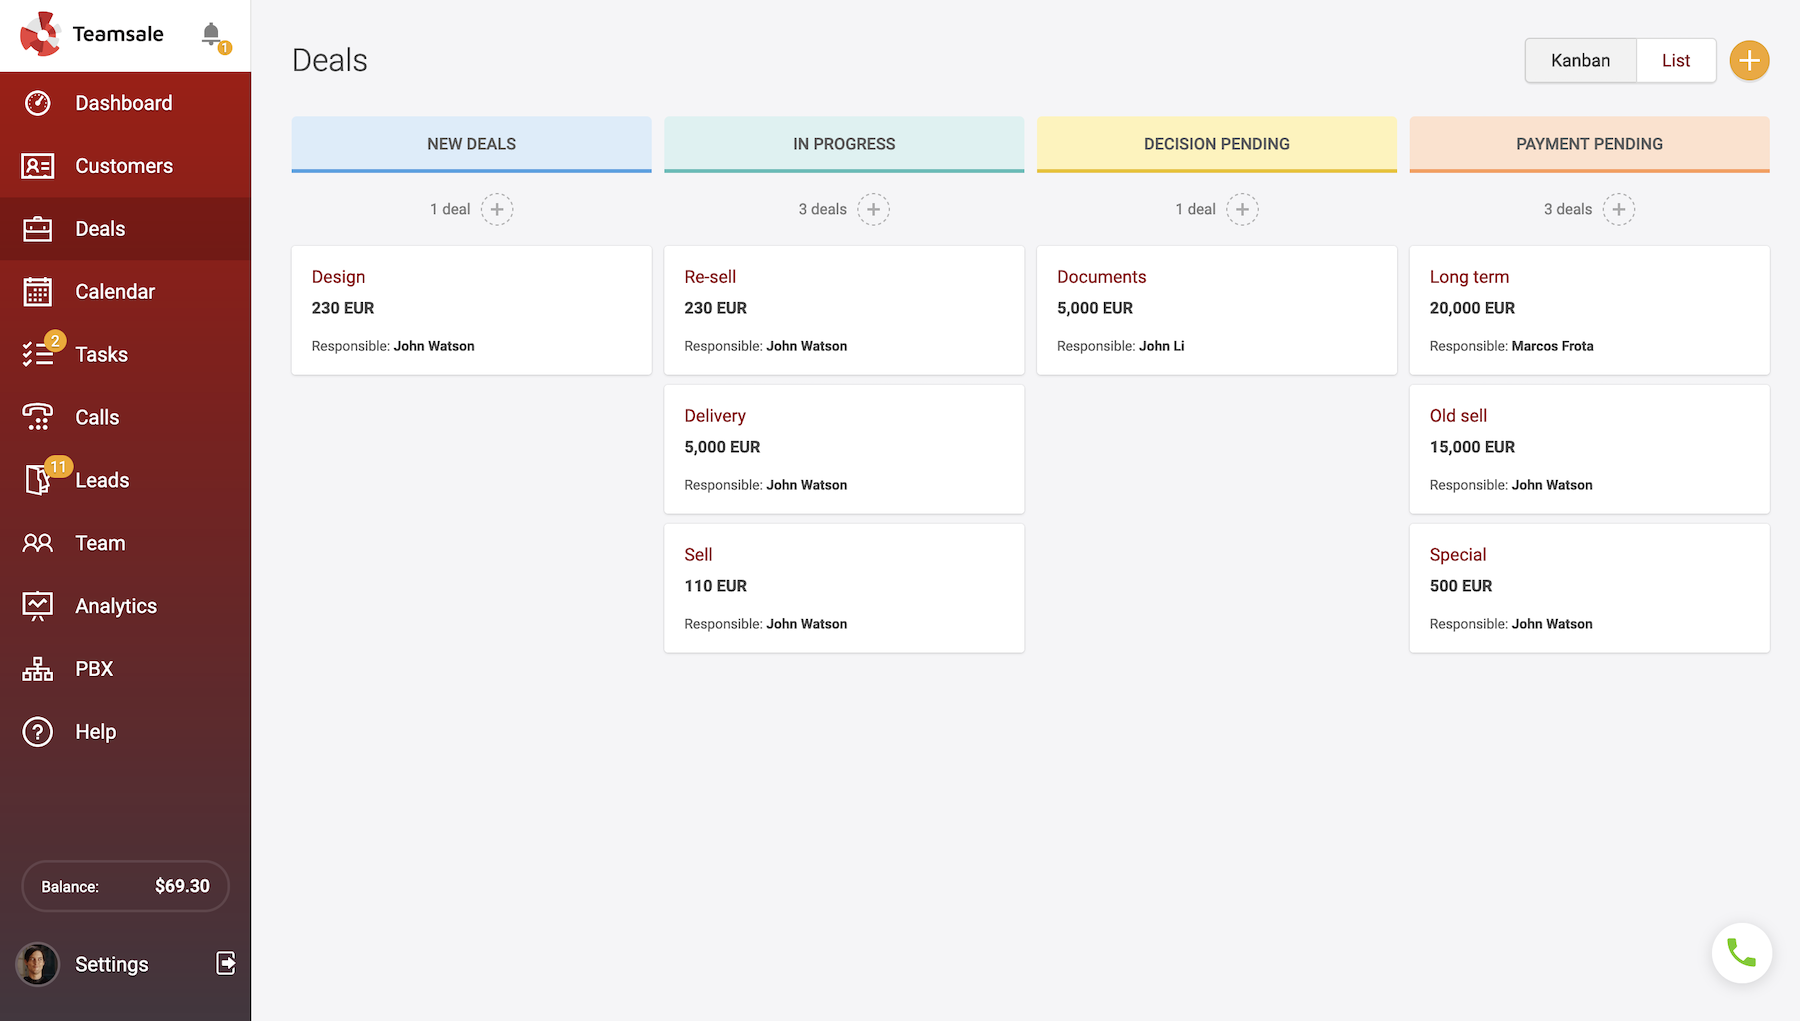
A deal represents the sale of a product or service to a customer. Deals can have the following statuses:
- New deals - the status for new deals
- In progress - active communication with the customer
- Decision pending - awaiting customer's decision
- Payment pending - active work on the deal is completed, awaiting payment from the clien.
- Deal successful - finalizing status, deal was successful, profit received
- Deal canceled - finalizing status for canceled deal
Deals are always linked to one of your customers. One customer can have multiple deals, in one or multiple currencies. You can view the sales funnel for deals in the Analytics section.
Each deal has its own activity feed, where all communication with the customer regarding that deal will be shown.
5. Calendar
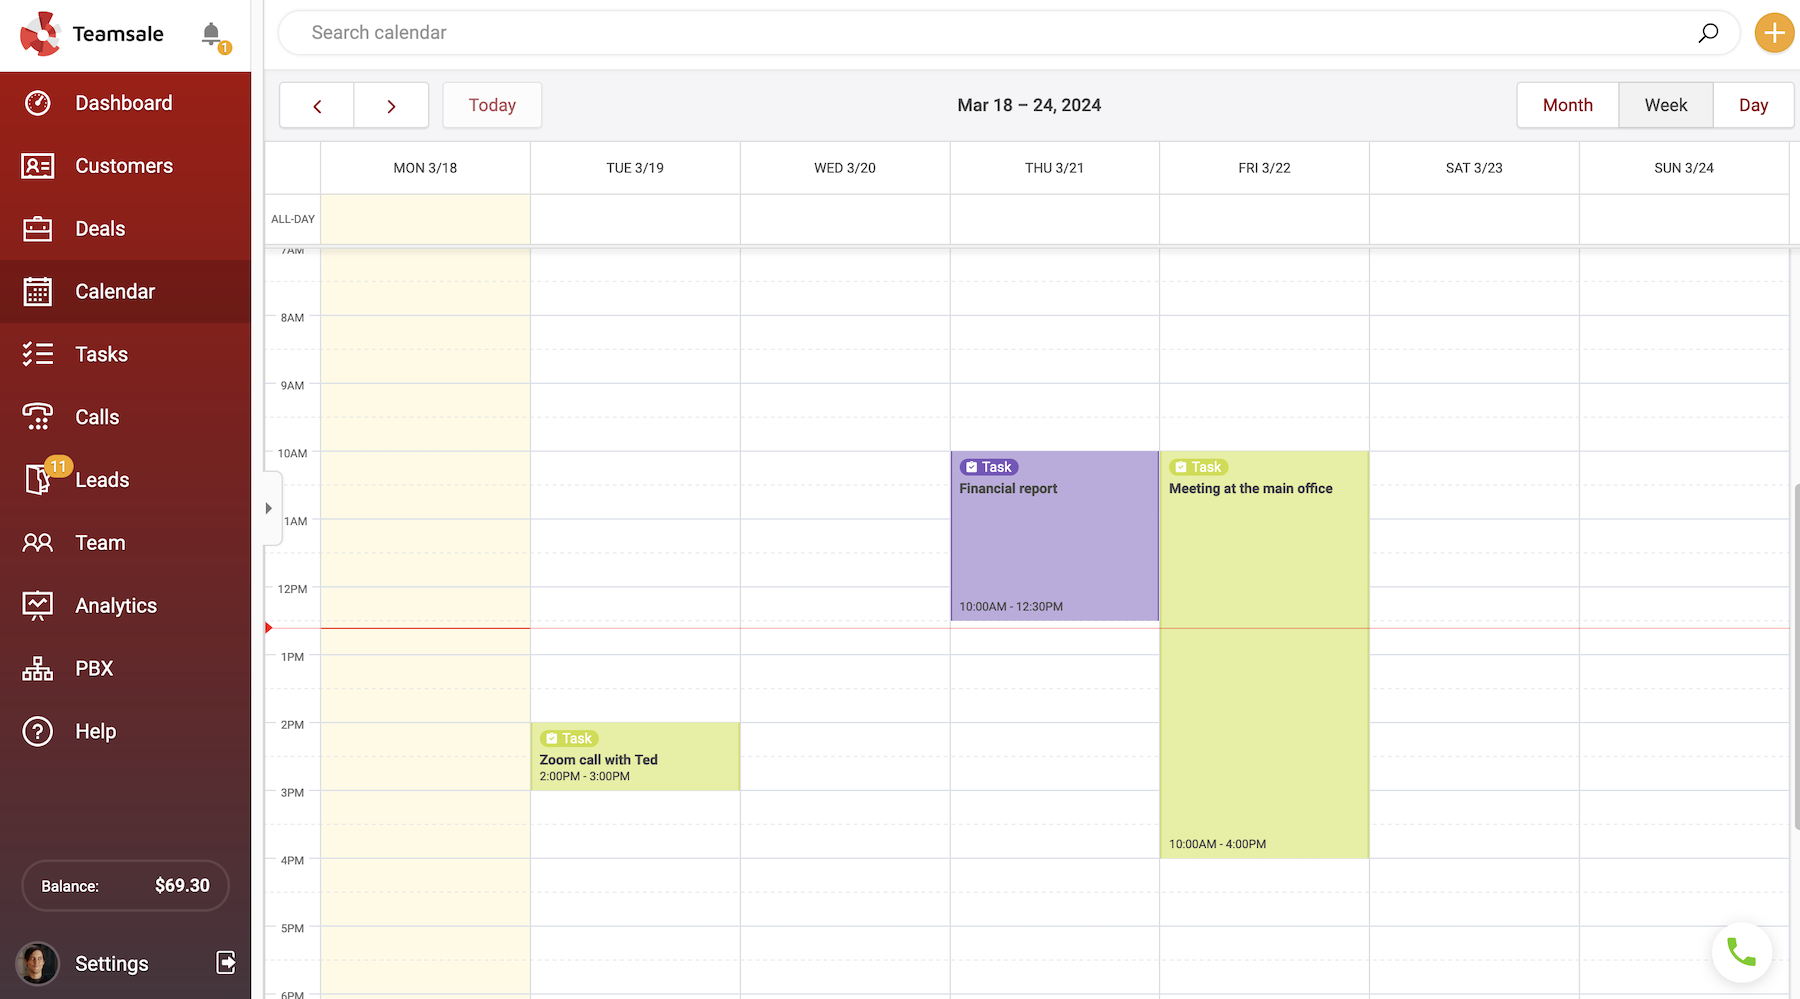
The calendar displays your tasks, and if you're an administrator, tasks of other employees as well. The calendar can be viewed in Month, Week, or Day format. You can create tasks for yourself or assign them to other CRM users.
Enable two-way synchronization of tasks with Google Calendar:
- Create events in Teamsale, and they will be automatically added to the Google Calendars of all participants
- Create events in Google Calendar to add tasks to Teamsale
- Modify events in Teamsale from Google Calendar, and vice versa
- Synchronize deletion of events between Teamsale and Google Calendar
6. Tasks
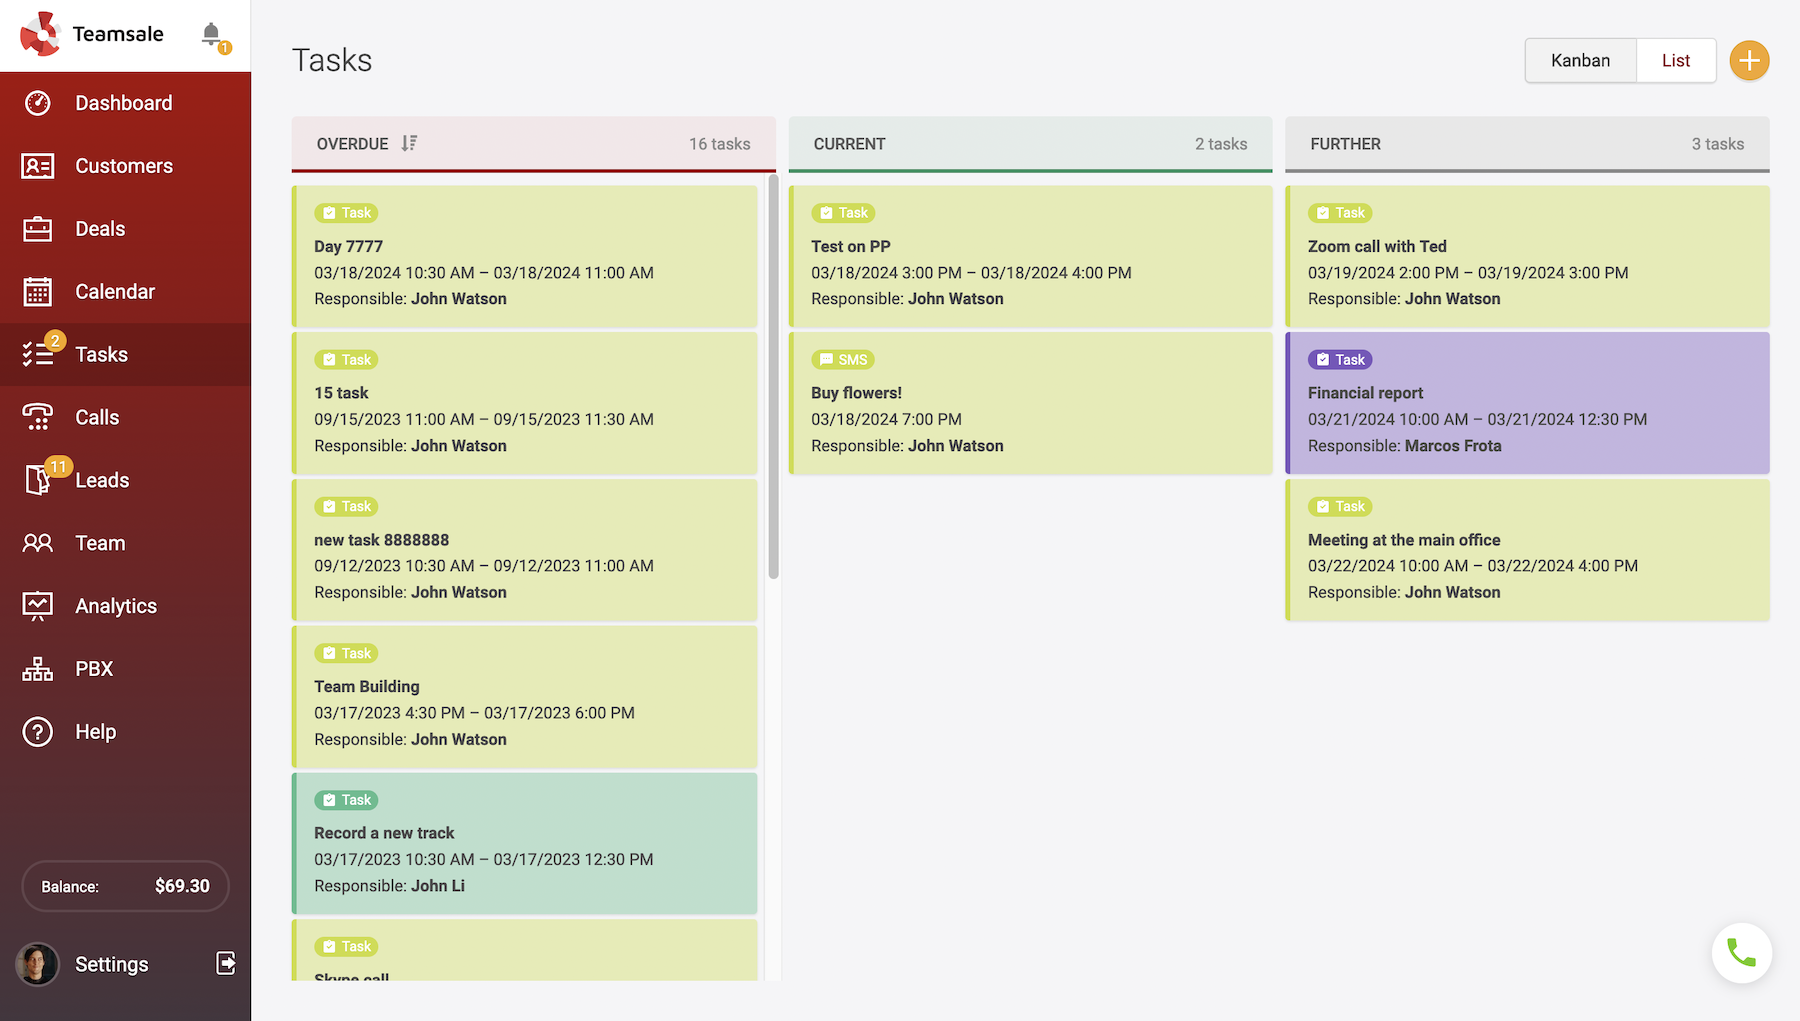
You can also work with tasks in Kanban or list view. A filter block will help you find the necessary task. By checking the "Completed tasks" checkbox, you can find old or closed tasks if needed.
A reminder about the task will be sent to the email of the employee to whom it was assigned.
ypes of tasks:
- Task - the standard task format where you can add customers or colleagues for collaboration
- Call - schedule an important call to the customer exactly at the appointed time
- Video conference - schedule a video conference with colleagues
- SMS - schedule a delayed SMS reminder to the customer, for example, "You have an appointment at 11:00 AM at the dentist's"
7. Calls
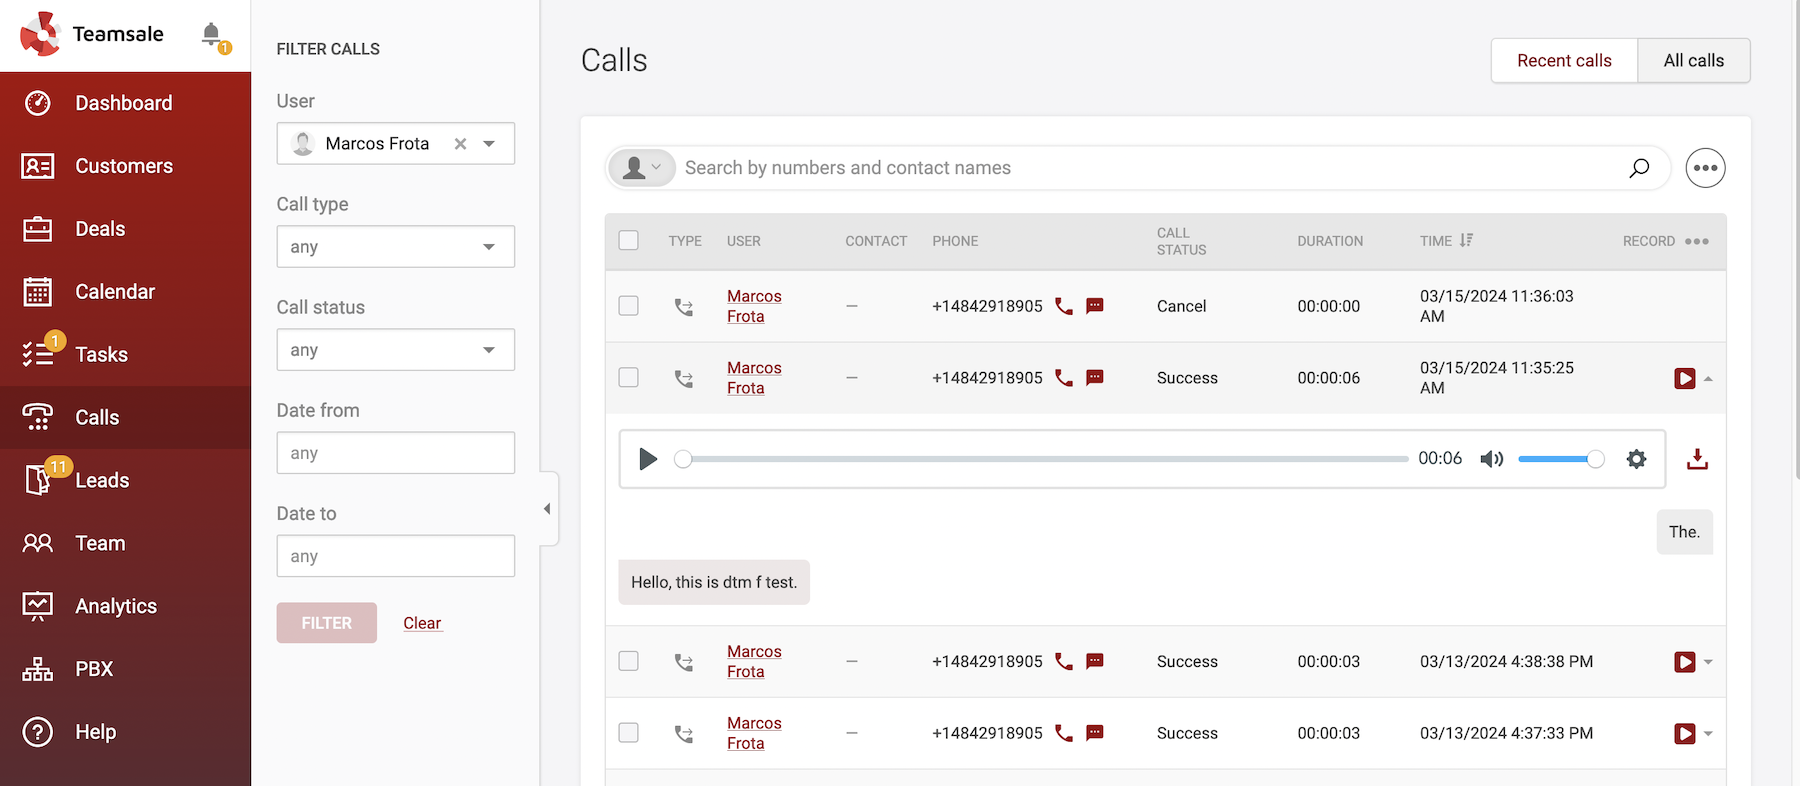
In this section, call details are available. Filters and general search will help you find the required call. You can listen to the call audio recording or view the call transcript if the feature is enabled Speech recognition
Call widget
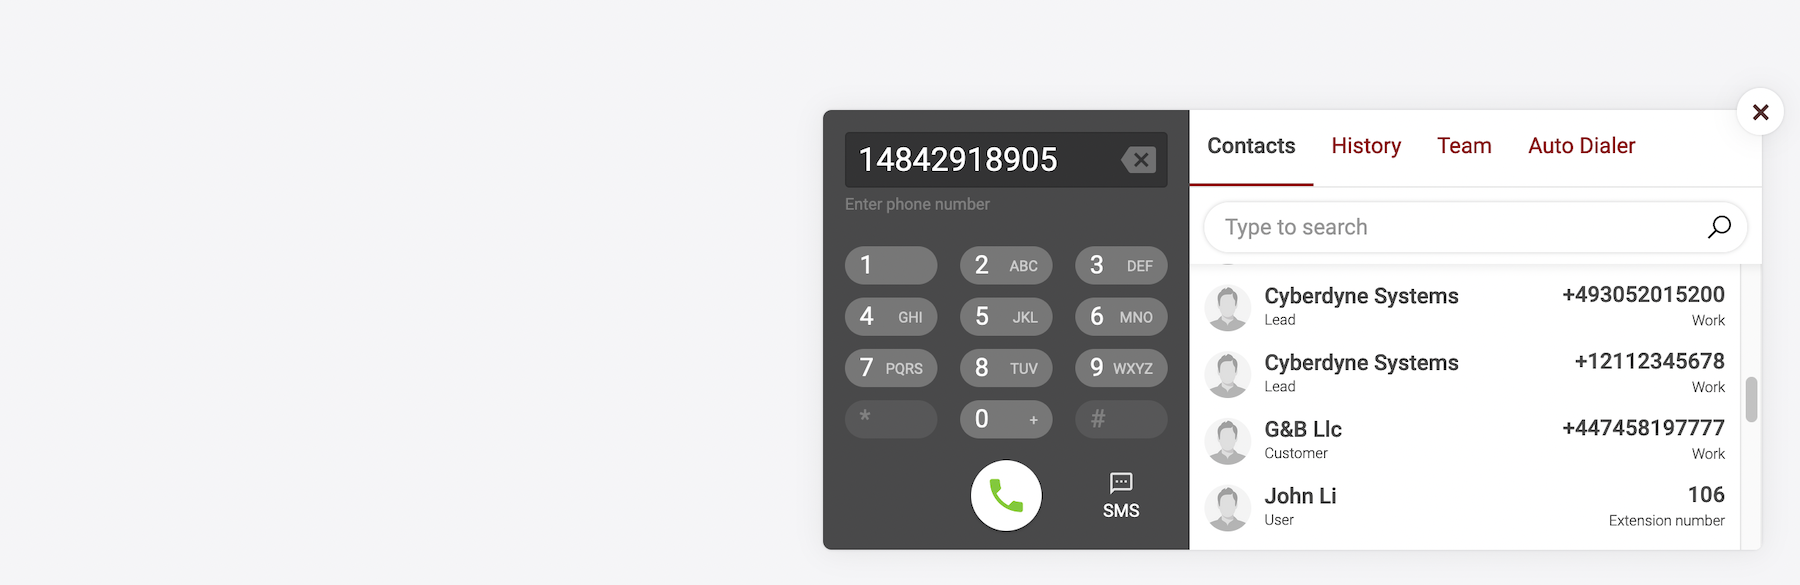
The default call widget icon is located in the bottom right corner of the page.
On the left side of the widget, there is a keyboard for entering the number, a call button, and an SMS send button. On the right side, there are tabs for contacts, call history, team (Your colleagues), and Auto dialer.
Important: During the first call, it is necessary to allow access to the microphone in the browser's pop-up window.The general search allows you to find a contact or a record in the history by phone number or name.
If a call comes from an unknown number, in the web phone you can create a customer or lead by specifying their name. After creation, the customer card will open, where you can make notes in the feed during the conversation with the customer.
During a call, you can transfer to another employee by pressing the button with the image of two handsets.
8. Leads
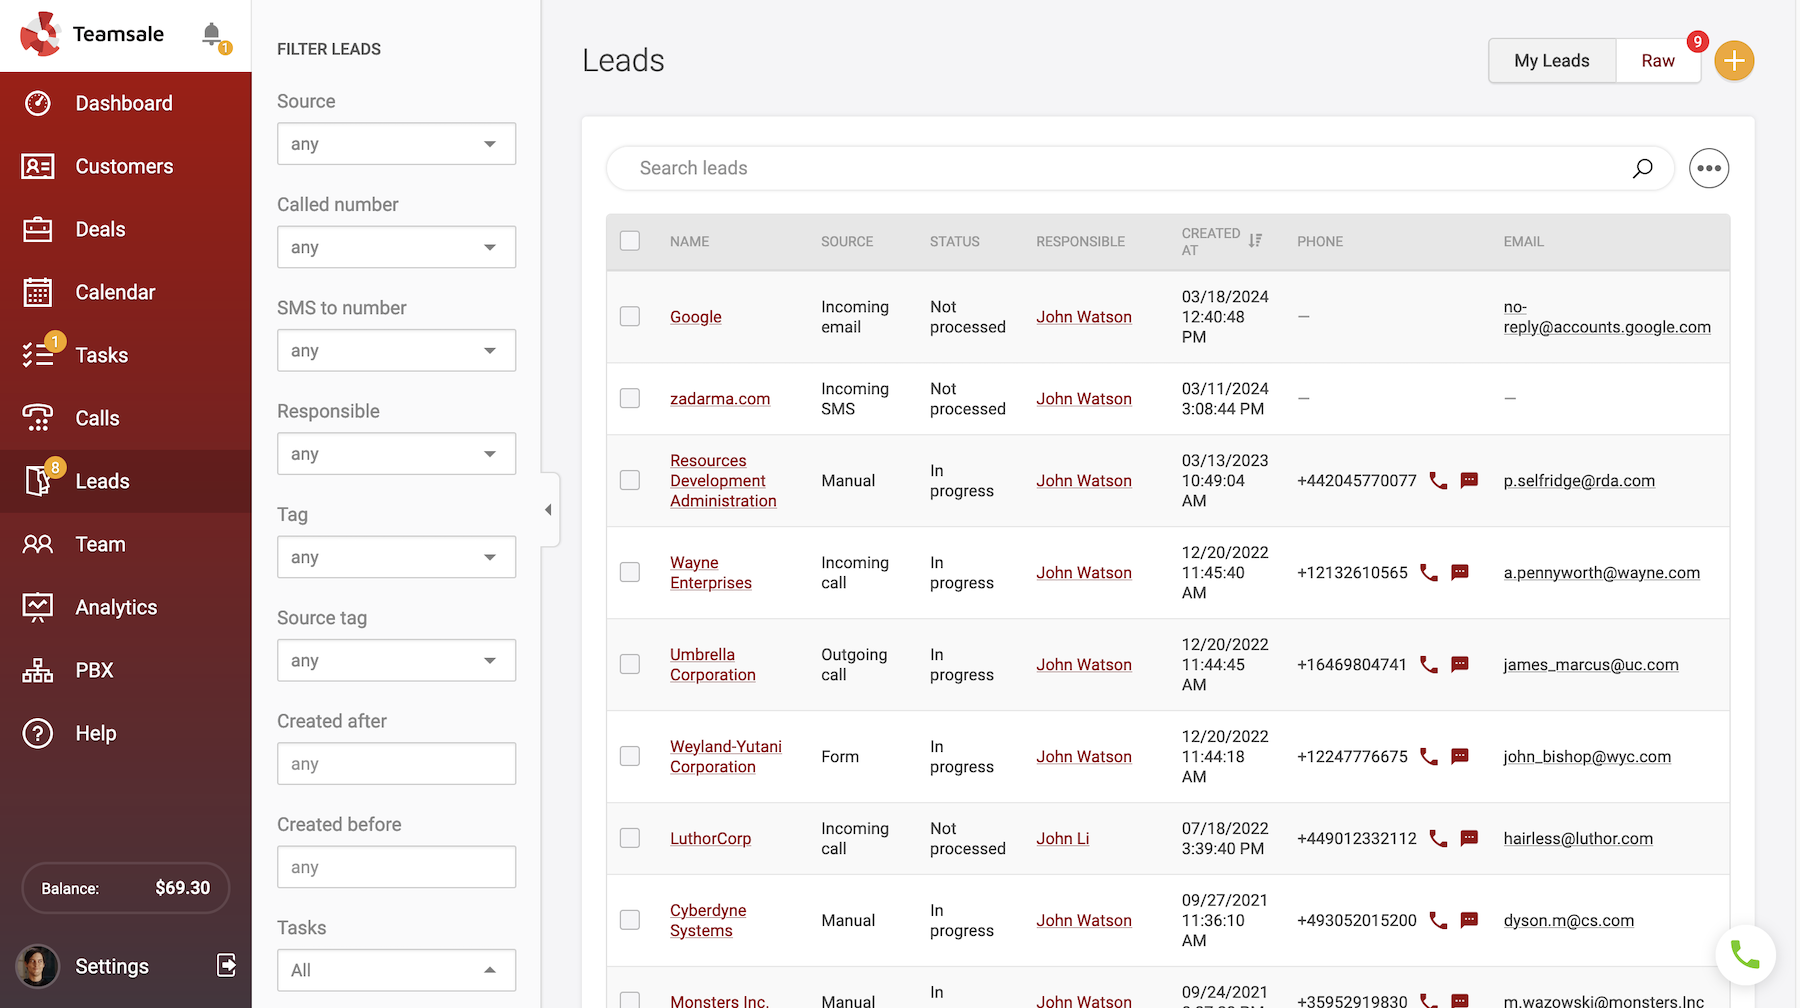
A lead is the initial contact with a potential customer.
On the right side of the page, there are tabs for "My Leads" and "Raw". "My Leads" contains a list of your leads, while "Raw" is a shared pool of leads that have not been assigned to anyone yet. All CRM users can access "Raw" and claim leads for themselves, nurturing the contact and converting the lead into a customer
Adding a lead in the "My Leads" tab via the "+" button will automatically assign the creator of the lead as responsible. If the lead was created through the "Raw" tab, the default lead status will be "unprocessed".
The more leads, the more customers, deals, and ultimately profit. There are several ways to generate new leads:
- Creating manually by clicking the + button in the top right corner of the page, or during a call in the web phone.
- Importing from a file, select "Import" from the menu •••
- Creating leads based on calls/SMS, if the number has not been previously saved in Teamsale, a lead will be created. Settings - Telephony
- Creating leads based on newly received or sent emails. Settings - Email
- Getting leads through free integration with the platform Zapier which in turn provides the ability to integrate Teamsale with more than 4000 other systems.
- Creating a lead with the help of API. You can create integration between Teamsale and your own website, for example, to generate leads through a contact form
Completing work with the lead.
By changing the lead status to '"Finished", you can choose the option to Create customer or mark as Bad fit (the lead will be deleted).
9. Team
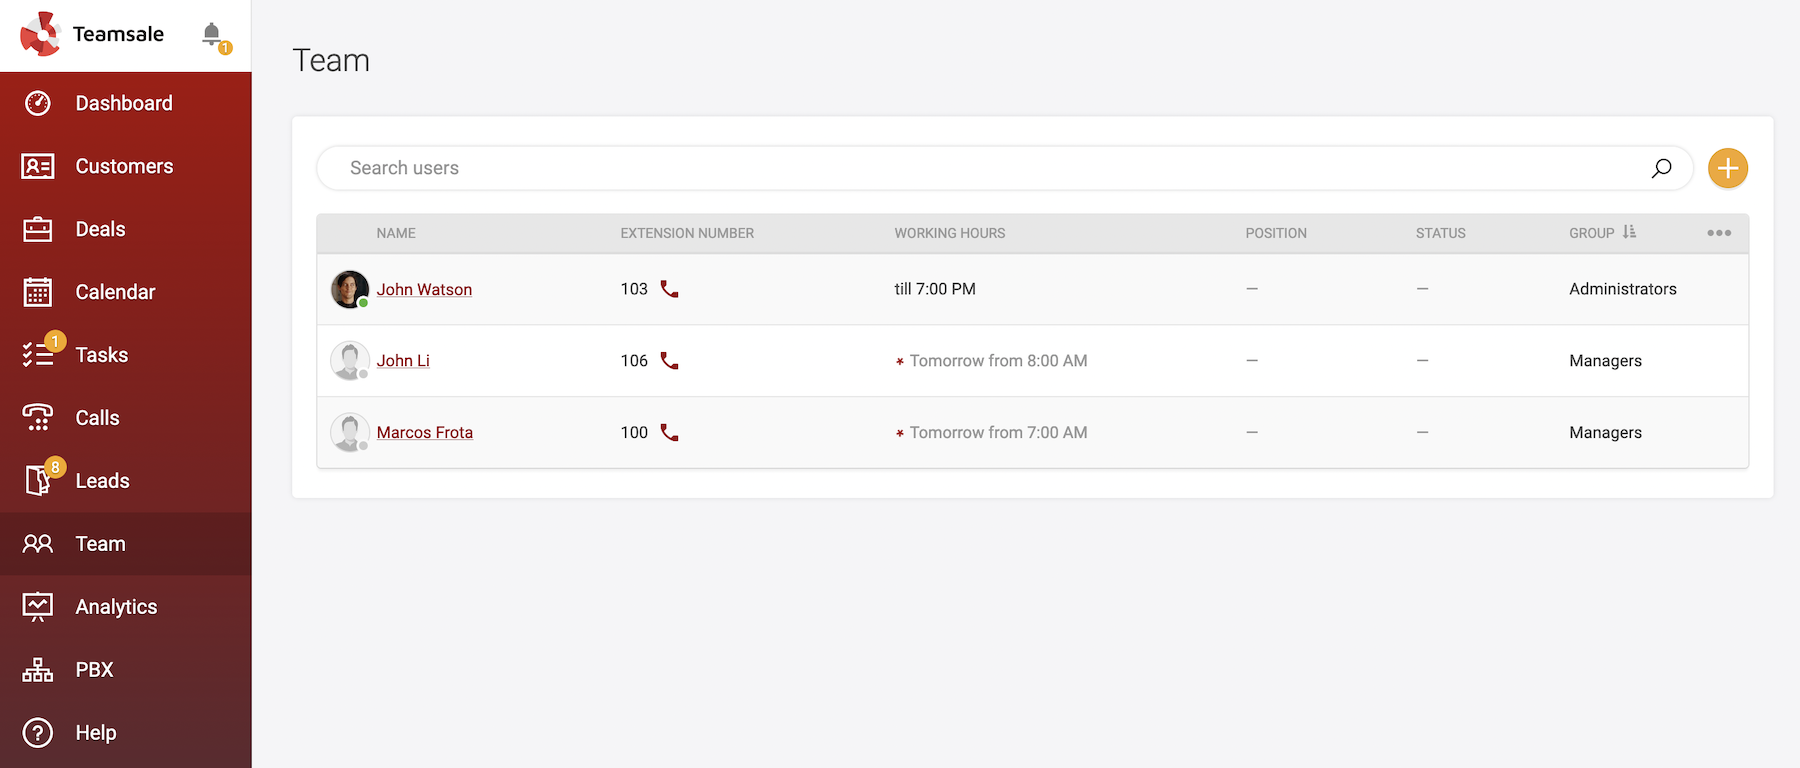
In this section, there is a list of all Teamsale users, their contact information, internal phone numbers, working hours, and other details. You can call your colleague by clicking on the phone icon next to their name. A green indicator on the user's avatar indicates that the user is currently online.
The administrator can add CRM users and edit the accounts of current users. The user addition button is located in the top right corner of the page.
Specify the name of the user, their email, assign a PBX extension, and click "Add User". In the "Share invite" tab, you can invite multiple users by listing their email addresses. In the "Generate Link" tab, you can create an invitation link and share it via messengers and social networks.
10. Analytics
Deals

A chart of the number of deals, profitability indicators, and sales funnel. Select the desired time period, analyse conversion rates, and average deal time.
Calls
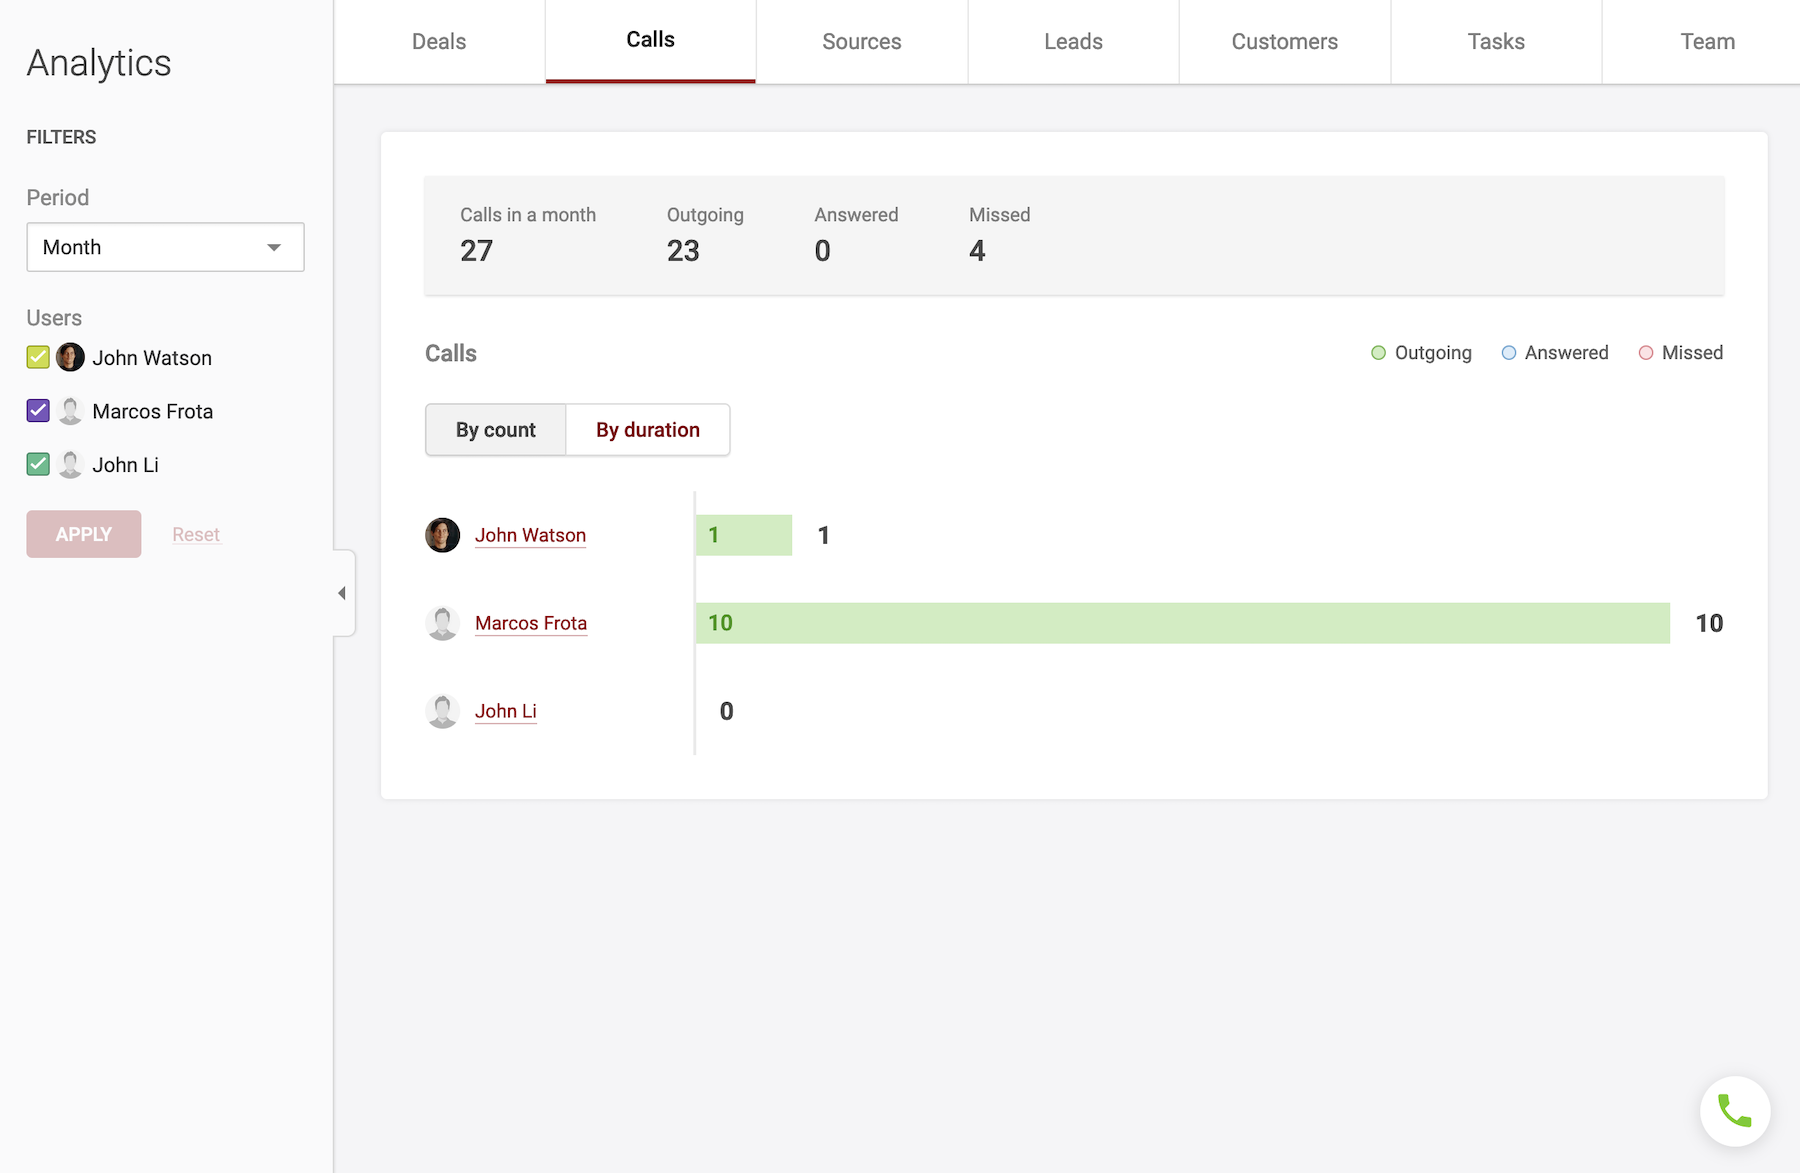
Filters are available for users and time. Find out which Teamsale users are most active in calls, analyse the number of calls and their duration.
Sources
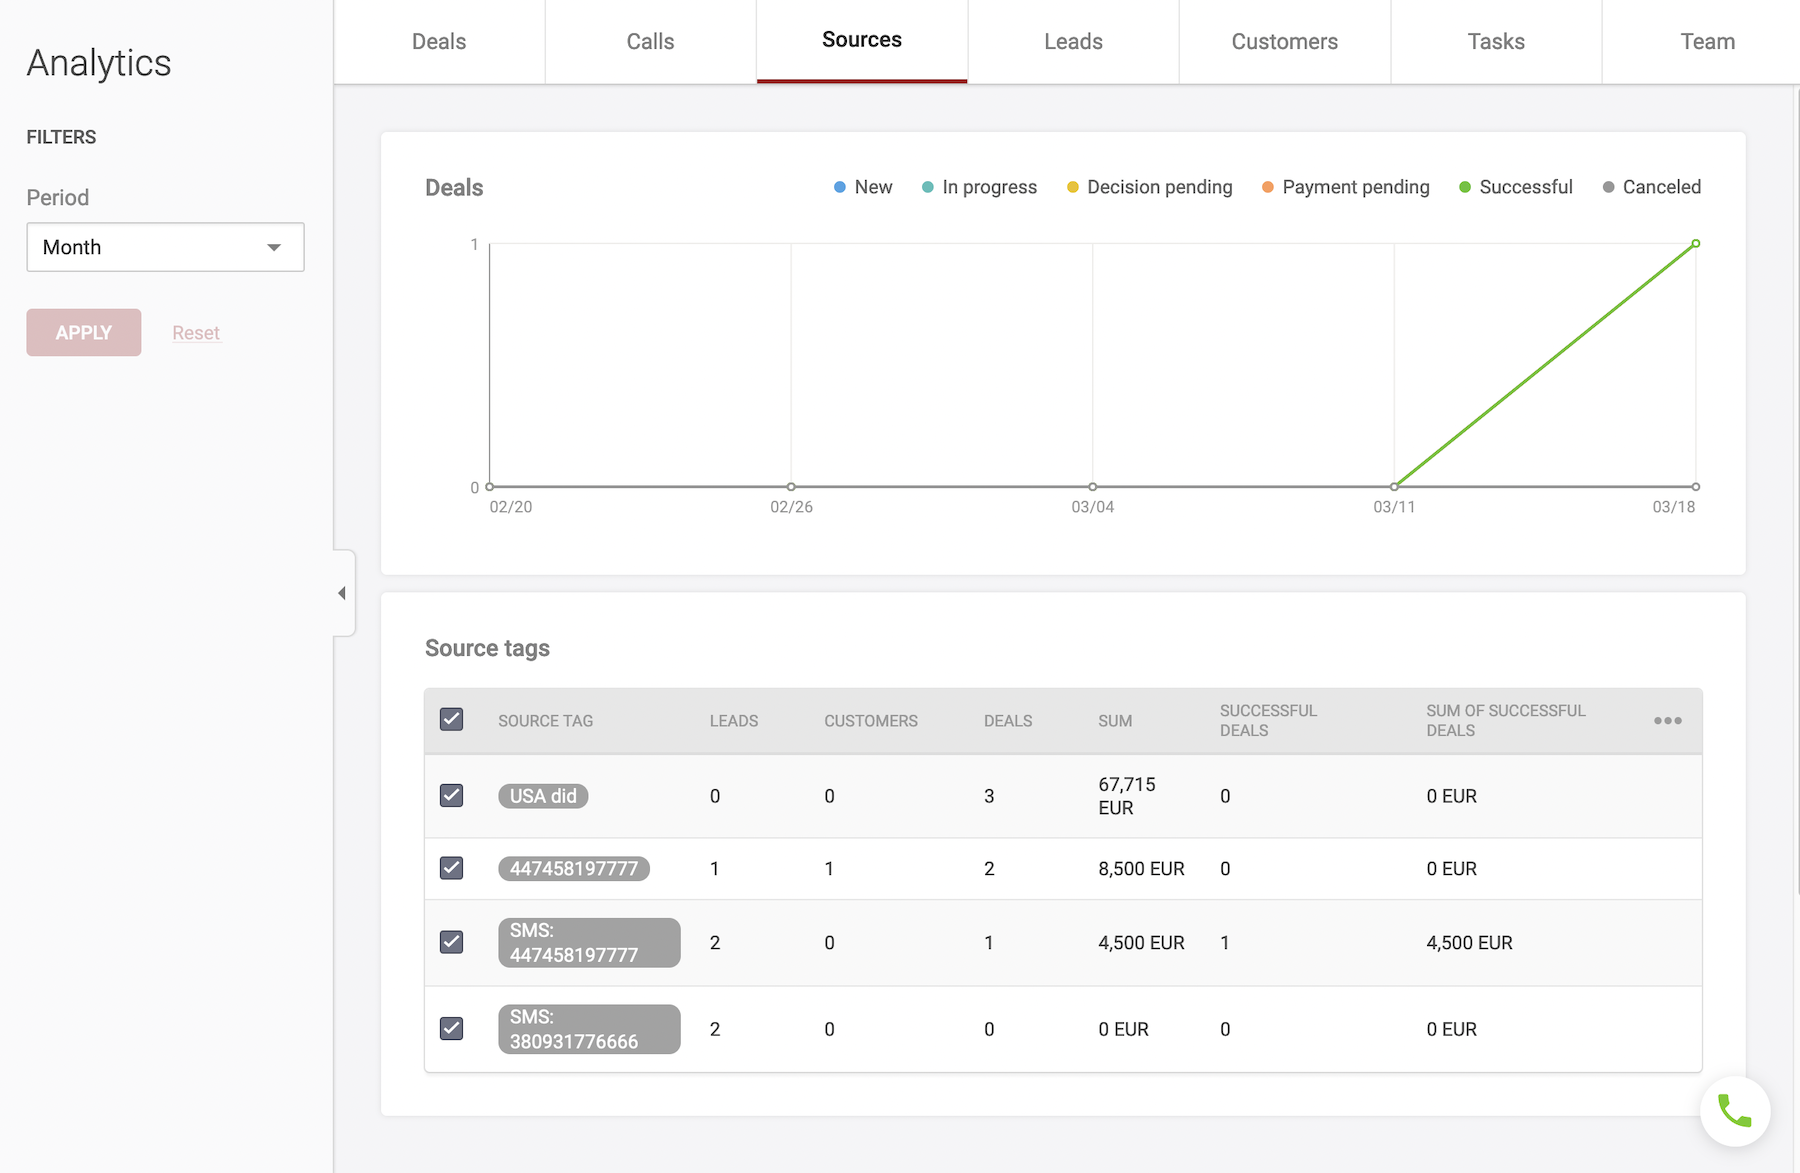
In this tab you can evaluate the effectiveness of your sources. For example, when you receive an incoming call that automatically generates a lead, Teamsale also creates a source label based on the number for analytics purposes. Using this label, you can determine how many new customers/leads and deals you have acquired thanks to this virtual number, and how effective the advertising associated with this number is. Source labels can be created manually or through API integration Zadarma Call Tracking UTM tags from call tracking will be automatically transferred to Teamsale and assigned to the created lead as source labels. You simply accepted an incoming call from a new number, and a lead was automatically created in Teamsale, showing the UTM tags of your advertising campaign (through which you received this new call), and the lead feed will include an audio recording of your call
Leads
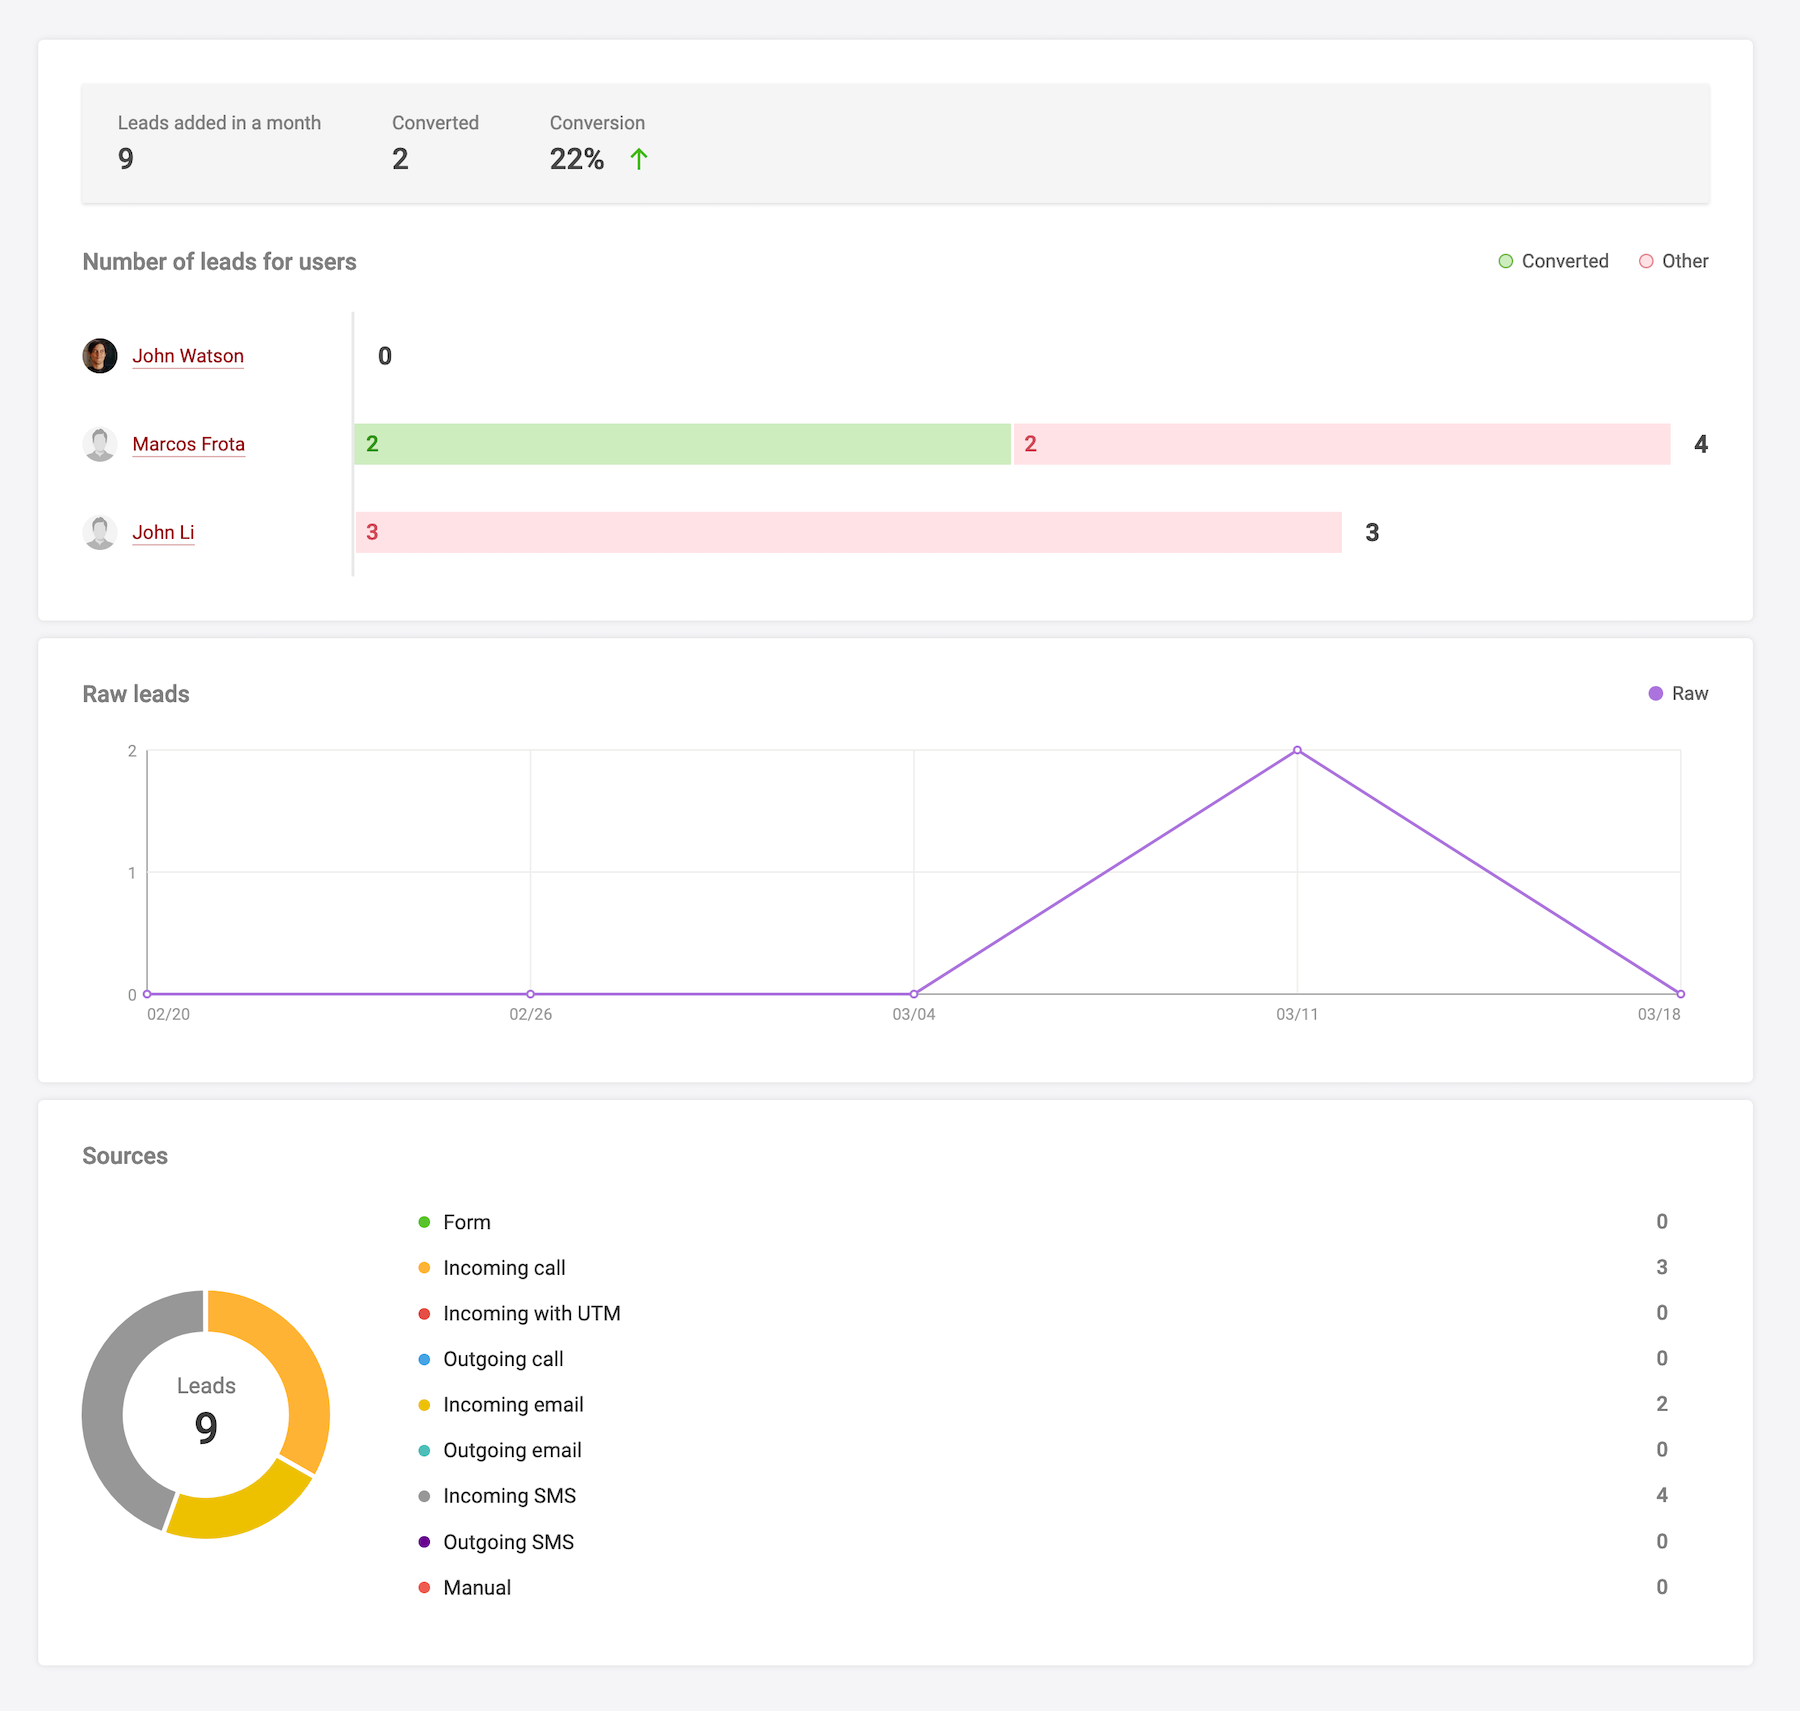
Analyse statistics for your leads, including the number of leads added and converted into customers. View a graph of the unassigned lead pool and a pie chart of lead creation sources.
Customers
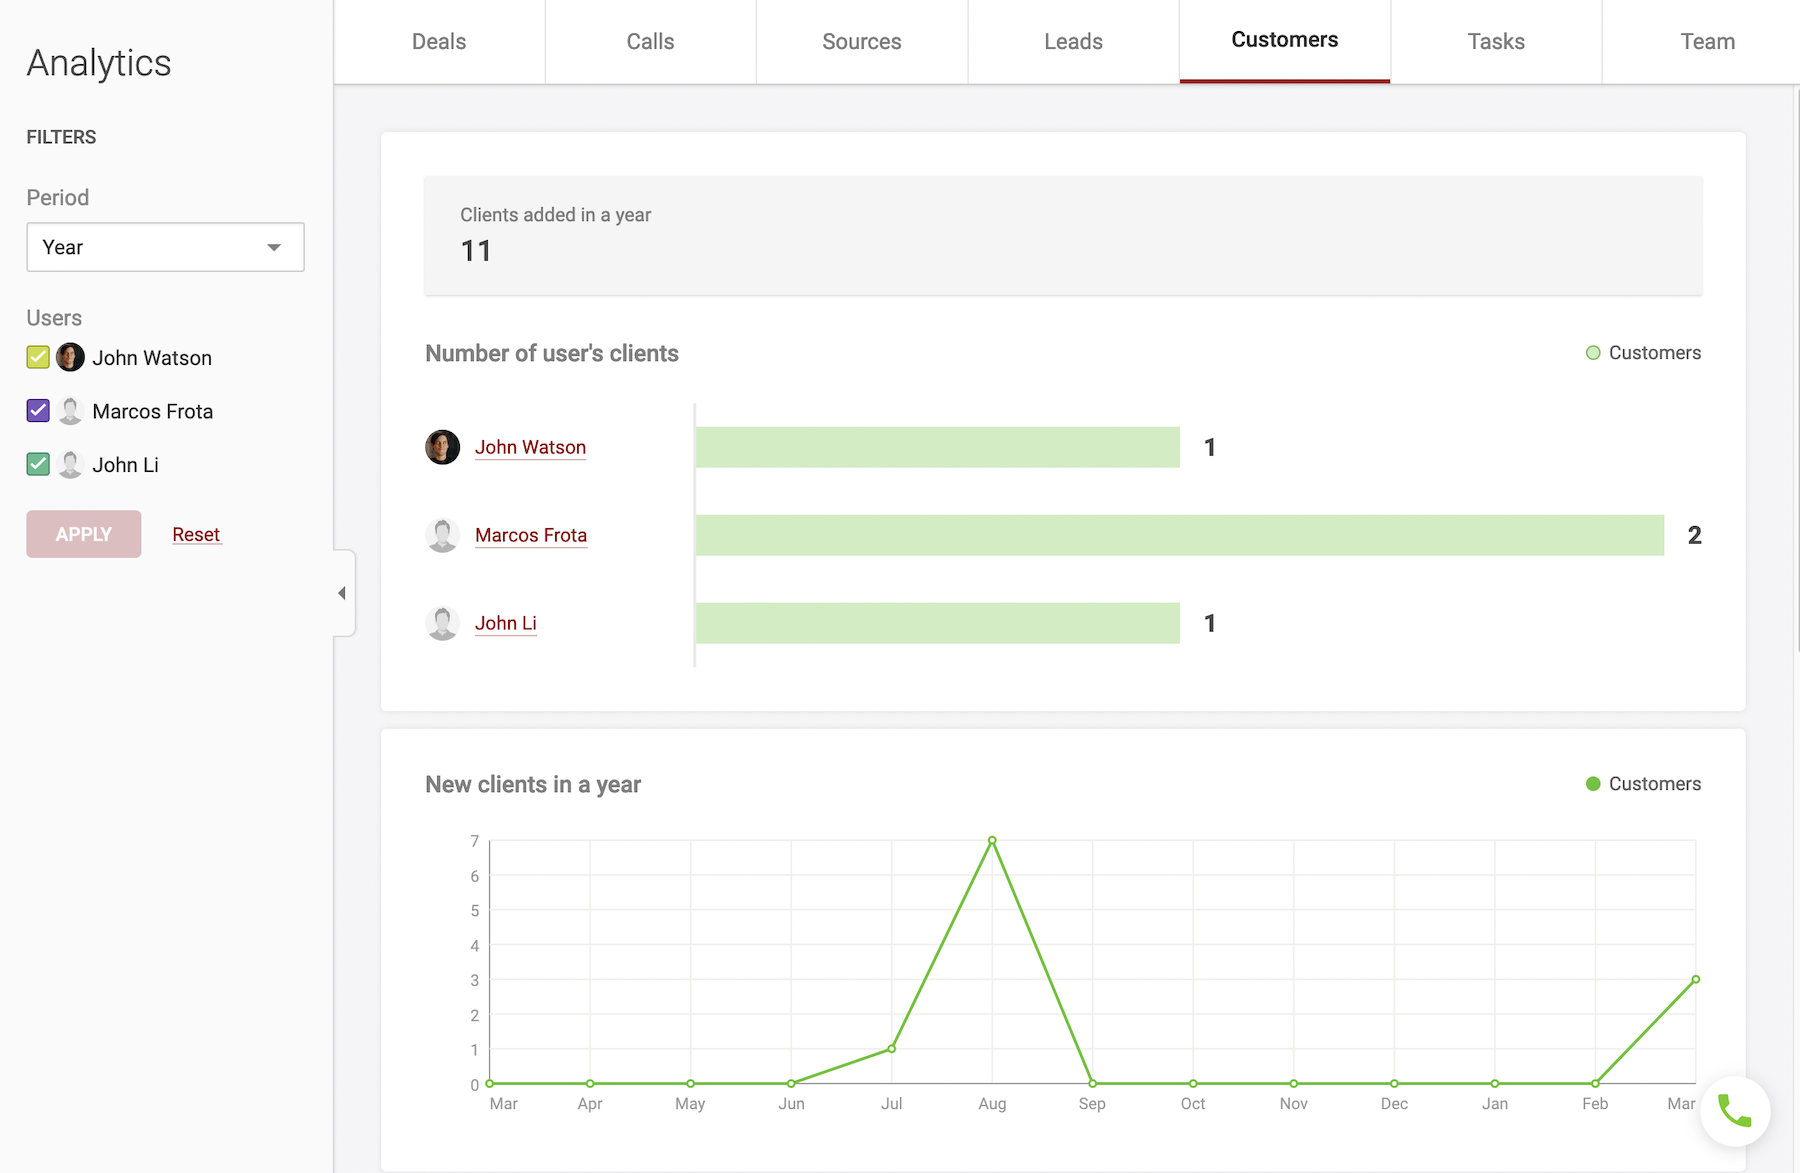
The growth of new customers over a specific period, for the entire CRM and separately for each user.
Tasks
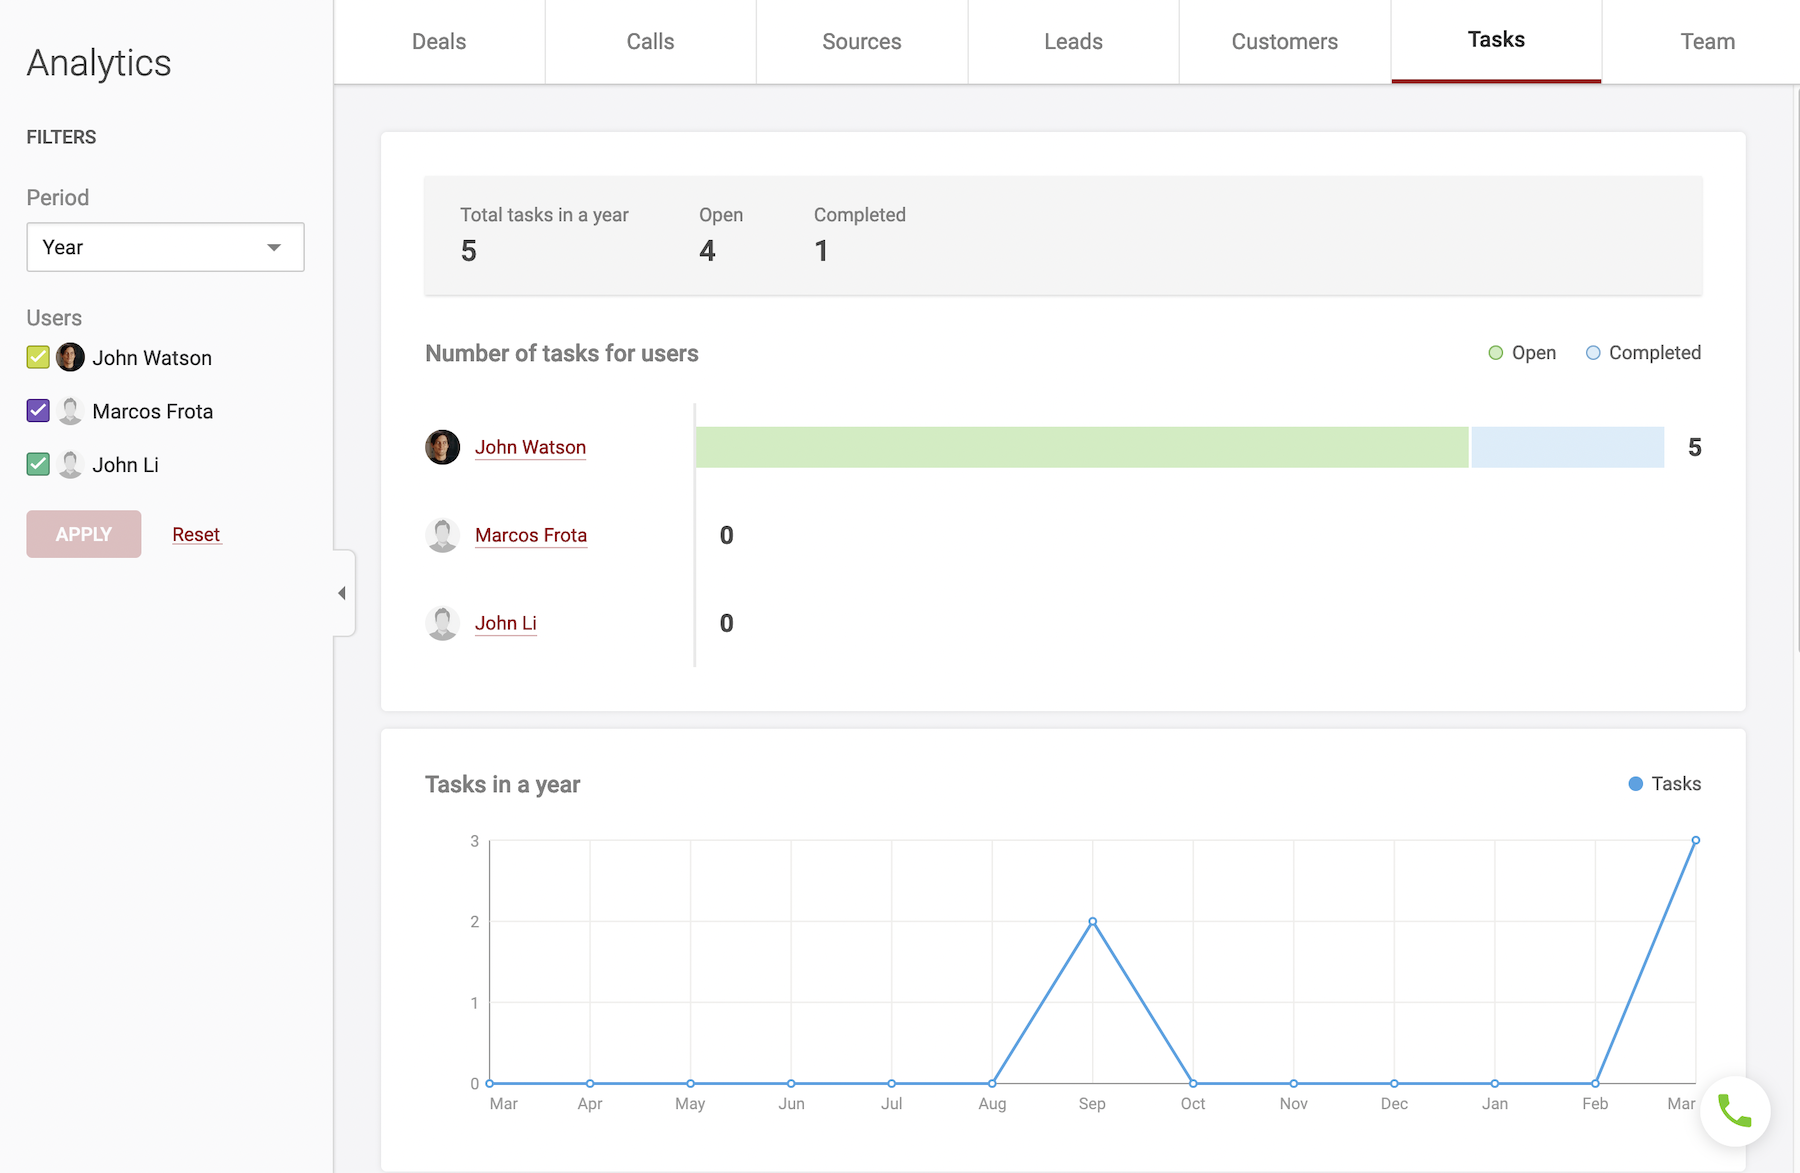
Analyse the number of tasks, find out how many open tasks and how many completed tasks each user has.
Team
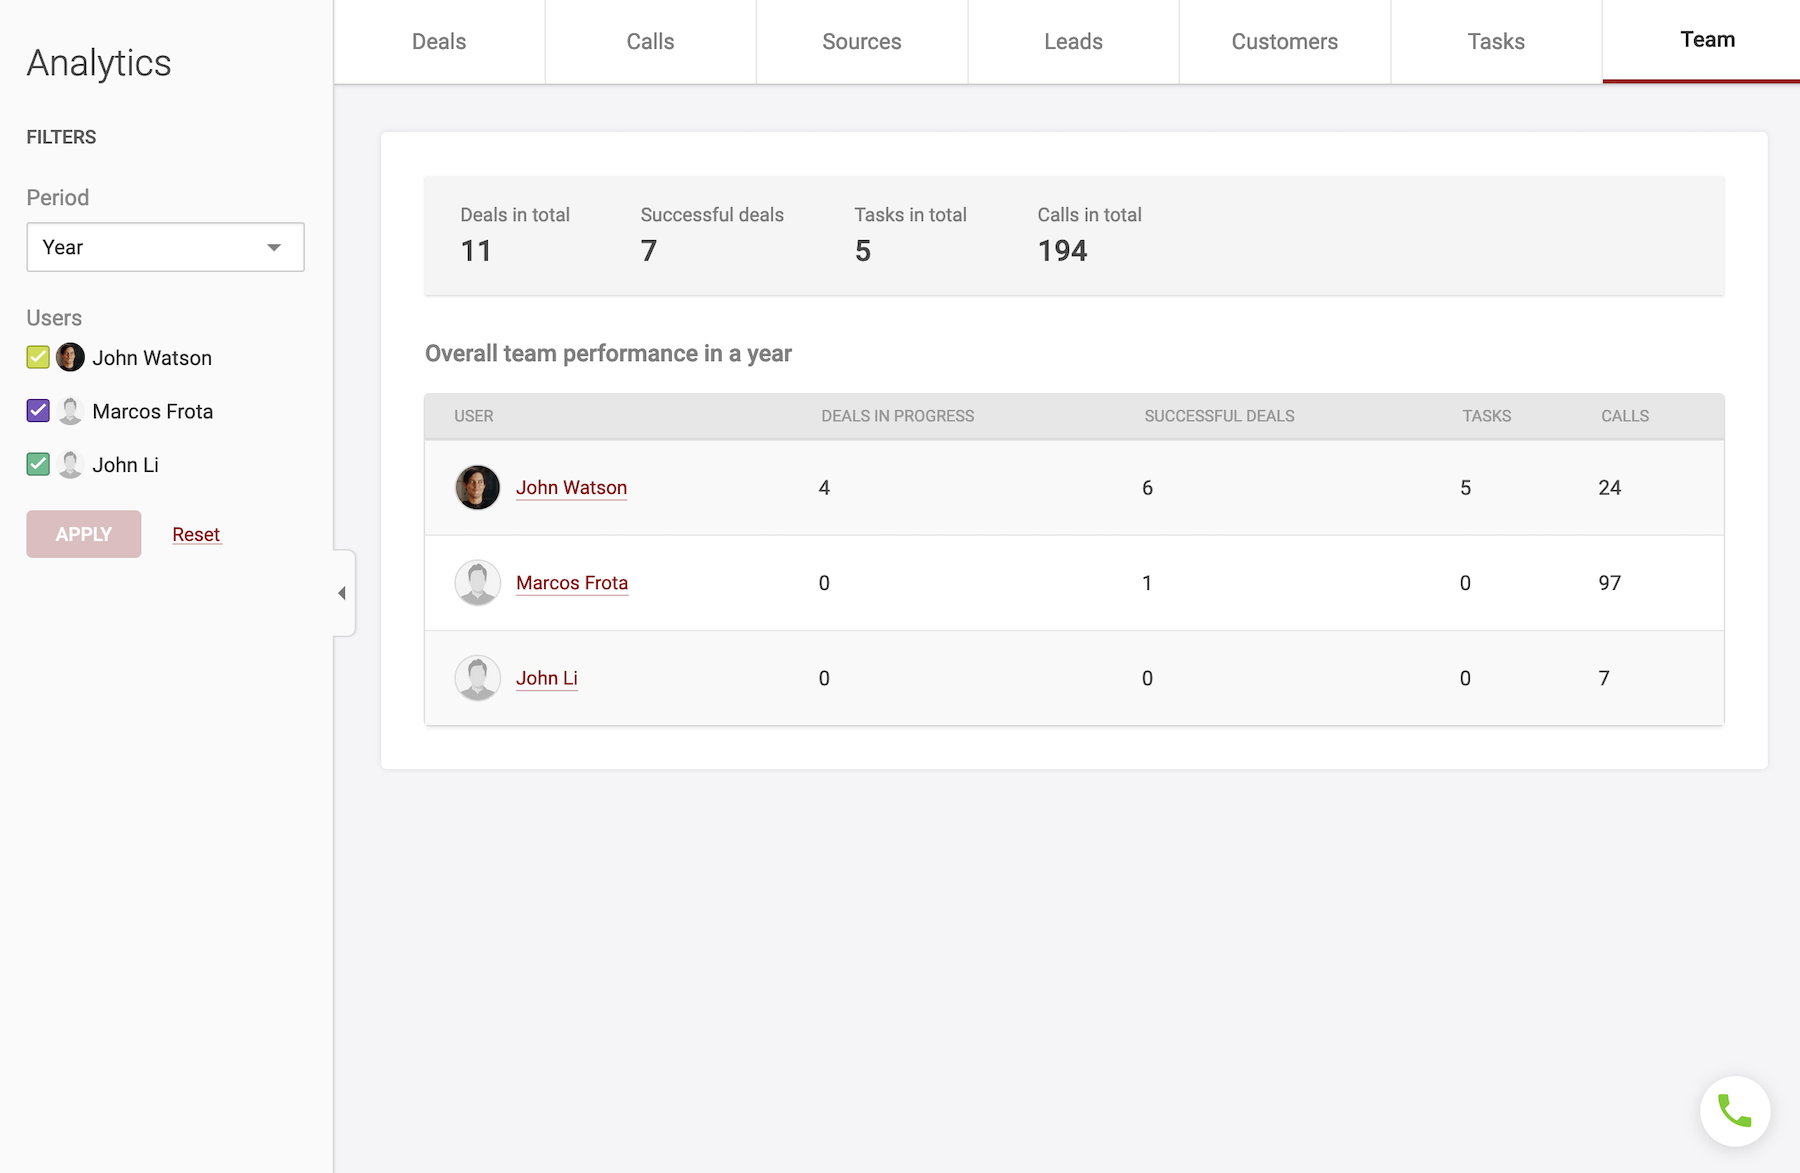
Analysis of team productivity across all metrics.
11. Settings
This section contains all Teamsale settings
Profile ▾
In the profile tab, you can select the interface language, upload an avatar, specify contact information visible to your colleagues. PBX extension number - the extension from which calls will be made and to which incoming calls will be received.
Calendar ▾
In this tab, you can enable two-way task synchronization with Google Calendar.
Simply press the "Connect with Google Calendar" button and authenticate with your Google account, then confirm access for Teamsale.
If you need to synchronize already created and future scheduled tasks and events, select the following options:
- Add upcoming Teamsale events to Google Calendar
- Add upcoming Google Calendar events to Teamsale
Save settings
Working hours ▾
Select your time zone and the start day of the week (default is Monday). Press the "Set" button, on this page, you can conveniently set up your work schedule.
Option 1: Five-day work week
If you work from Monday to Friday from 9:00 AM to 5:00 PM, click on 9:00 AM in the Monday column and drag the cursor down to 5:00 PM. Repeat this action for the other weekdays and press save. Your work schedule is now set.

Option 2: "day-night-48"
Let's say on Monday you have a day shift, so you mark the working hours from 8:00 AM to 8:00 PM. Then, for the night shift from Tuesday to Wednesday, you mark the working hours from 8:00 PM to 0:00 AM on Tuesday and from 0:00 AM to 8:00 AM on Wednesday.
The schedule repeats every 4 days. Set the frequency and click the "Save" button. The schedule is now set. In the top left corner of the page, there are arrows to switch between weeks, so you can easily check if you have a work shift on New Year's Day or any other holiday.
Telephony ▾
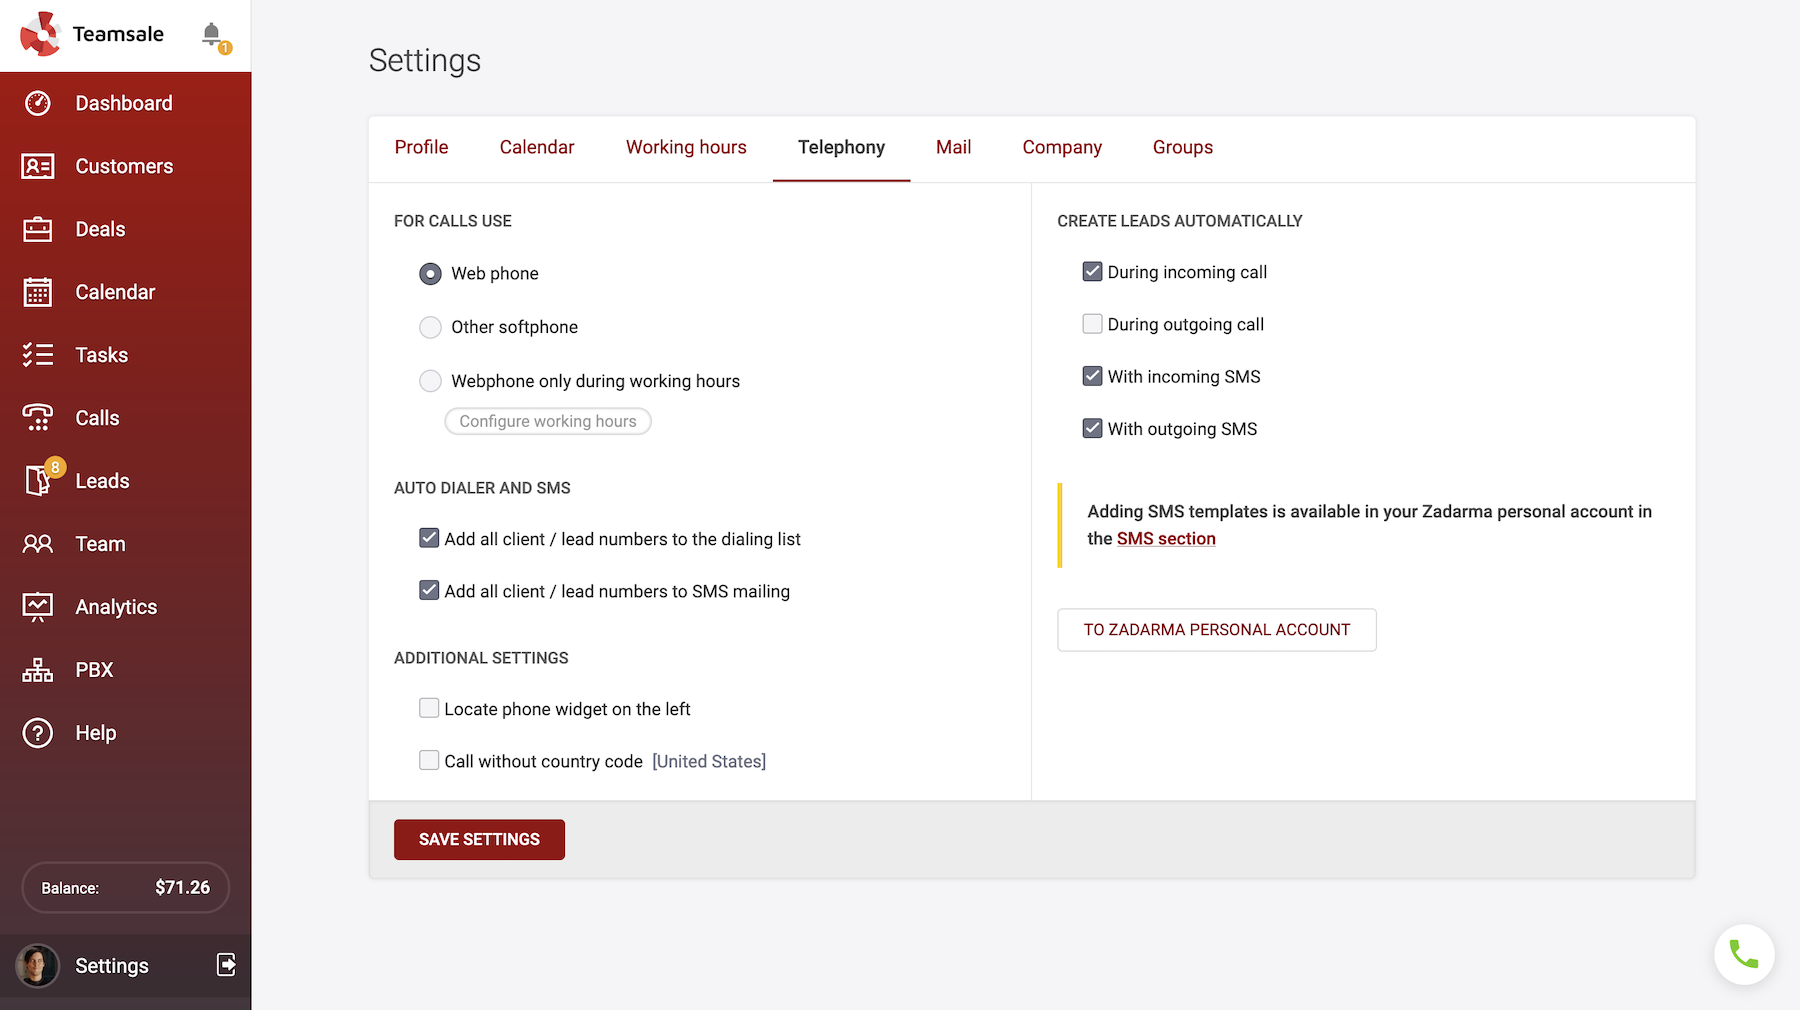
The call widget can operate in "web phone" mode, "other softphone" mode, and "webphone only during working hours" mode.
Web phone - the call will be made directly from the browser. Important: During the first call, it is necessary to allow access to the microphone in the browser's pop-up window.
Other softphone - for calls, an IP phone or a softphone configured with the PBX extension is used. During a call, information about the call will be displayed in the widget. When initiating an outgoing call, a call will be sent to PBX extension. After lifting the handset, the call to the customer's number from the CRM will begin.
Webphone only during working hours - the webphone will only operate during your working hours.
Options for automatically creating leads during incoming or outgoing calls. If an incoming call comes from a new number (which is not assigned to a customer or lead in the CRM), a new lead will be automatically created. Similarly, during an outgoing call, if you call a new customer using a number not saved in the CRM, a lead will be created.
Automatic lead creation can also be configured for incoming and outgoing SMS.
The "Call without country code" option allows making outgoing calls in local format. If the option is disabled, the number should be dialed in international format.
Options for automatic dialing and SMS broadcasting.
If a customer or lead has multiple phone numbers, adding them to the list for automatic dialing or SMS broadcasting will automatically include all their phone numbers. If you disable the corresponding options, only the first phone number from the customer's or lead's profile will be added.
Mail ▾
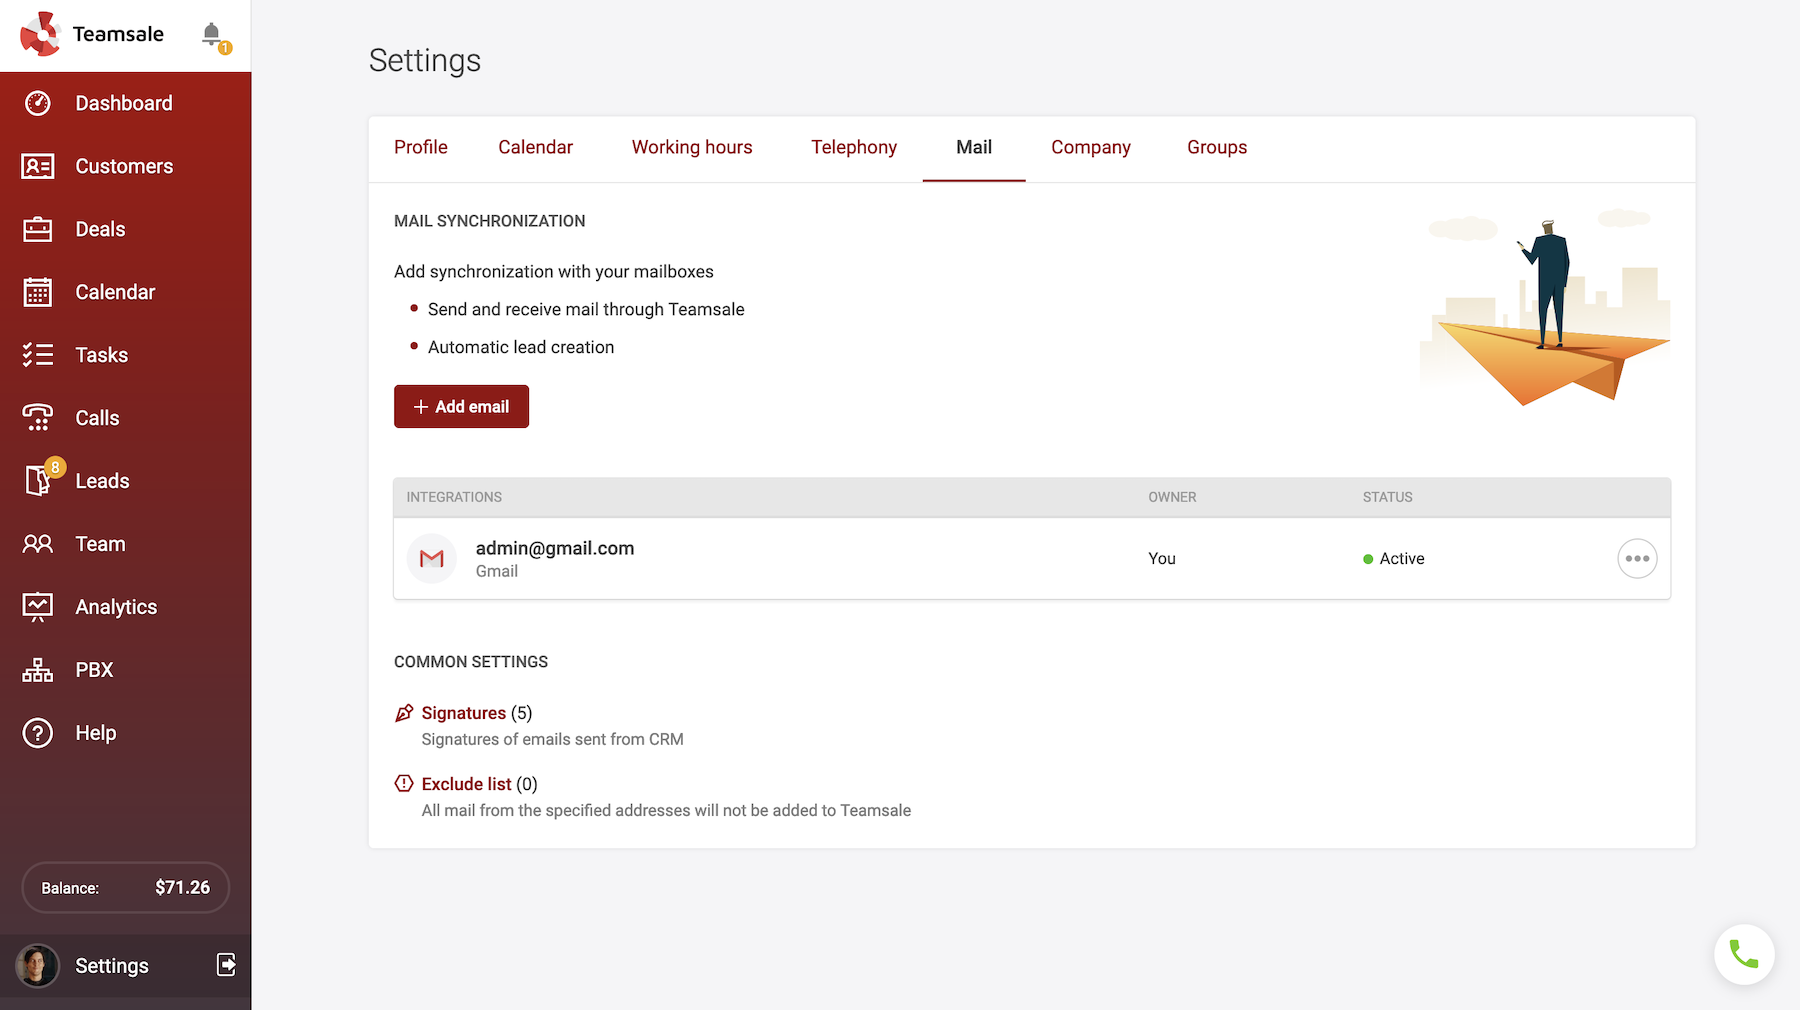
In Teamsale, you can receive and send emails thanks to integration with popular email services.
Click on the "Add email" button and select one of the email services or set up your IMAP settings.
Note: for integration with Gmail, two-factor authentication (2FA) must be enabled in your Google account. If it is disabled, enable it first, then go to the section App Passwords and create a new password. Enter a name, such as "teamsale," and click "Create" — a password will be generated for integrating Teamsale with Gmail.
At the same time, you can send an email to a list of up to 100 recipients. The limit for the number of email integrations is 20. You can use email integration only for yourself or grant access to the email (for example, corporate email) to other Teamsale users. Additionally, there are options for automatically creating leads based on new emails. Checking for new emails is performed every 10 minutes. When a new email is received, you will see a popup notification in the top right corner of the page and also in the notification center.
Common settings:
Signatures - email signature templates for emails sent from CRM
Exclude list - all emails from the specified addresses will not be added to Teamsale
Company ▾
Settings for the company name, as well as currency. In addition to the base currency, you can choose additional ones, for example, if your company conducts transactions in different countries in different currencies. By setting the currency exchange rates, you will be able to see accurate profit data in the base currency in the Analytics section.
Groups ▾
Here are the settings for access rights for standard Teamsale user groups. You can also create custom groups and assign specific permissions to them. The CRM administrator can go to the Team section, select a user, and change their group, for example, promote them from Trainee to Manager.