
 Calls
 Phone numbers
 SMS
 Business Phone System
 CRM
 eSIM for Internet
 AI agent
 AI Speech Analytics
 Click to Call
 Call Tracking
 VoIP for Business
 Become a partner
 Integrations
 For whom
 Setup guides
 FAQ
 Online chat
 Contact us
 Blog
Setup guides / Salesforce
Unify your calls and customer management in Salesforce. Zadarma provides the phone numbers and connectivity, while the integration option you choose determines how your team handles calls and which features they get.
Connecting via BYOC
BYOC (Bring Your Own Carrier) lets you use Zadarma as the carrier for Salesforce’s telephony features. Connect your Zadarma numbers to Salesforce’s telephony infrastructure and handle calls in the workspace your team already knows.
This option suits you if you already use Salesforce’s telephony tools and want to connect them to Zadarma’s network. Call handling, routing and analytics features depend on your Salesforce solution and licences.
Integration via the Zadarma app
This free integration connects the Zadarma cloud PBX to Salesforce CRM and adds tools for everyday call handling:
- One-click calls from the CRM, via your browser or Callback.
- Customer card pops up on incoming and outgoing calls.
- Call statistics and recording playback right in the CRM.
- Automatic lead creation for calls from unknown numbers and calls to new ones.
This option suits you if you want to manage calls through the Zadarma cloud PBX and keep a record of them in Salesforce.
Integration options
1. Zadarma as BYOC in Salesforce CRM ▾
Create a Custom Trunk in Salesforce and connect Zadarma as the provider for inbound and outbound calls via BYOC.
Your Salesforce organisation must be on the Enterprise, Performance or Unlimited edition.
In Salesforce, open Setup, type Trunks in the search box, then click New Trunk. Under Choose Type of Trunk, select Custom and enter the following details
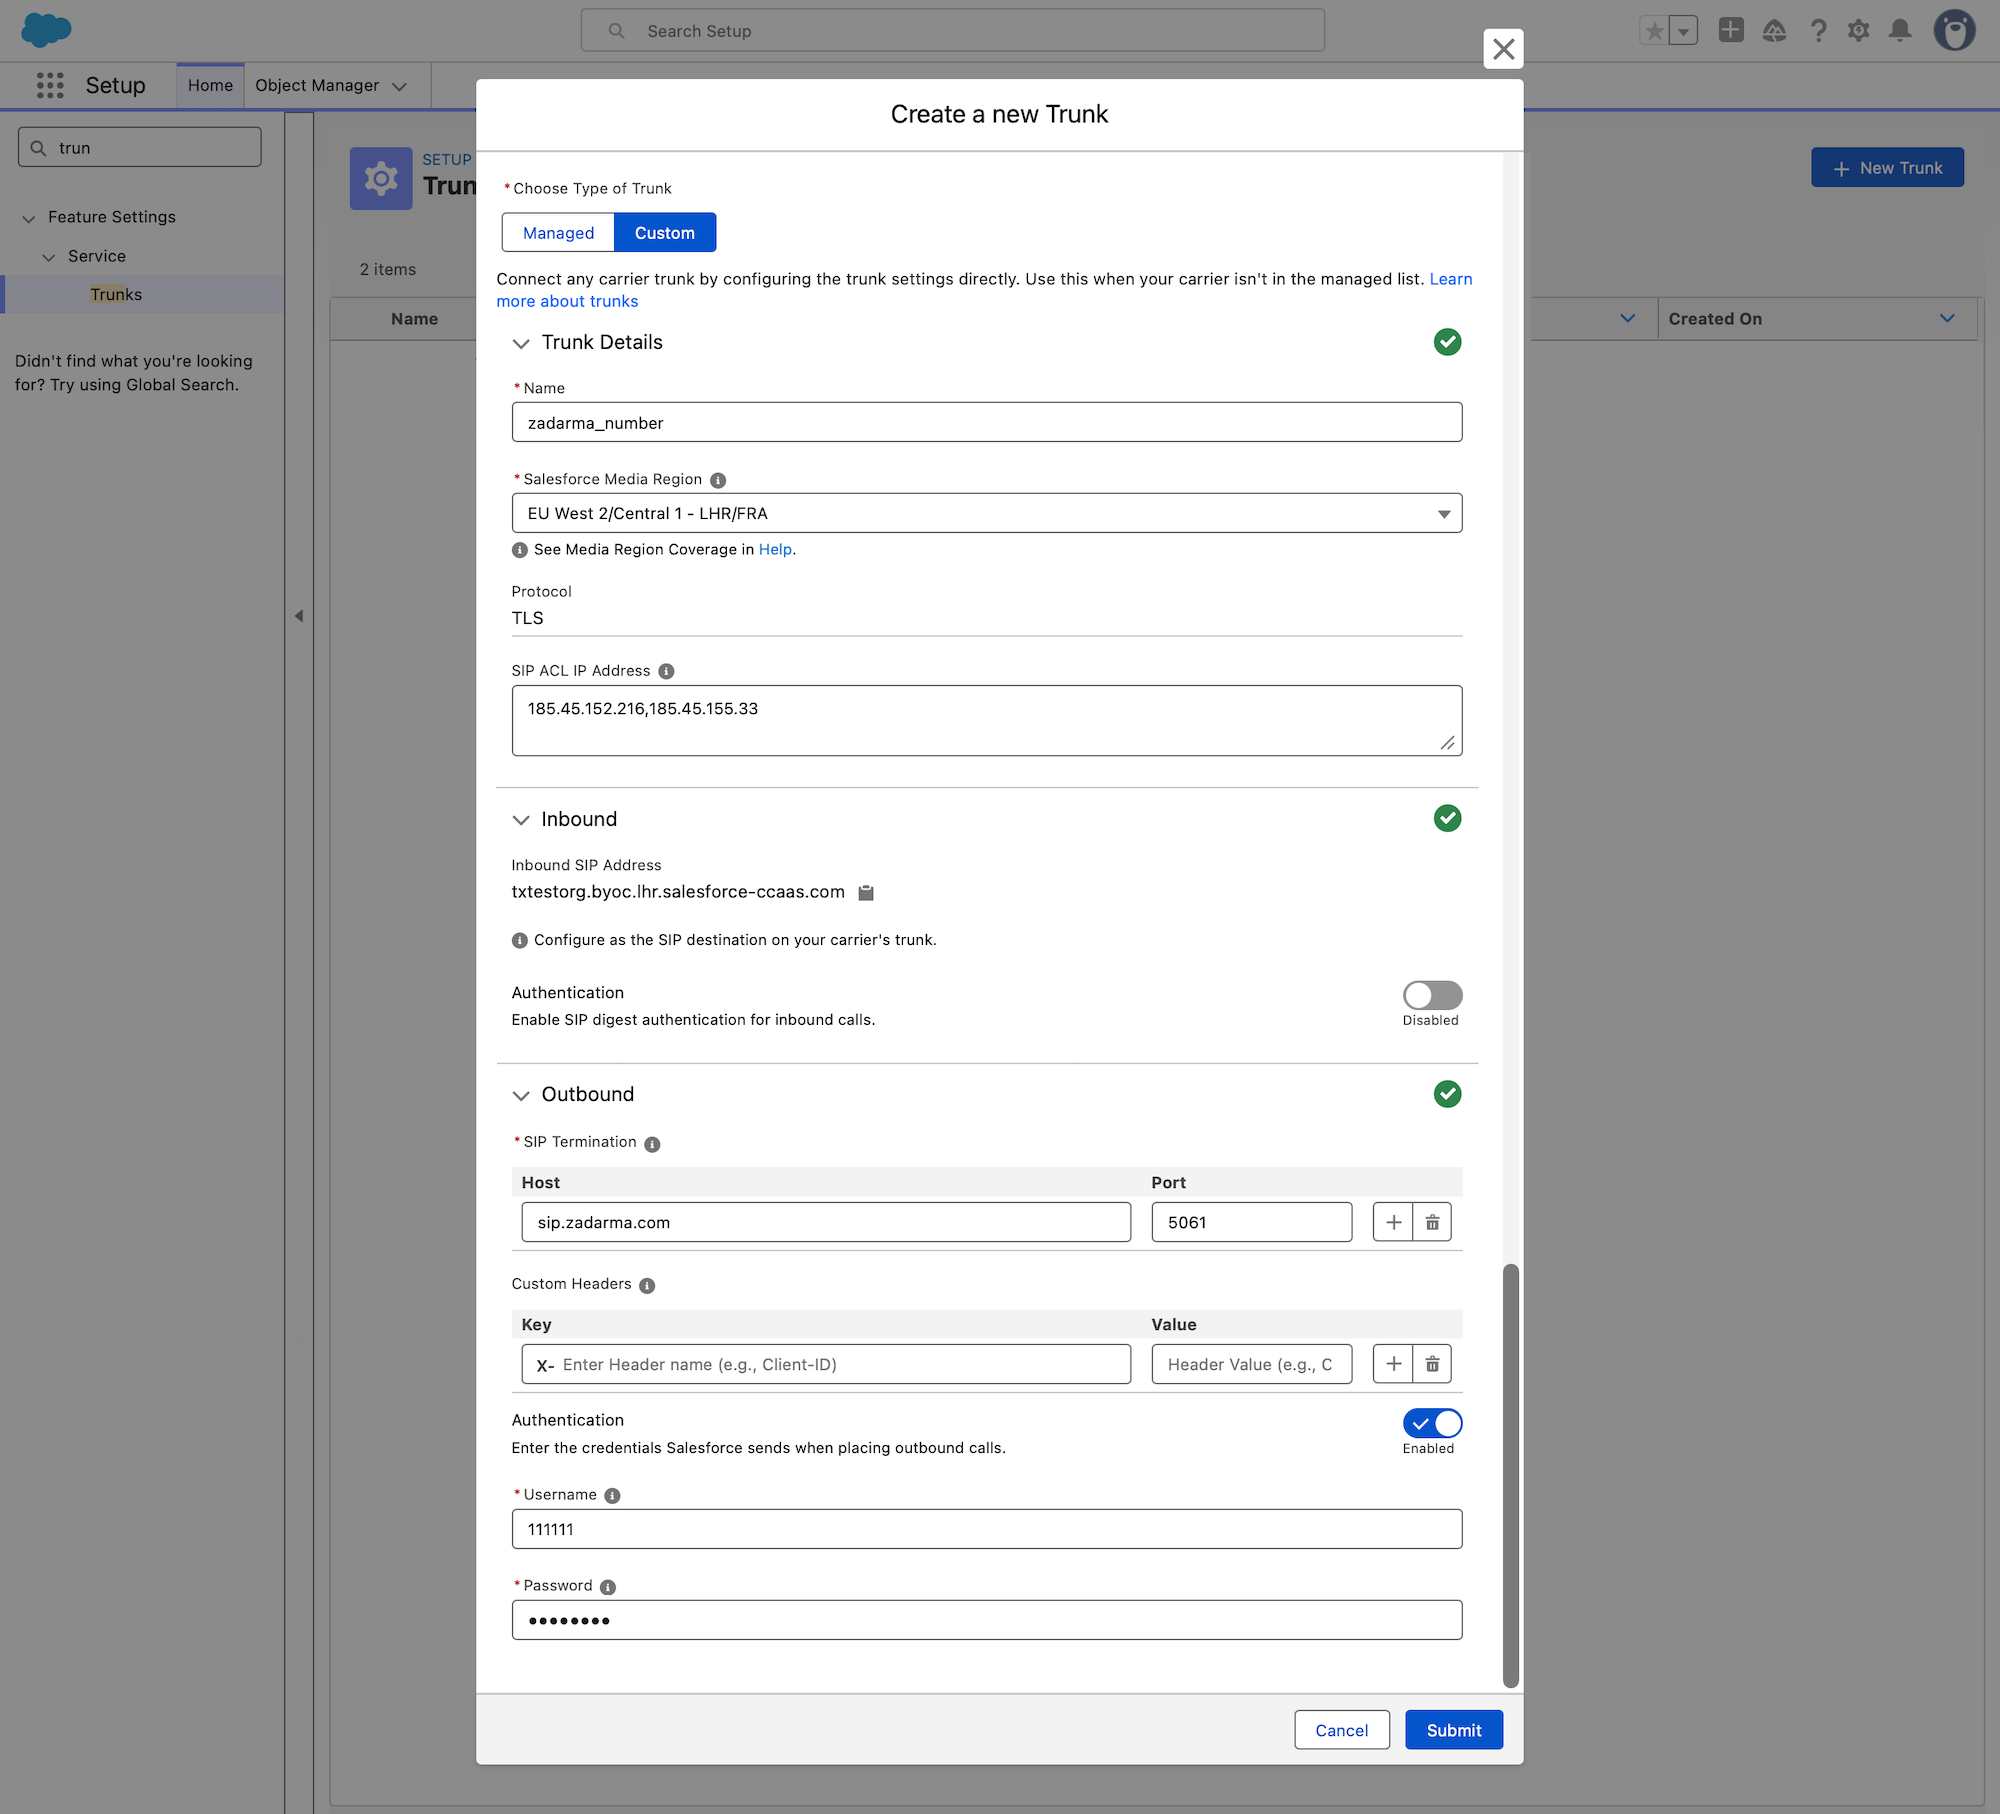
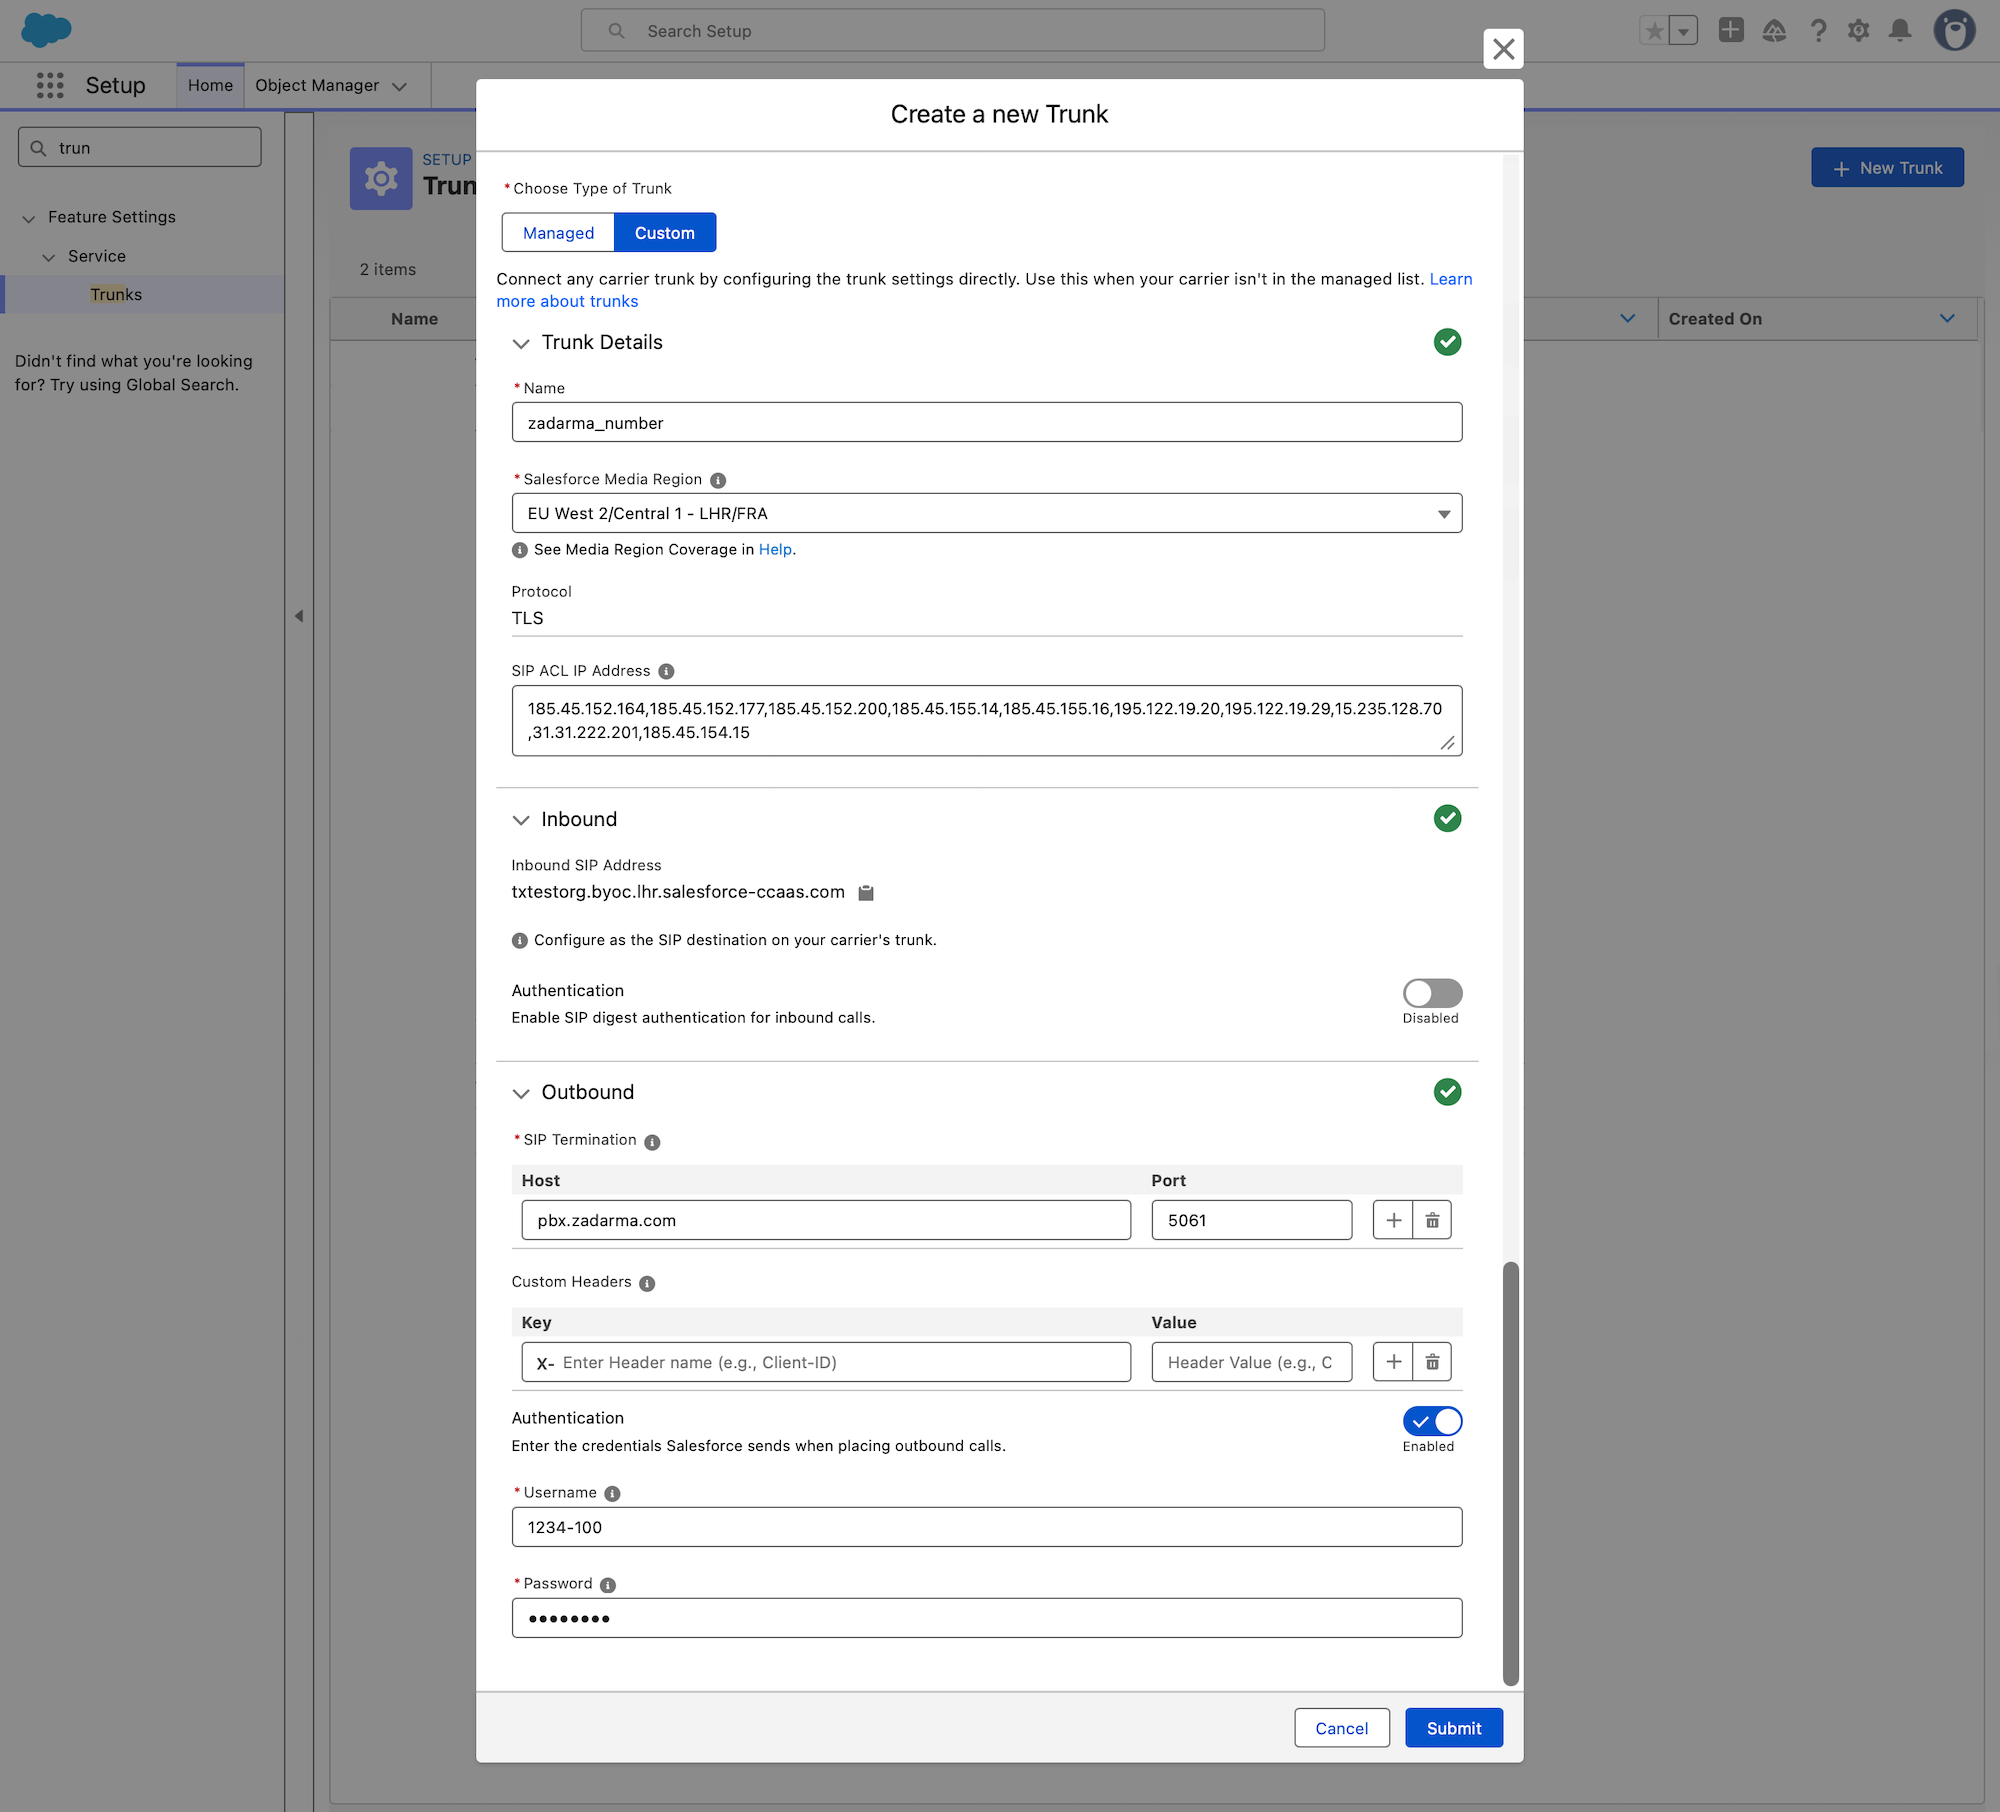
- Name - trunk name, e.g. zadarma_number
- Salesforce Media Region - the Salesforce PoP closest to you
- Protocol - TLS.
- SIP ACL IP Addresses - the list of Zadarma IP addresses that incoming calls will be sent from (185.45.152.216,185.45.155.33).
- SIP ACL IP Addresses - the list of Zadarma IP addresses that incoming calls will be sent from (185.45.152.164,185.45.152.177,185.45.152.200,185.45.155.14,185.45.155.16,195.122.19.20,195.122.19.29,15.235.128.70,31.31.222.201,185.45.154.15).
- Inbound SIP Address - your organisation’s domain for the SIP URI
- Inbound Authentication - Disabled
- Host - sip.zadarma.com
- Host - pbx.zadarma.com
- Port - 5061
- Username - SIP login from your Zadarma account.
- Password - SIP login password from your Zadarma account.
- Username - Cloud PBX extension from your Zadarma account.
- Password - Cloud PBX extension password from your Zadarma account.
Routing calls to Salesforce
- In Zadarma, go to Settings → Virtual phone numbers.
- Click the ⚙ (gear) icon next to your number.
- Open the "External server" tab.
- Switch on the "External server (SIP URI)" option.
In the new field, enter +15551111111@txtestorg.byoc.fra.salesforce-ccaas.com;transport=tls
where txtestorg.byoc.fra.salesforce-ccaas.com is your unique Inbound SIP Address,
and +15551111111 is your virtual number for incoming calls.
- Click "Save".
- In Zadarma, go to My PBX → Extensions.
- In the extension settings, next to "Call forwarding and voicemail" click Enable.
- Choose a forwarding condition, for example Always active.
- Under "Forward to" elect "External server (SIP URI)".
In the new window, enter +15551111111@txtestorg.byoc.fra.salesforce-ccaas.com;transport=tls
where txtestorg.byoc.fra.salesforce-ccaas.com is your unique Inbound SIP Address,
and +15551111111 is your virtual number for incoming calls.
- Click "Save".
Your Custom Trunk is now set up.
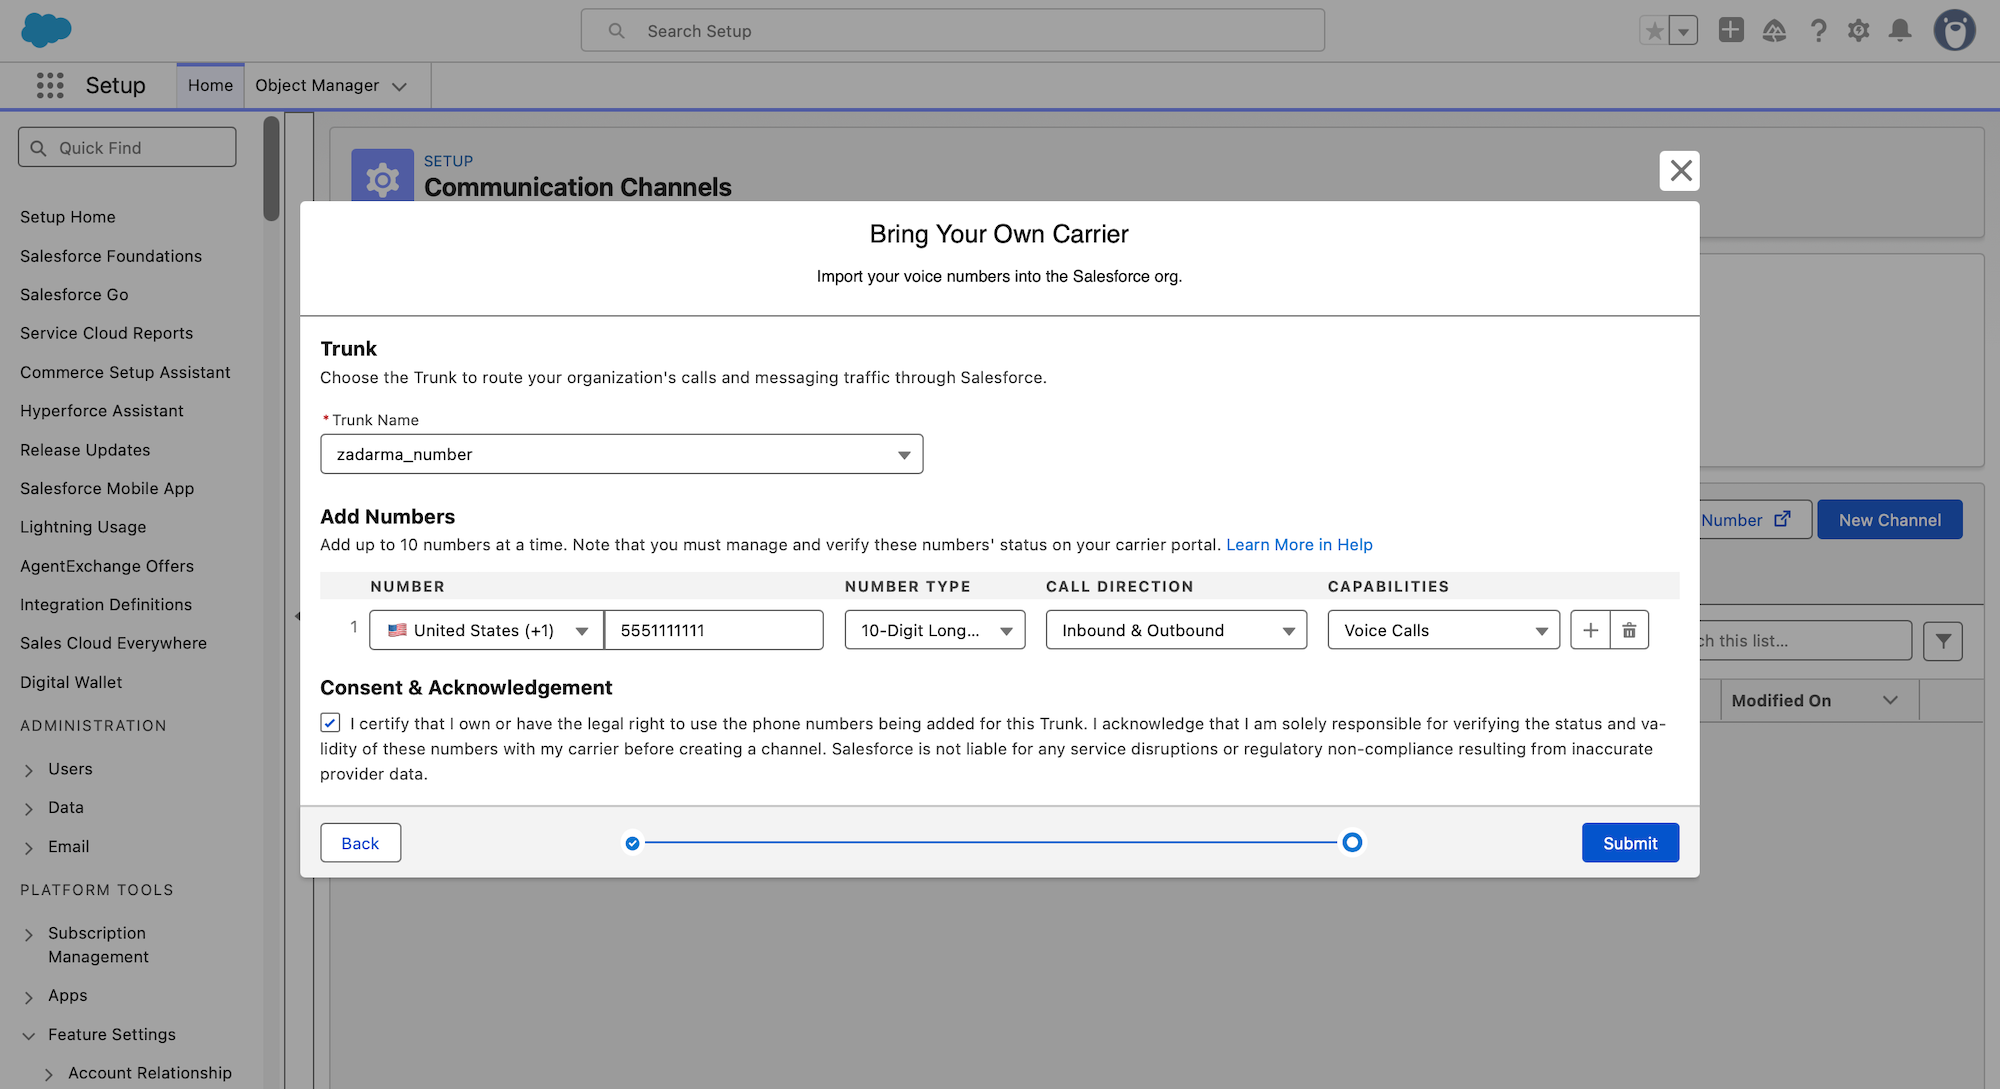
In Salesforce, open Setup, type Communication Channels in the search box, then click Add external number - Bring your own carrier. In the next window, select the Trunk you created earlier, then choose and add your virtual number
Next, add a communication channel: click New Channel, select Voice then choose the number you added earlier and set the Call Routing Type (where incoming calls will go: a user, a call queue, etc.)
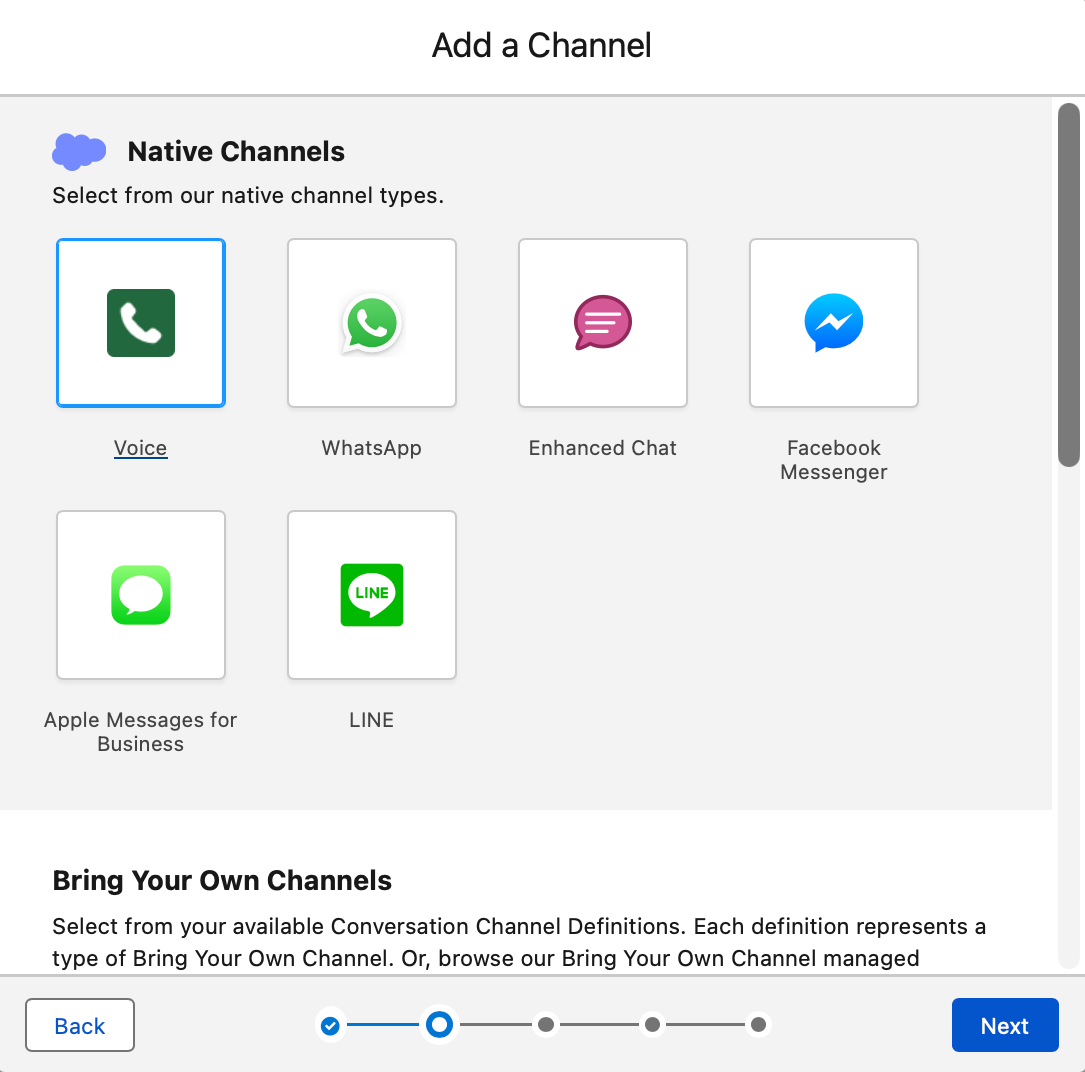
To save, click Next.
Setup is complete.
2. Zadarma cloud PBX and Salesforce CRM integration▾
Setup instructions
The Zadarma PBX integration with Salesforce works without additional modules and agents to provide maximum service quality and reliability.
Zadarma - Salesforce integration is absolutely free.
Integration features:
- Calls to clients from Salesforce in one click from the browser (WebRTC) or via Callback.
- A pop-up client card during incoming and outgoing calls.
- Call statistics and recordings integration. Listen to call recordings from the Salesforce CRM interface.
- Automatic lead creation during incoming calls from unknown phone numbers and outgoing calls to new numbers.
Zadarma advantages:
- Completely free PBX, 5 minutes setup
- Phone system price plans for calls to all destinations at attractive rates
- Multichannel numbers in 110 countries (local, mobile, toll-free)
- Additional features: call tracking, website widgets, video conferencing
- Maximum quality and security (19 years of work, data centers in 6 countries, 24/7 support)
Setup instructions
1. To set up the Zadarma PBX integration with Salesforce, the following requirements have to be met:
- You should be using Salesforce Group, Enterprise, Performance, Unlimited or Developer Editions.
- You need to have an active and configured Zadarma PBX. Complete the setup wizard, it will take less than 2 minutes.
- Calls from the browser are supported by all browser except Safari, Internet Explorer and Microsoft Edge
- When making calls via Callback, PBX extension numbers should have call programs/applications configured (we recommend Zadarma for Windows, macOS, iOS, Android) or other equipment. You can also enable call forwarding to a different number (paid feature).
2. In your Zadarma personal account go to "Settings" - "API and integrations", choose Salesforce and select "Enable Integration". Generate a Socket Key by clicking the corresponding button.
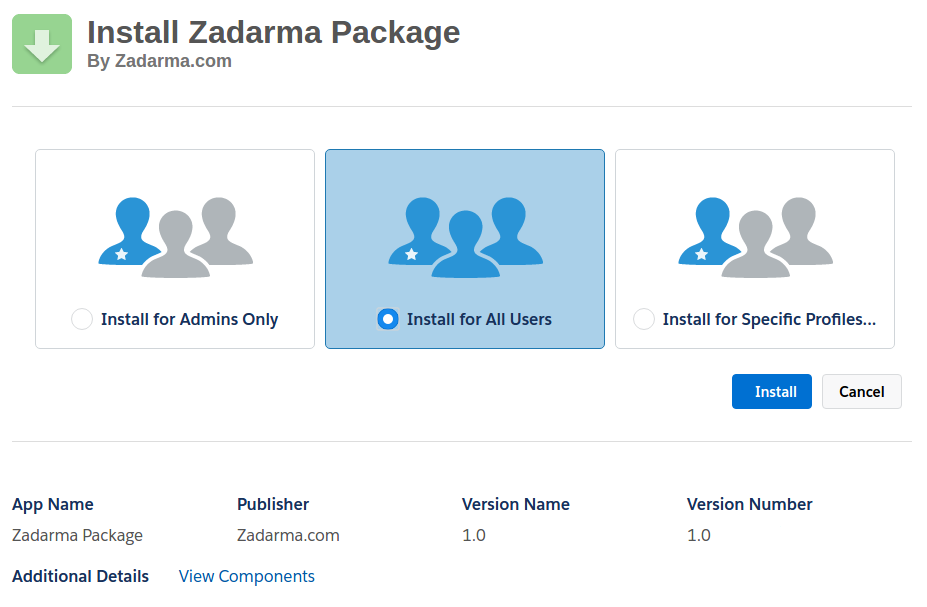
Select one of the options to install the integration application: for 1 user, for all users or for selected users and then click "Install".
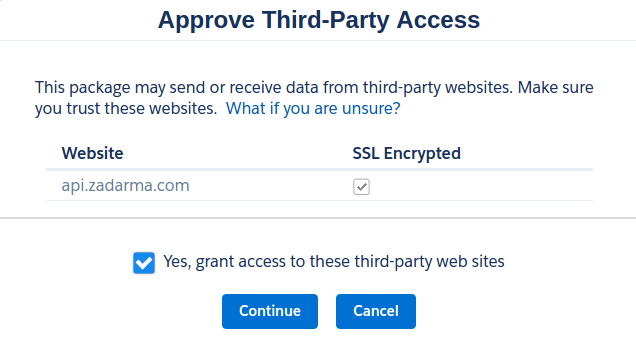
On the next page, confirm the user authorization request and click on continue.
In the right top corner of the page, select Zadarma from the menu and then go to Zadarma Settings.
In your Zadarma personal account in “Settings - API and integrations”, copy your API keys from the Key: and Secret: parameters to the appropriate fields in the Salesforce integration settings and click “Save”.
Key => Access Key
Secret => Secret Key
Socket Key => Socket Key
On the Zadarma Settings page, assign PBX extension numbers to Salesforce CRM users and choose WebRTC mode (calls straight from the browser) or Callback, in this case, an outgoing call back will be initiated to PBX extension number, which has to have a configured softphone or IP phone. You can also enable automatic lead creation for incoming calls from unknown numbers or outgoing calls to new numbers. Save the settings.
We recommend using Chrome and Firefox browsers when working via WebRTC.
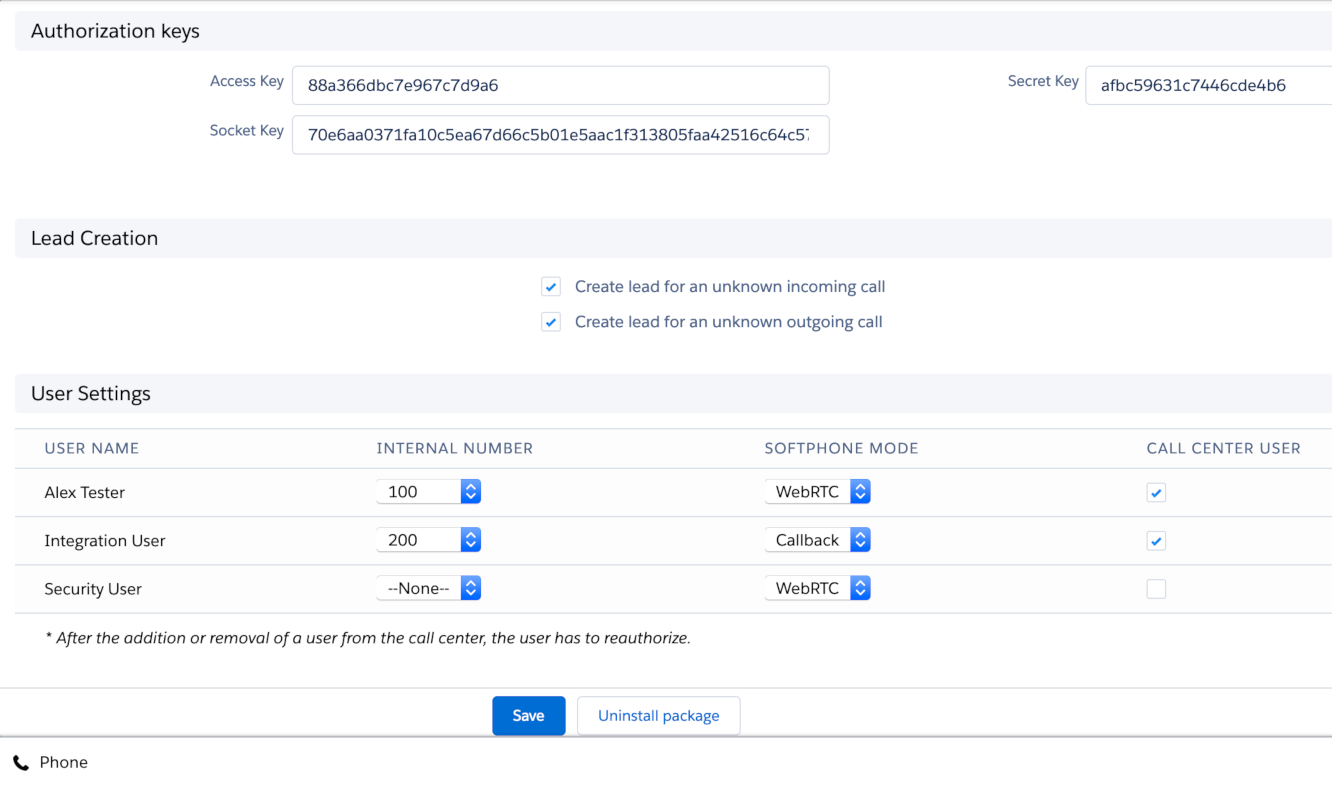
Virtual Zadarma PBX and Salesforce CRM is installed and configured.
3. To make an outgoing call from Salesforce CRM, just click on the phone image next to the telephone number that you want to call, or type in the telephone number in the webphone.
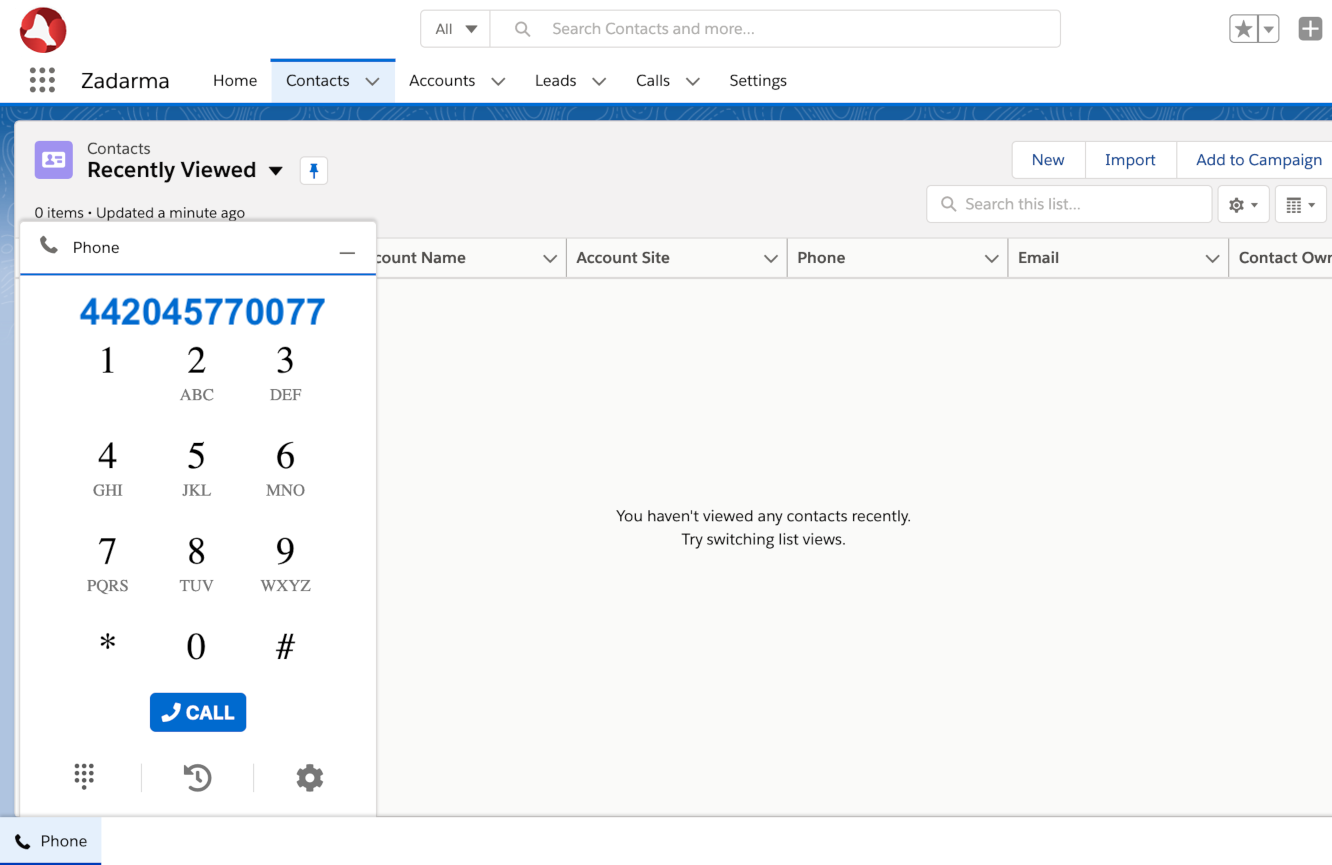
At the time of an incoming call or outgoing call, you will see a notification in the webphone. If the phone number has been previously saved in Salesforce CRM, you will see the client details.