Calls
Calls
 Phone numbers
 eSIM for Internet
 SMS
SMS
 Business Phone System
 Speech analytics
 Call Tracking
 Callback button
 Video conferencing
 Click to call button
 VoIP for Business
 Become a partner
 Integrations
 For whom
 Setup guides
 FAQ
FAQ
 Online chat
 Contact support
 Blog
Blog
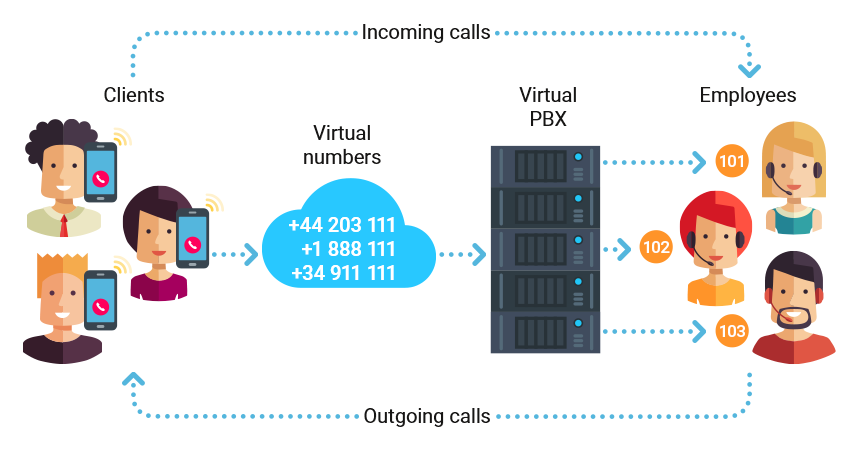
Why do you need virtual PBX?
If your company has more than one employee (or you are striving to have more employees, or would like your customer to think so), you need Cloud PBX for voice communications.
Free PBX allows you to connect any amount of phone numbers in regions convenient for your clients and direct calls to appropriate employees.
- Call recording and statistics will help control the operators and analyze the calls;
- Call forwarding, voicemail and missed calls notifications will not let any call go unnoticed;
- Voice menu and working hours will simplify the working process and increase company’s prestige.
How to set up your virtual PBX? Basic instructions
In this section we will take a look at the minimum settings required for PBX to work, further you will find the description of all the features.
How to set up a free PBX: On the main page of your personal account in “Virtual Phone System” section press “Settings” button. You will be taken to PBX Wizard:
Step 1 Extension numbers
For each PBX user you can create a 3-digit extension number and set up a separate program, equipment, IP-phone, call-forwarding etc. Usually there is one number for each employee, but you can also create 2-3 numbers (for example, for the desk phone and for a program).
Specify the number of employees or devices that will be connected to PBX, check the “Enable call recording for all” box (if required) and click the “Next” button.
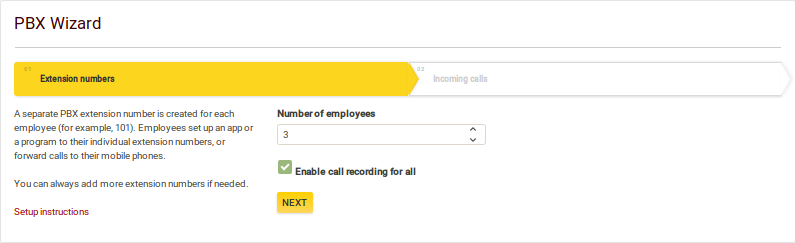
You don’t have to create extension numbers in advance, you can always add more.
Note: call recording is provided for free for 3 extension lines (more lines in price plans Office and Corporation).
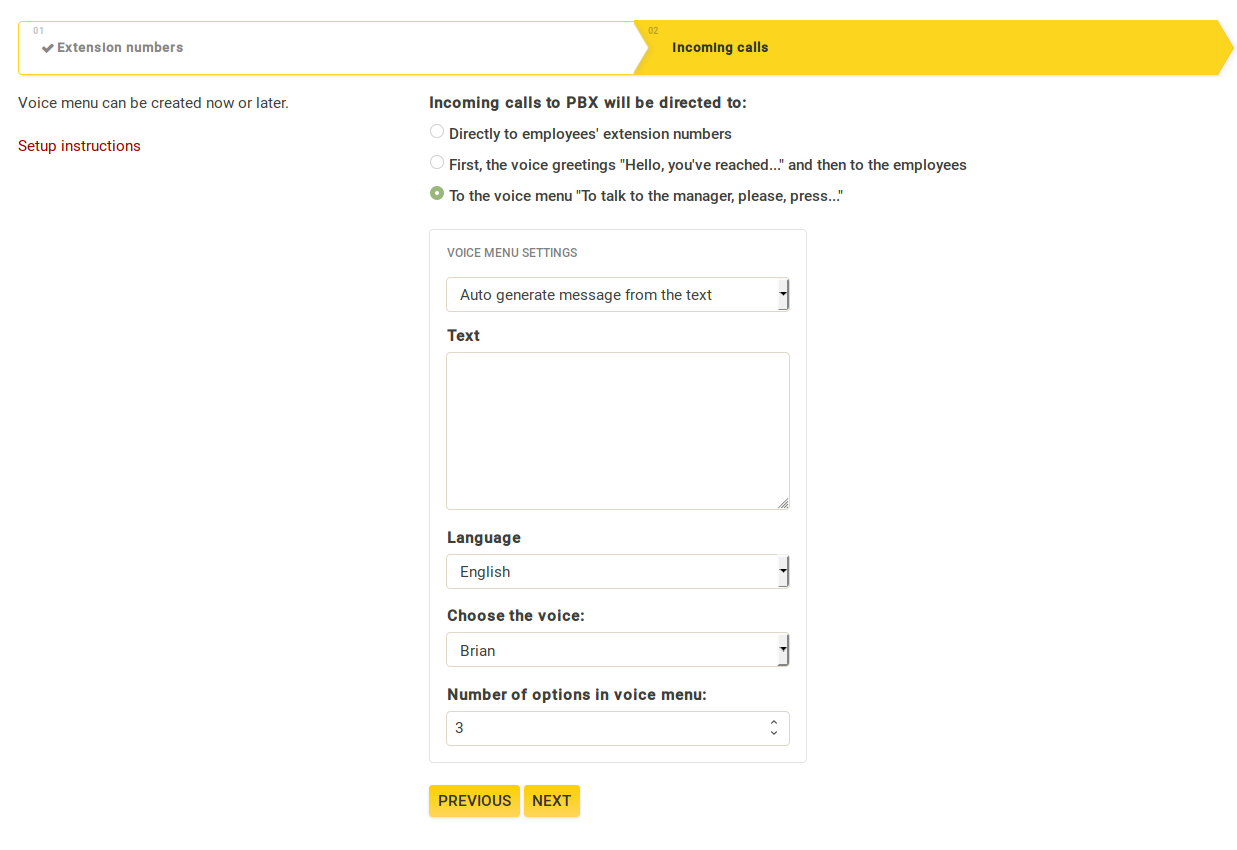
Step 2 Incoming calls
In this section you can set up the parameters of receiving incoming calls:
- Directly to employees’ extension numbers;
- First to the voice greeting “Hello, you have reached…”, then to employees;
- To the voice menu “To talk to the manager, please, press…” – necessary to set the number of menu options (between 1 and 10).
In the second and third options you can enter the text of the greeting that will be read by a robot or upload your own audio file.
Audio file size cannot exceed 5 Mb, available formats are MP3, WAV.
We recommend to use the following audio files parameters for voice greetings or hold music:
WAV format: Bitrate = 8 bit, sampling frequency = 16 kHz.
MP3 format: Bitrate = 64 kbps, sampling frequency = 16 kHz.
This is the best sound quality that phone connection can provide.
You can convert an audio file with appropriate programs or online services.
When choosing an option to automatically read the text, your input text with be read by our system. You can enter 5 to 255 characters.
Choose a desired option and press the “Next” button.
Step 2.1 Voice menu
If in the previous step you have chosen option 3 (voice menu), PBX Wizard will automatically create as many voice menu options(scenarios) as you specify, as well as the main “without pushing” scenario, which will activate if the caller does not press any button while listening to the voice menu.
For options “Directly to employees’ extension numbers” and “First the voice greeting, then to employees” only the “without pushing” scenario will be created.
Also, all previously created extension numbers will be added to this scenario (to “First call to” section). If needed you can change the order of extension numbers, for example, delete from the “First call to” and add in “Second call to” section.

Step 3 Downloading and installing a program on a device
To receive and make calls you can use any software or equipment that works using SIP protocol. Examples of some popular software and equipment you can find in “Help” section - "Setup manual". We recommend to use our Zadarma app for Windows, iOS, Android.
- To connect equipment or a program use settings from “My PBX” page - “Extension numbers” (server, login, extension number password). For each program/equipment you have to use a separate extension number with its login and password. If the amount of extension numbers created earlier is not enough, you can add more on this page;
- You can also receive calls on your existing mobile or landline number with call forwarding. Information regarding detailed call forwarding setup can be found here. Call forwarding is a paid feature, you can find out more on this page.
Step 4 Connecting a virtual number
You have set up your equipment and can make calls now. In order to receive incoming calls from clients, you need to connect a virtual phone number to PBX. You can choose one or several virtual numbers from 110 countries around the world on the “Settings” page - “Virtual numbers”.
If you have a previously connected number from a different provider, you can connect it to the PBX as well in the section “Additional external lines”, manual is located below. You can also port your existing number to Zadarma.
This concludes minimal PBX setup. You can start using PBX or complete additional features setup.
Features for daily PBX use:
Call transfer and interception
To transfer a client to a different extension number press #, the extension number and again #, for example, #101#.
To transfer a call with a voice note press *, extension number and #, for example, *101#. In this case, you will be connected to the extension number first and will be able to notify why you are transferring the call. After one of you finishes the call, the client will be connected to the second number.
If the dialled extension number does not answer the call in 25 seconds, the client will be returned to you.
To intercept an incoming call, if your extension number was not added to the incoming calls scenario, enter 40 and press the call button.
To transfer a call to the scenario (department) dial scenarios number in the voice menu, for example #1#.
Number dialing format
Number dialing format for making and forwarding calls is set in section "Outgoing calls", by default the numbers are dialed in local format (for example, for the US in format 415...). You can also turn off the “Call without country code” feature and make calls in an international format (country code, city code, a number without 1 or 0 in front of it).
Fax
Automatic fax is available at extension number 50. Currently the fax only works for receiving. By default received faxes are sent to the email address used to register the account. You can change the email address for fax receiving in extension number creation.
Additional features and PBX abilities (virtual PBX benefits)
1. Call recording ▾
You can turn on call recording for one or several PBX extension lines. Records are sent by email or stored in the cloud (on our server).
You can record calls on 3 extension numbers for free (8 numbers in “Office” price plan and 20 numbers in “Corporation” price plan). The cost of each additional line recording is $1 a month.
The size of the free cloud storage is 200 MB for “Standard” price plan, 2000 MB for “Office” price plan and 5000 MB for “Corporation” price plan (5000 MB is over 250 hours of calls).
You can listen to the recordings saved in the cloud in “My PBX” section - "PBX statistics" or download with the help of API. After turning off call recording the records will be stored in the cloud for 180 days.
You can turn on call recording on “My PBX” page - "Extension numbers".
2. Integrating Zadarma PBX with CRM and other business systems▾
You can integrate Zadarma PBX with one of top CRM and other business systems. Integrations are set up in the "Settings" - section “API and integrations”. Detailed instructions on integrations can be found in an appropriate section.
Currently the following official integrations are available and completely free: Bitrix24, Zoho CRM, amoCRM, Salesforce, Megaplan, RetailCRM, ZohoDESK, PlanFix, WireCRM.
3. Incoming calls and voice menu ▾
3.1 Incoming calls setup ("My PBX" - "Incoming calls and IVR")
Incoming calls scenario is a group of extension numbers that will receive incoming calls in a specific situation (for example, when pressing 1 in IVR or calling from a certain city). On the page "My PBX" - "Incoming calls and IVR" you can edit previously created scenarios for incoming calls, add new ones or delete the ones you no longer need.
In scenarios you can set up in which order and what numbers will be called. There are three sections created for that: “First call to”, “Second call to” and “Third call to”. You can add one or more extension numbers to each of them. In the section “Possible extensions” select a required extension number and press “Add”.
On this page you can also change IVR settings and hold music, set working hours and turn on missed calls notifications.
3.2 Several voice menus
If you need a separate voice menu or working hours for each employee, on page “My PBX” – “Incoming calls and IVR” add a new menu (“+” button), turn on option “Trigger for calls from numbers” and specify the number.
Additional menu is not only useful when working with different virtual numbers, but also for calls to and from different regions.
3.3 Additional scenario for direct dialing
If your account has several virtual numbers and calls from them have to be directed to different PBX extension numbers, you can create a separate scenario for each number. In this case a call from a certain number will go straight to a responsible employee without voice greeting or menu.

On the page "My PBX" - "Incoming calls and IVR" create a scenario item “Additional scenario”.
In a created scenario enable feature “Trigger for calls to numbers”, check a needed number (or several) and add PBX extension login to it.
With this feature active, calls to selected numbers will follow the scenario bypassing voice greeting.
3.4 Accepting calls by caller numbers
If you need to direct calls from a certain client to a certain manager, you can create an additional scenario. Turn on “Trigger for calls from numbers”, enter client’s number in an international format and click “Add”.
You can also add a mask of a country and city/provider code, for example, 1415*, to direct calls to different employees based on the region that the call is coming from.
Calls from specified numbers will be directed to scenario’s extension logins bypassing voice greeting. If you need to add a separate voice greeting you can do that in the additional menu.
3.5. Blacklist
On the page “My PBX” - "Incoming calls and IVR" you can create a menu option “Blacklist” and add numbers that you don’t want to receive calls from, as well as a mask of numbers starting with a country and city/provider code, for example, 1415123* or 44*.
3.6 Hold music
When transferring calls or for when calls are on hold on the page “My PBX” - "Incoming calls and IVR" you can turn on hold music instead of regular beeps, for example, a song or an ad.
Please note: playing hold music is only guaranteed when the IVR is turned on.
3.7 Working hours
To accept calls only during working hours, on the page “My PBX" - "Incoming calls and IVR" turn on feature “Working hours” and select your working days and set working hours. You can also set lunch breaks and upload a separate voice greeting for outside working hours.
Calls outside working hours can be directed to a separate scenario, for example, to a certain employee or to a voicemail so the caller can leave you a message. For this purpose create an “Autoresponder” scenario.
4. Call forwarding ▾
4.1 Incoming calls forwarding
Call forwarding is directing a call to a mobile or landline number. Call forwarding is needed to receive calls without additional programs, equipment or internet connection.
To never miss a call, set up conditional call forwarding to your mobile or landline number.
To turn on call forwarding on the page “My PBX” - "Extension numbers" on the left side in number settings in the field “Call Forwarding and Voicemail” choose an option “No answer or unavailable” to turn on conditional call forwarding or an option “Always” to turn on unconditional call forwarding.
In the first case the call will first be directed through the internet to you app, program or equipment, and if it is off or there is not answer for 20 seconds the call will be forwarded.
When enabling unconditional forwarding, the call will go straight to the forwarding number, regardless of an active program/equipment.
In “Phone” field enter a number in accordance with dialing prefixes (if they were set in “My PBX - "Outgoing calls") without a plus sign and check “Phone” to save the settings. If the “Call without country code” feature is on, enter the number in a local format.
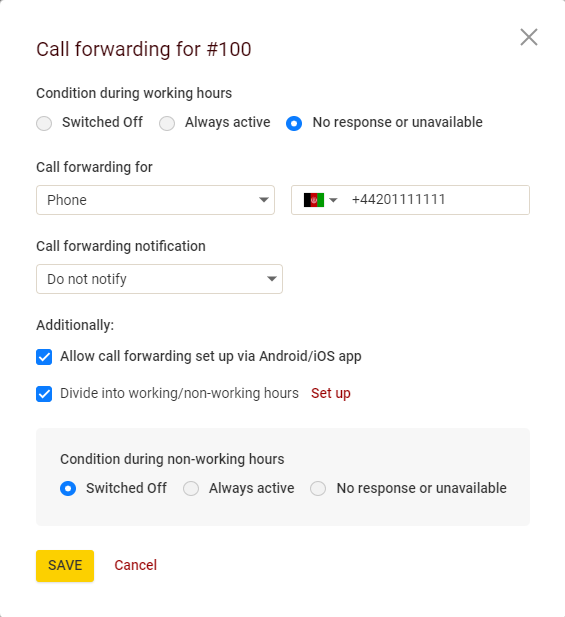
If the prefixes are not set, enter the number in an international format: [country code][city/provider code][number], for example, 14151270777.
Also, in your personal account in “Settings” - "My profile" you can turn on “Call without country code” feature, in this case the numbers can be entered in a local format, for example, 4151270777.
The cost of call forwarding is the same as our prices on outgoing calls.
4.2 Call forwarding notifications
So that you know when the call has been forwarded to your mobile and not made directly, you can set an appropriate notification. It will play when you answer the call before connecting you to the caller.
Standard notification is a one-tone signal, similar to a voicemail tone. You can set your own notification (for example, “Sales call”).
4.3 Call forwarding to voicemail
On the page “My PBX” - "Extension numbers" in the extension number settings in the field “Call Forwarding and Voicemail” choose “Always”. In the field “E-mail for the voicemail” enter your email address and check a box next to the field. In the field “Greeting” you can upload a separate audio file for the voicemail.
Then add an extension number to a needed scenario, for example, “Autoresponder”, on the “My PBX” page - "Incoming calls and IVR".
5. Determining the number by call destination (CallerID) ▾
CallerID is the number that will be displayed for outgoing calls.
You can set any connected or verified number for CallerID.
You can use different CallerIDs when calling from different devices or to different destinations (countries and cities).
To set your CallerID by destination, on the page “My PBX” - "Outgoing calls" on the right click “CallerID by called destination”. Enter country and/or city code that you call (for example, 44 for Great Britain or 1 for the US etc), choose a CallerID and click “Create”.
6. Additional external lines ▾
You can connect up to 20 numbers from a different provider to Zadarma virtual PBX on the page “My PBX” - "External lines".
If you have a traditional landline number connected through a copper line, you need to use VoIP gateway with FXO port, enable an external line in the gateway mode and specify settings from the website for the gateway. If your number supports SIP operation, you can just enable the line in Server mode and specify number settings.
Your provider needs to provide data for connecting: server, domain (can be the same as the server), login, password.
On our side the connection to the number is realized from the following IP addresses:
185.45.152.167
185.45.152.184
185.45.152.185
195.122.19.26
195.122.19.16
37.139.38.70
37.139.38.71
185.45.155.13
185.45.155.27
You can also port (transfer) a number from a different provider to Zadarma. Numbers available for porting can be found on this page.
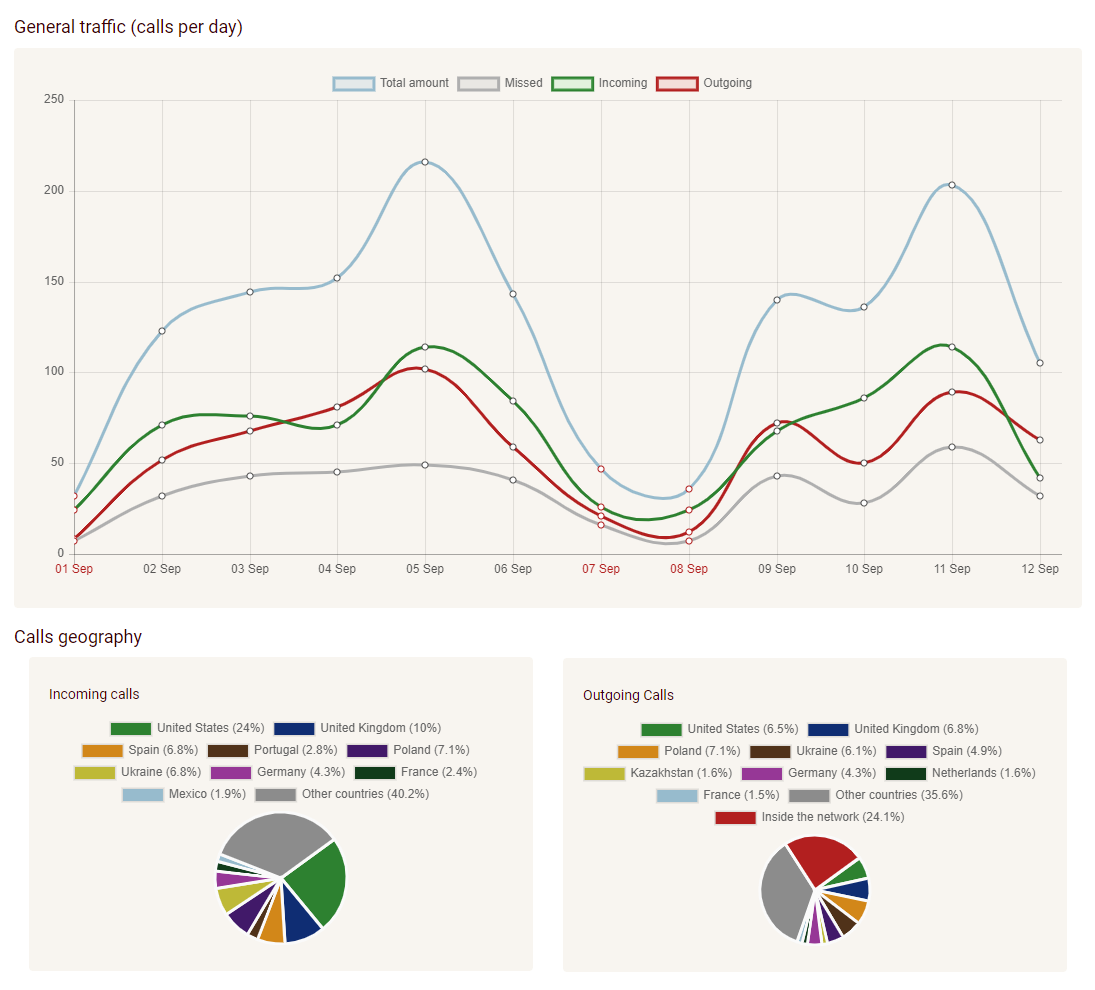
7. PBX Statistics ▾
Detailed statistics of PBX calls can be found on “My PBX” page - “PBX Statistics”. Here you can set statistics timeframe, compare different periods, see charts and geography of calls. Statistics and charts are available both for all calls and calls on certain virtual numbers (or external lines).