Business phone system setup in 5 minutes.
In just 5 minutes, without even leaving our comfortable chairs, we set up and configured a virtual PBX. We'd like to share this experience with you, using the example of setting up a free Zadarma PBX.
Why do you need a PBX, and how does it work?
In most offices you call, you're likely to be greeted by an automated message. Then, an operator picks up the phone and transfers the call to the right person. The employee might not even be in the office - they could be in New York or Prague - but you’ll be connected with them quickly and easily. And the best part? An operator or even a physical office isn’t always necessary
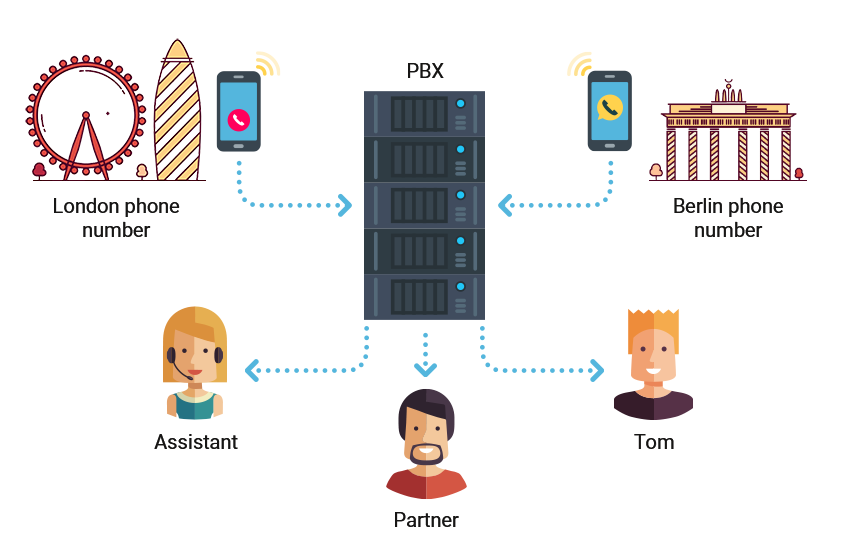
Want to set up your own system like this? It's not complicated. Below is a diagram explaining how a PBX works.

Does it seem complicated? Don’t worry! Everything in the diagram, except for you, can be virtual, yet it works perfectly in reality. We set up and configured the PBX in just 5 minutes.
You can launch the PBX in just 4 simple steps:
- Register and top up your account;
- Choose and purchase a number;
- Activate the PBX and go through the setup wizard;
- Download and configure the client application on your computer or phone.
And as a fifth, optional step, you can customize various features such as voicemail, auto-attendant, call recording, conferencing, and fax.
Let’s start setting up the PBX:
1) Registration and account top-up
To get started, simply register on our website. For the initial plan, the "Standard" option is ideal. It offers per-second billing, comes with free minutes, and can be easily upgraded or changed to a different plan at any time. If you make a lot of calls, you might want to consider our PBX price plans, which include virtual numbers and outgoing minutes for various destinations.
After registering, log in to your account. Check the connection with a test call, and top up your account. I topped up my account with a card for $10, which was enough to cover 2 numbers and some initial calls. It only took me a few seconds.
2) Selecting and purchasing numbers
First, take a look at the options by checking out the full list of available numbers. I need a London city number and a second one for New York.
3) Activating and configuring the PBX
Click the “Set Up” the PBX button in the personal account, in the “Virtual Phone System” section on the right.
After clicking, you'll be taken to the “Setup Wizard.”
Let’s walk through it step by step:
- Step one:
On the main screen, in the “Virtual Phone System" section, click the “Set Up” button. This will bring up the Setup Wizard.

On the first step, you need to specify the number of employees who will handle the calls. Each employee will be assigned a unique three-digit extension required for call routing.
By default, the "Standard" and "Economy" plans allow for up to 5 extensions. The "Office" plan supports up to 10 extensions, and the "Corporation" plan - for up to 20extensions.
Additional extensions can be added for a fee of $2 per month. You can manage this in the price plan settings under the tab "Billing - Pricing," in the "Current Plan" block.
There’s no need to create extra extensions in advance. You can always add more as needed later on.
Also, be sure to check the box for “Enable call recording for all” and set up a CRM system if needed.
- Step two:

On the second step of the setup, you need to define the scenario that will be activated for incoming calls. You will have three options available:
- Calls will be routed directly to employees;
- First, an automated voice greeting will play, and then the call will be routed to the employees;
- First, an interactive voice menu will play, and then, depending on the caller's selection, the call will be routed to an employee.
When choosing the last two options, you'll have the choice to either upload a pre-recorded voice file or automatically generate one from text.
How to set up an interactive voice menu?
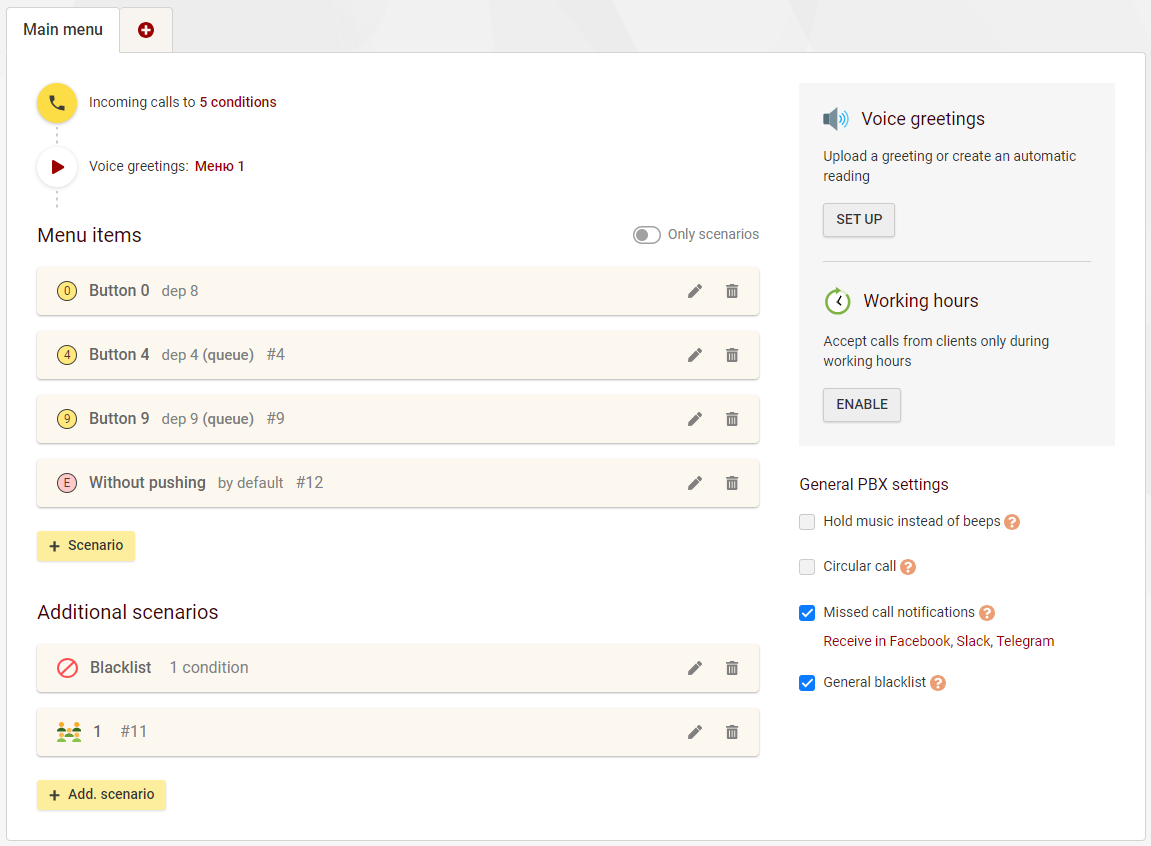
To manage these settings, go to the "My PBX" section in your personal account and select "Incoming Calls and IVR."
You will see a list of all your scenarios.

Each scenario is triggered by a specific condition. For example, it might activate when a caller presses "1" or when a call comes from a particular number.
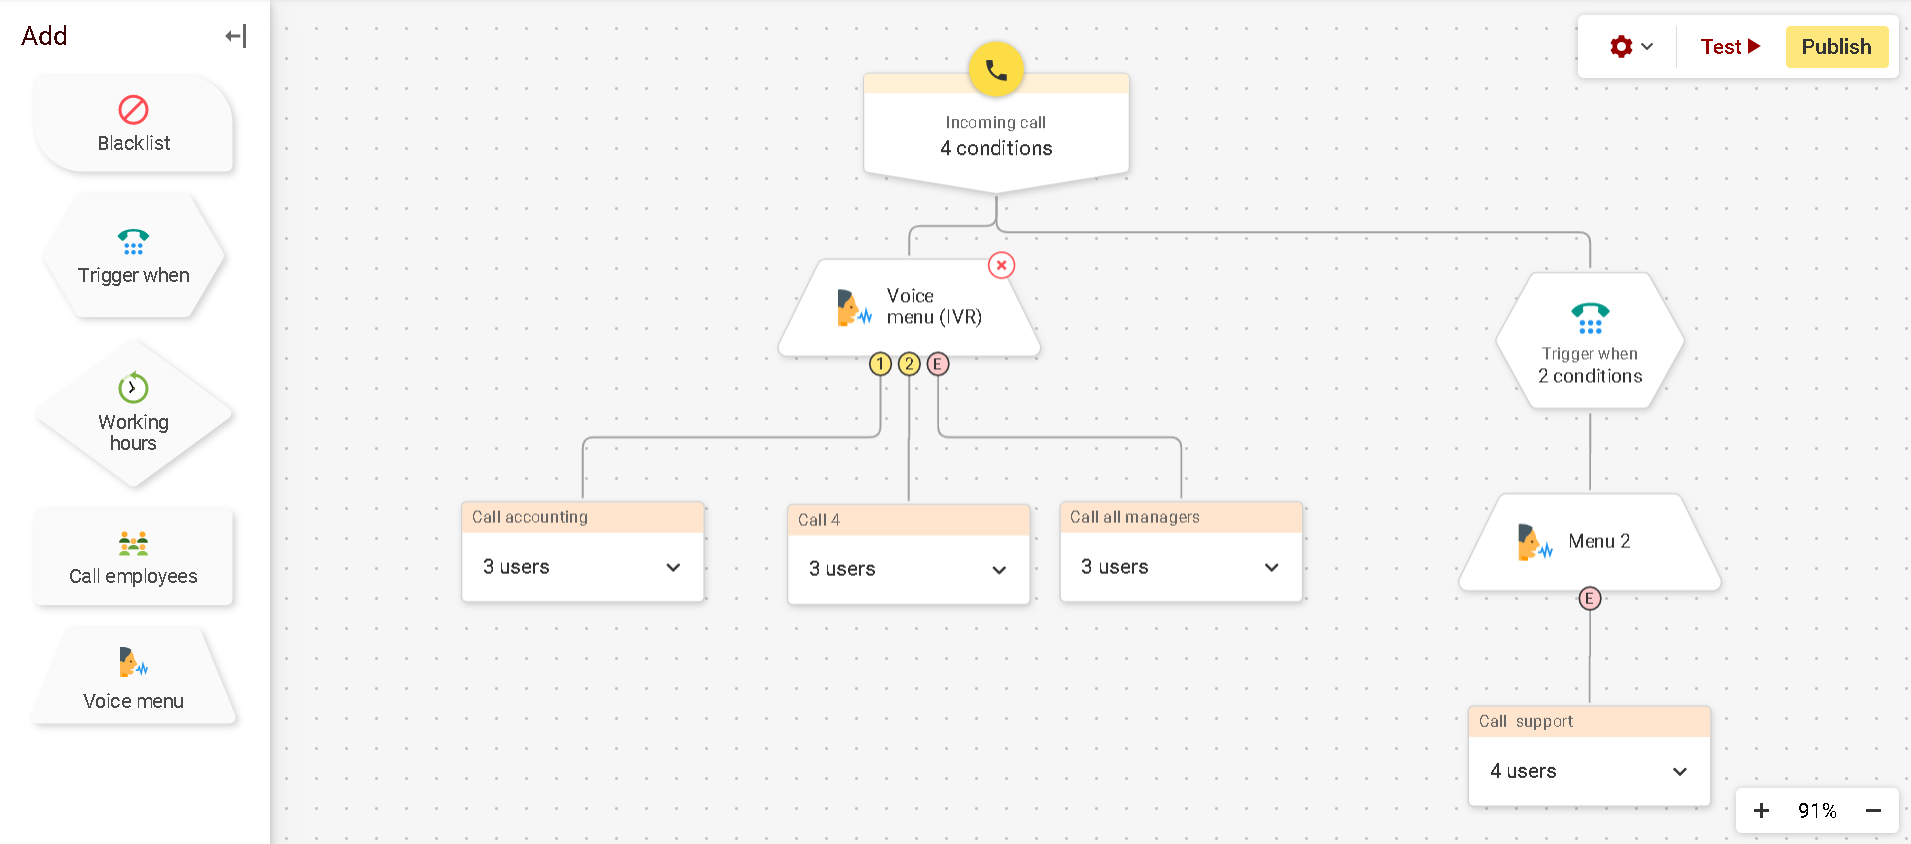
By the way, the interactive menu can be multi-level. For example, your customer might first select a language by pressing a button, and then choose departments or employees. The voice menu can have any depth, and each scenario can be easily configured in the corresponding section. The most convenient and intuitive way to design your PBX layout is through the visual editor, which you can access via the link at the bottom of the page.

Here, you can visually see the possible user scenarios and call paths. If needed, you can also edit the layout directly, adding new menu levels and scenarios.
For more details on how to use the editor and configure the voice menu, please refer to the instructions on the website.
How to download and set up calling applications?
Calling applications are available for all major platforms. You can find the download links in this section.
After installing and launching the application, you will need to enter the login and password. These credentials can be found in your personal account under the "My PBX" section, in the "Extensions" menu. You will need to retrieve the server, login, and password for each extension.
Each extension can simultaneously use one web phone (WebRTC), one Zadarma mobile app, and any number of permanent registrations (IP equipment, PC software, and third-party applications).
You can also receive calls not only through a dedicated application but also via the web phone in Teamsale CRM or through the Chrome browser plugin.
What else can you configure with a Cloud PBX??
Working hours and auto-attendant

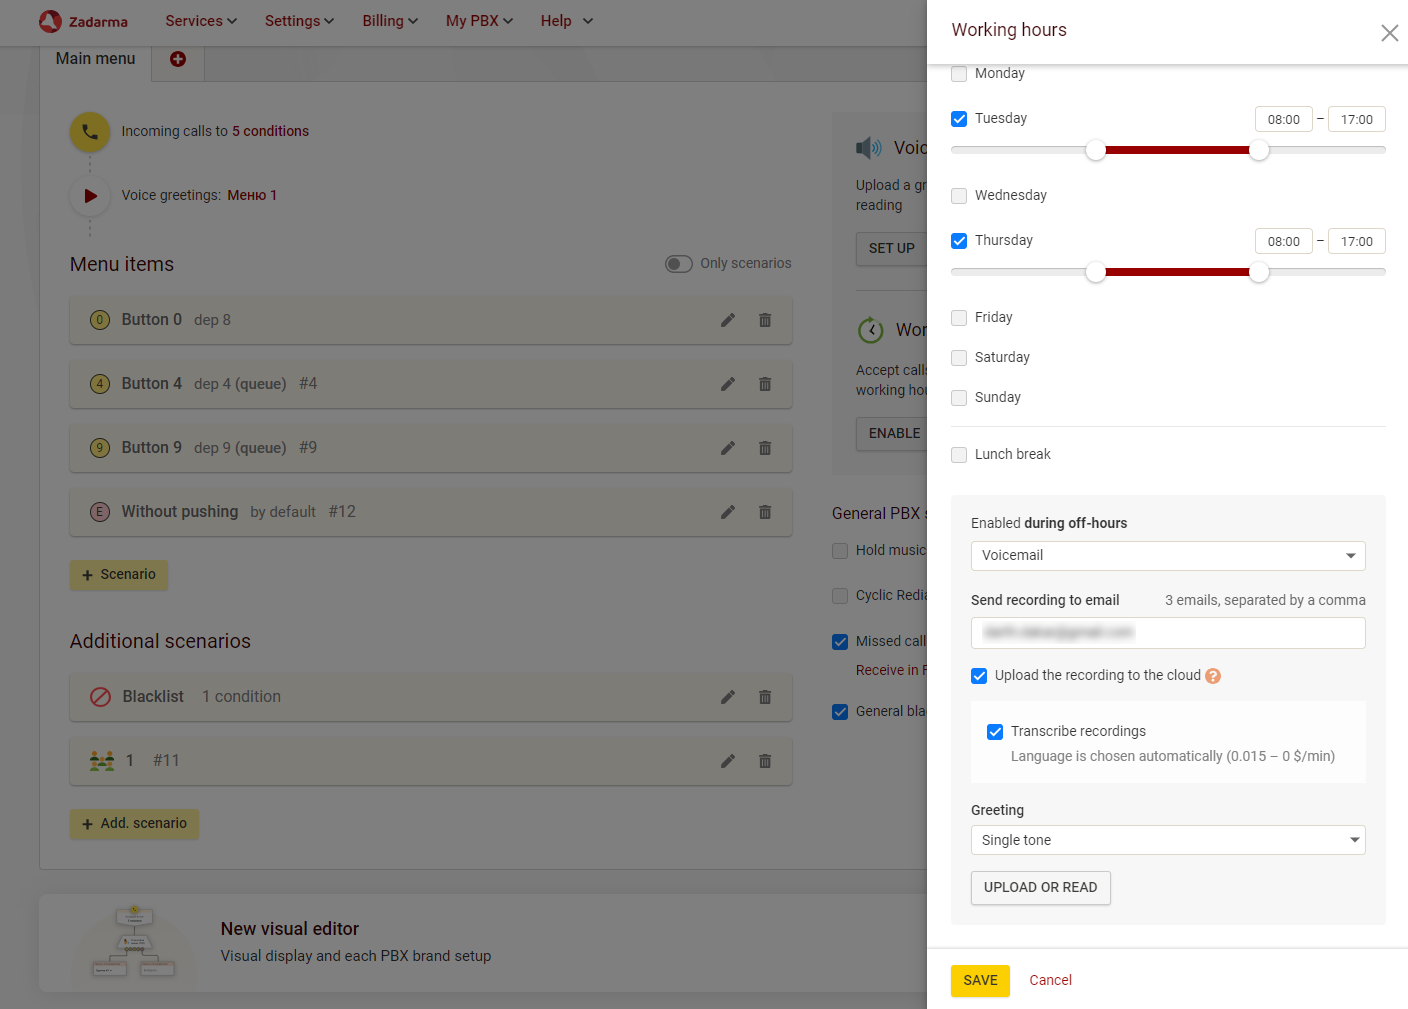
To receive calls only during working hours, go to the "My PBX - Incoming Calls and IVR" page, enable the "Working Hours" option, check the boxes for your working days, and specify the working hours.
In the "Holidays" tab, you can automatically add non-working public holidays for the relevant country. You can also include a lunch break if needed.
All calls received outside of business hours can be directed to a specific employee or to an auto-attendant (voicemail). To set this up, go to the "Working Hours" section and select the option "Enabled during off-hours, Voicemail" at the bottom of the block.
Call recording.
You can enable call recording for one or more extensions of your PBX. Recordings can be sent via email or stored in the cloud (on our server).
You can record calls on 5 extensions free of charge (on 8 extensions in the “Office” price plans, and on 20 extensions in the “Corporation” price plans).
The free cloud storage size is 200 MB for the "Standard" plan, 2 GB for the "Office" plan, and 5 GB for the "Corporation" plan (which can hold over 250 hours of conversations).
Records saved in the cloud can be listened to in the "My PBX" section under «Statistics and charts» or downloaded using the API. After call recording is turned off, the recordings will be deleted from the cloud after 180 days.
You can enable call recording on the "My PBX" page under «Extensions».
Creating a conference call.
During a call between PBX extensions, participants can use the command 000 to create a conference.
After dialing 000, enter the phone number of the participant C (e.g., 102) and confirm by pressing #. For example, you would dial 000102#.
During the process of adding participant, participant B will hear music, while participants A and C can continue their conversation
Press # to confirm the addition of participant C during the conversation with them
Press * to reject participant C and return to the call with participant B or to the conference
*# - return to participant B or to the conference
Once participant C is added, you can dial 000 again to add another participant, and the existing conversation will continue. The conference will remain active as long as there is more than one participant.
Participant C can be any number (using the same format as for a regular call from the PBX).
For more details on how to work with PBX settings, you can refer to the сrelevant article.
Connect Free PBX Calls
Calls
 Phone numbers
 eSIM for Internet
 SMS
SMS
 Business Phone System
 Speech analytics
 Callback button
 Video conferencing
 Click to call button
 VoIP for Business
 Become a partner
 Integrations
 For whom
 Setup guides
 FAQ
FAQ
 Online chat
 Contact support
 Blog
Blog


